|
|
|
|
|
|
|
|
|
|
|
|
|
|
|
Home |
Sitemap |
Feedback |
Contact |
|
|
|
| |
|
|
|
|
|
|
|
|
|
|
|
|
|
|
|
|
|
|
|
|
|
|
|
|
|
| |
|
Implementation |
|
|
|
|
|

|
|
|
|
|
|
|
| |
|
|
|
|
|
|
|
|
|
|
|
|
|
|
|
|
|
|
|
|
|
|
|
|
|
| |
|
|
|
|
|
|
|
|
|
|
|
|
|
|
|
|
|
|
|
|
|
|
|
|
|
| Concept |
|
|
|
What is
Freesound Music? |
|
|
|
|
|
|
|
|
|
|
|
|
|
| Implementation |
|
|
|
|
Built of sounds shared
by a world-wide alliance of sound creatives – the “Freesound” community. |
|
|
|
| Presentation |
|
|
|
|
Takes listening
sensations from there one step further - powered by FleX. |
|
|
|
|
|
|
|
| Contribution |
|
|
|
|
Suitable for
environmental, entertainment, artistic, and educational deployments. |
|
|
|
|
|
|
| |
|
|
|
|
|
|
|
|
|
|
|
|
|
|
|
|
|
|
|
|
|
|
|
|
|
| |
|
|
|
|
|
|
|
|
|
|
|
|
|
|
|
|
|
|
|
|
|
|
|
|
|
| |
|
|
|
Freesound Music |
> |
Introduction
into the usage of the Freesound Music portal and related pages. |
|
|
|
| |
|
|
|
|
|
|
|
|
Which
browser to use, how to arrange windows, what to access, etc. |
|
|
|
|
| |
|
|
|
Sound
Park |
|
> |
Tutorial for
the creation of a first Sound Trip using the Freesound Workbench. |
|
|
|
| |
|
|
|
|
|
|
|
|
Hot path through sound
selection, assembly rules and page generation. |
|
|
|
|
| |
|
|
|
Publishing |
|
> |
Explanation
of further publishing and recording possibilities for Sound Trips. |
|
|
|
| |
|
|
|
|
|
|
|
|
Standard set
of sound page creation, tips and tricks + extended possibilities. |
|
|
|
| |
|
|
|
Library |
|
|
> |
Overview about further
information resources. |
|
|
|
|
|
|
|
|

|
|
|
|
|
|
|
|
|
|
|
|
|
|
|
|
|
|
|
|
|
|
|
|
|
|
| |
|
|
|
|
|
|
|
|
|
|
|
|
|
|
|
|
|
|
|
|
|
|
|
|
|
| |
|
|
|
|
|
|
|
|
|
|
|
|
|
|
|
|
|
|
|
|
|
|
|
|
|
| |
|
|
|
|
|
|
|
|
|
|
|
|
|
|
|
|
|
|
|
|
|
|
|
|
|
| |
|
|
|
|
|
|
|
|
|
|
|
|
|
|
|
|
|
|
|
|
|
|
|
|
|
| |
|
|
|
|
|
|
|
|
|
|
|
|
|
|
|
|
|
|
|
|
|
|
|
|
|
| |
|
|
|
|
|
|
|
|
|
|
|
|
|
|
|
|
|
|
|
|
|
|
|
|
|
| |
|
|
|
|
|
|
|
|
|
|
|
|
|
|
|
|
|
|
|
|
|
|
|
|
|
| |
|
|
|
|
|
|
|
|
|
|
|
|
|
|
|
|
|
|
|
|
|
|
|
|
|
| |
|
|
|
|
|
|
|
|
|
|
|
|
|
|
|
|
|
|
|
|
|
|
|
|
|
| |
|
Freesound
Music |
|
|
|
|
|
|
|
|
|
|
|
|
|
|
|
| |
|
|
|
|
|
|
|
|
|
|
|
|
|
|
|
|
|
|
|
|
|
|
|
|
|
| |
|
|
|
|
|
|
|
|
|
|
|
|
|
|
|
|
|
|
|
|
|
|
|
|
|
| |
|
|
|
Introduction |
|
Technology |
|
Setup |
|
Navigation |
|
|
|
|
|
|
|
|
| |
|
|
|
|
|
|
|
|
|
|
|
|
|
|
|
|
|
|
|
|
|
|
|
|
|
| Implementation |
|
|
|
FleX
Deployment |
> |
General
concept |
|
|
|
|
|
|
>> |
|
|
|
|
|
|
| |
|
|
|
|
|
|
|
|
|
|
|
|
|
|
|
|
|
|
|
|
|
|
|
|
|
| |
|
|
|
Freesound
Music |
> |
Realization of
a prototype, proof of concept |
|
|
>> |
|
|
|
|
|
|
| |
|
|
|
|
|
|
|
|
|
|
|
|
|
|
|
|
|
|
|
|
|
|
|
|
|
| |
|
|
|
|
|
|
|
|
|
|
|
|
|
|
|
|
|
|
|
|
|
|
|
|
|
| Introduction |
|
|
|
Freesound
Music is built of sounds that are shared by a world-wide alliance of
sound |
|
|
|
|
|
|
| |
|
|
|
creatives –
the “Freesound” community (see Freesound website). |
|
|
|
|
|
|
|
|
|
|
| |
|
|
|
|
|
|
|
|
|
|
|
|
|
|
|
|
|
|
|
|
|
|
|
|
|
| |
|
|
|
Freesound
Music takes listening sensations from there one step further by applying
two |
|
|
|
|
|
|
| |
|
|
|
basic methods: |
|
|
|
|
|
|
|
|
|
|
|
|
|
|
|
|
|
|
|
| |
|
|
|
|
|
|
|
|
|
|
|
|
|
|
|
|
|
|
|
|
|
|
|
|
|
| |
|
|
|
> |
Organizing
the sounds according to common musical experiences (4 basic |
|
|
|
|
|
|
|
| |
|
|
|
|
recognition
areas “Melody”, “Rhythm”, “Harmony”, “Effects”, and phenotypical |
|
|
|
|
|
|
|
| |
|
|
|
|
sound
classifications, as realized in the Workbench) |
|
|
|
|
|
|
|
|
|
|
|
| |
|
|
|
|
|
|
|
|
|
|
|
|
|
|
|
|
|
|
|
|
|
|
|
|
|
| |
|
|
|
> |
Realizing a
new concept of flexible linkage between the sounds which leads to new |
|
|
|
|
|
|
| |
|
|
|
|
sound
combinations and new musical metrics (interactive Hypersound
functionality |
|
|
|
|
|
|
| |
|
|
|
|
utilized by
easy-to-use web page assembly, and supported by multi-media ASP |
|
|
|
|
|
|
| |
|
|
|
|
technology) |
|
|
|
|
|
|
|
|
|
|
|
|
|
|
|
|
|
|
| |
|
|
|
|
|
|
|
|
|
|
|
|
|
|
|
|
|
|
|
|
|
|
|
|
|
| |
|
|
|
Freesound
Music is suitable for environmental, entertainment, artistic, and
educational |
|
|
|
|
|
|
| |
|
|
|
deployments.
It is freely available (online and offline), but must be used in
accordance |
|
|
|
|
|
|
| |
|
|
|
with Creative
Commons License protection rules. |
|
|
|
|
|
|
|
|
|
|
|
|
|
| |
|
|
|
|
|
|
|
|
|
|
|
|
|
|
|
|
|
|
|
|
|
|
|
|
|
| |
|
|
|
|
|
|
|
|
|
|
|
|
|
|
|
|
|
|
|
|
|
|
|
|
|
| Technology |
|
|
|
The
technology behind the implementation of Freesound Music can be outlined
as |
|
|
|
|
|
|
|
| |
|
|
|
follows: |
|
|
|
|
|
|
|
|
|
|
|
|
|
|
|
|
|
|
|
|
| |
|
|
|
|
|
|
|
|
|
|
|
|
|
|
|
|
|
|
|
|
|
|
|
|
|
| Resources |
|
|
|
1. |
Sounds |
|
|
|
|
|
|
|
|
|
|
|
|
|
|
|
|
|
|
|
| |
|
|
|
|
|
|
|
|
|
|
|
|
|
|
|
|
|
|
|
|
|
|
|
|
|
| |
|
|
|
|
Free
available sounds are the foundation of Freesound Music. They are created |
|
|
|
|
|
|
| |
|
|
|
|
with any kind
of standard audio recording and processing equipment. |
|
|
|
|
|
|
|
|
| |
|
|
|
|
|
|
|
|
|
|
|
|
|
|
|
|
|
|
|
|
|
|
|
|
|
| |
|
|
|
|
Freesound
Music sounds are being shared online through the Freesound |
|
|
|
|
|
|
|
| |
|
|
|
|
site which
serves as a kind of online sound portal, repository, and much more |
|
|
|
|
|
|
|
| |
|
|
|
|
(see Freesound
site for further information). |
|
|
|
|
|
|
|
|
|
|
|
|
|
| |
|
|
|
|
|
|
|
|
|
|
|
|
|
|
|
|
|
|
|
|
|
|
|
|
|
| Streamers |
|
|
|
2. |
Animated
Sounds |
|
|
|
|
|
|
|
|
|
|
|
|
|
|
|
|
|
| |
|
|
|
|
|
|
|
|
|
|
|
|
|
|
|
|
|
|
|
|
|
|
|
|
|
| |
|
|
|
|
Animated
Sounds are the building blocks for Freesound Music Sound Pages that |
|
|
|
|
|
|
| |
|
|
|
|
can be
interactively used for Freesound Music creation. |
|
|
|
|
|
|
|
|
|
|
| |
|
|
|
|
|
|
|
|
|
|
|
|
|
|
|
|
|
|
|
|
|
|
|
|
|
| |
|
|
|
|
Animated
Sounds are realized as Adobe Shockwave applets that can be |
|
|
|
|
|
|
|
| |
|
|
|
|
accessed
through the Internet. |
|
|
|
|
|
|
|
|
|
|
|
|
|
|
|
| |
|
|
|
|
|
|
|
|
|
|
|
|
|
|
|
|
|
|
|
|
|
|
|
|
|
| |
|
|
|
|
The use of
Animated Sounds is described in the Animated Sounds Online Help. |
|
|
|
|
|
|
| |
|
|
|
|
|
|
|
|
|
|
|
|
|
|
|
|
|
|
|
|
|
|
|
|
|
| Playgrounds |
|
|
|
3. |
Sound Pages |
|
|
|
|
|
|
|
|
|
|
|
|
|
|
|
|
|
|
| |
|
|
|
|
|
|
|
|
|
|
|
|
|
|
|
|
|
|
|
|
|
|
|
|
|
| |
|
|
|
|
Animated
Sounds are assembled into standard Internet browser pages as the |
|
|
|
|
|
|
| |
|
|
|
|
Adobe
Shockwave lingo scripting technology suggests. See next "Setup" |
|
|
|
|
|
|
|
| |
|
|
|
|
chapter for
specific conditions of browser usage. |
|
|
|
|
|
|
|
|
|
|
|
|
| |
|
|
|
|
|
|
|
|
|
|
|
|
|
|
|
|
|
|
|
|
|
|
|
|
|
| Hypersounds |
|
|
|
|
In order to
utilize a maximum of flexibility for interactive musical use, Animated Sounds |
|
|
|
|
|
| |
|
|
|
|
are linked
with each other, thus behaving as a kind of local musical network. These |
|
|
|
|
|
|
| |
|
|
|
|
relationship
is also called "Hypersound" since links from sound to sound can be |
|
|
|
|
|
|
| |
|
|
|
|
executed such
as "Hypertext" links with text. |
|
|
|
|
|
|
|
|
|
|
|
|
|
| |
|
|
|
|
|
|
|
|
|
|
|
|
|
|
|
|
|
|
|
|
|
|
|
|
|
| Freesound Music |
|
|
|
4. |
Pieces |
|
|
|
|
|
|
|
|
|
|
|
|
|
|
|
|
|
|
|
| |
|
|
|
|
|
|
|
|
|
|
|
|
|
|
|
|
|
|
|
|
|
|
|
|
|
| |
|
|
|
|
Freesound
pieces can be interactively played using Freesound Sound Pages. |
|
|
|
|
|
|
| |
|
|
|
|
While
playing, the resulting music can be recorded within the Sound Page |
|
|
|
|
|
|
|
| |
|
|
|
|
environment. |
|
|
|
|
|
|
|
|
|
|
|
|
|
|
|
|
|
|
| |
|
|
|
|
|
|
|
|
|
|
|
|
|
|
|
|
|
|
|
|
|
|
|
|
|
| Distribution |
|
|
|
|
All Sound
Pages are obtaining the Animated Sound resources from the |
|
|
|
|
|
|
|
|
| |
|
|
|
|
Freesound
Music portal server. The pages may be local copies that are distributed |
|
|
|
|
|
| |
|
|
|
|
freely
between friends, or copies that are directly accessed from the server. |
|
|
|
|
|
|
|
| |
|
|
|
|
|
|
|
|
|
|
|
|
|
|
|
|
|
|
|
|
|
|
|
|
|
| |
|
|
|
|
|
|
|
|
|
|
|
|
|
|
|
|
|
|
|
|
|
|
|
|
|
| Setup |
|
|
|
The current
implementation of the Freesound Music Project is represented by a specific |
|
|
|
|
|
|
| |
|
|
|
prototype.
Although it complies to freely available standards and applications, it
cannot |
|
|
|
|
|
|
| |
|
|
|
be freely
used across various platforms and product versions. |
|
|
|
|
|
|
|
|
|
|
| |
|
|
|
|
|
|
|
|
|
|
|
|
|
|
|
|
|
|
|
|
|
|
|
|
|
| |
|
|
|
In order to
assure the best performance possible, the following requirements should be |
|
|
|
|
|
|
| |
|
|
|
considered to
be able to fully enjoy the Freesound Music project: |
|
|
|
|
|
|
|
|
|
|
| |
|
|
|
|
|
|
|
|
|
|
|
|
|
|
|
|
|
|
|
|
|
|
|
|
|
| Sounds Online |
|
|
|
1. |
Freesound Site |
|
|
|
|
|
|
|
|
|
|
|
|
|
|
|
|
|
| |
|
|
|
|
|
|
|
|
|
|
|
|
|
|
|
|
|
|
|
|
|
|
|
|
|
| |
|
|
|
|
The Freesound
site itself should work fine on any standard platform and browser |
|
|
|
|
|
|
| |
|
|
|
|
type. For
further information refer to the relevant section at the Freesound site. |
|
|
|
|
|
|
|
| |
|
|
|
|
|
|
|
|
|
|
|
|
|
|
|
|
|
|
|
|
|
|
|
|
|
| Portal |
|
|
|
2. |
Freesound
Music Portal with Read-only Access |
|
|
|
|
|
|
|
|
|
|
|
| |
|
|
|
|
|
|
|
|
|
|
|
|
|
|
|
|
|
|
|
|
|
|
|
|
|
| |
|
|
|
|
The Freesound
Music Portal can work on various standard platforms and browser |
|
|
|
|
|
|
| |
|
|
|
|
versions for
the purpose of obtaining written information, and standard static media |
|
|
|
|
|
|
| |
|
|
|
|
such as
graphics and mp3 sounds. Short file names (8 characters limitation) are |
|
|
|
|
|
|
| |
|
|
|
|
not supported. |
|
|
|
|
|
|
|
|
|
|
|
|
|
|
|
|
|
|
| |
|
|
|
|
|
|
|
|
|
|
|
|
|
|
|
|
|
|
|
|
|
|
|
|
|
| Read-only |
|
|
|
|
However,
Animated Sounds and related features can only be operated when using |
|
|
|
|
|
|
| |
|
|
|
|
Internet
Explorer which covers the central part of the Freesound Music project. |
|
|
|
|
|
|
|
| |
|
|
|
|
Other
browsers do not comply to the full functional scope that is offered by the |
|
|
|
|
|
|
|
| |
|
|
|
|
Adobe
Shockwave Lingo scripting technology. |
|
|
|
|
|
|
|
|
|
|
|
|
| |
|
|
|
|
|
|
|
|
|
|
|
|
|
|
|
|
|
|
|
|
|
|
|
|
|
| |
|
|
|
|
Most
convenient and tested environment for performing Sound Pages with the |
|
|
|
|
|
|
| |
|
|
|
|
Animated
Sounds is described in the following section. |
|
|
|
|
|
|
|
|
|
|
|
| |
|
|
|
|
|
|
|
|
|
|
|
|
|
|
|
|
|
|
|
|
|
|
|
|
|
| Recommendation |
|
|
|
3. |
Recommended
Environment for the Freesound Music Portal |
|
|
|
|
|
|
|
|
| |
|
|
|
|
|
|
|
|
|
|
|
|
|
|
|
|
|
|
|
|
|
|
|
|
|
| Platform |
|
|
|
|
Computer:
High performance for real-time/multimedia use, at least Pentium M. |
|
|
|
|
|
|
|
| |
|
|
|
|
OS: Windows XP
Professional, SP 2 |
|
|
|
|
|
|
|
|
|
|
|
|
|
|
| |
|
|
|
|
Internet
Explorer: 6.0.2900.2180.xpsp_sp2_gdr.050301-1519 |
|
|
|
|
|
|
|
|
|
|
| |
|
|
|
|
Screen
Resolution: 1024 x 768 |
|
|
|
|
|
|
|
|
|
|
|
|
|
|
|
| |
|
|
|
|
|
|
|
|
|
|
|
|
|
|
|
|
|
|
|
|
|
|
|
|
|
| Browser |
|
|
|
|
Most
recommended Browser: Maxthon Internet Browser (based on Internet Explorer) |
|
|
|
|
|
| |
|
|
|
|
Version:
1.5.2.21 (free available) |
|
|
|
|
|
|
|
|
|
|
|
|
|
|
|
| |
|
|
|
|
Download:
http://go.maxthon.com, find 1.5.2build21_msetup.zip |
|
|
|
|
|
|
|
|
|
| |
|
|
|
|
Local Download Here |
|
|
|
|
|
|
|
|
|
|
|
|
|
|
|
|
|
| |
|
|
|
|
File Size:
4.79 MB |
|
|
|
|
|
|
|
|
|
|
|
|
|
|
|
|
|
| |
|
|
|
|
|
|
|
|
|
|
|
|
|
|
|
|
|
|
|
|
|
|
|
|
|
| |
|
|
|
|
Description:
Maxthon Internet Browser software is a powerful tabbed browser |
|
|
|
|
|
|
|
| |
|
|
|
|
with a highly
customizable interface. It is based on the Internet Explorer |
|
|
|
|
|
|
|
|
| |
|
|
|
|
browser
engine (your most likely current web browser) which means that |
|
|
|
|
|
|
|
|
| |
|
|
|
|
what works in
the IE browser will work the same in Maxthon tabbed browser |
|
|
|
|
|
|
|
| |
|
|
|
|
with many
additional efficient features. |
|
|
|
|
|
|
|
|
|
|
|
|
|
|
| |
|
|
|
|
|
|
|
|
|
|
|
|
|
|
|
|
|
|
|
|
|
|
|
|
|
| Multimedia |
|
|
|
|
Browser
Plug-in: Adobe Shockwave Player |
|
|
|
|
|
|
|
|
|
|
|
|
|
| |
|
|
|
|
Version:
Shockwave 10.1.3.018 |
|
|
|
|
|
|
|
|
|
|
|
|
|
|
|
| |
|
|
|
|
Download:
http://www.adobe.com |
|
|
|
|
|
|
|
|
|
|
|
|
|
|
| |
|
|
|
|
Local Download Here |
|
|
|
|
|
|
|
|
|
|
|
|
|
|
|
|
|
| |
|
|
|
|
File Size:
2,726 K |
|
|
|
|
|
|
|
|
|
|
|
|
|
|
|
|
|
| |
|
|
|
|
|
|
|
|
|
|
|
|
|
|
|
|
|
|
|
|
|
|
|
|
|
| |
|
|
|
|
Setup tip:
When you see the animation playing below the labeled box, then |
|
|
|
|
|
|
|
| |
|
|
|
|
your
installation was successful. |
|
|
|
|
|
|
|
|
|
|
|
|
|
|
|
| |
|
|
|
|
|
|
|
|
|
|
|
|
|
|
|
|
|
|
|
|
|
|
|
|
|
| Considerations |
|
|
|
4. |
How does the
Portal perform on my computer? |
|
|
|
|
|
|
|
|
|
|
|
| |
|
|
|
|
|
|
|
|
|
|
|
|
|
|
|
|
|
|
|
|
|
|
|
|
|
| Applets |
|
|
|
|
There is no
installation required to drive the Adobe Macromedia applets, |
|
|
|
|
|
|
|
| |
|
|
|
|
e.g., no
client needs to be downloaded and to be installed. |
|
|
|
|
|
|
|
|
|
|
| |
|
|
|
|
All
executable resources will be accessed through the server. This is also |
|
|
|
|
|
|
|
| |
|
|
|
|
valid for the
FleX Publisher (see below) that will be downloaded for execution. |
|
|
|
|
|
|
|
| |
|
|
|
|
|
|
|
|
|
|
|
|
|
|
|
|
|
|
|
|
|
|
|
|
|
| Warnings |
|
|
|
|
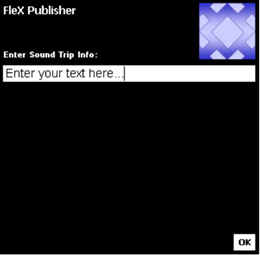
You will get
warnings when executing the FleX Publisher since it is a regular |
|
|
|
|
|
|
|
| |
|
|
|
|
executable
file. You need to allow the FleX Publisher to execute in order to be |
|
|
|
|
|
|
| |
|
|
|
|
able to create
your own Sound Trips. |
|
|
|
|
|
|
|
|
|
|
|
|
|
|
| |
|
|
|
|
|
|
|
|
|
|
|
|
|
|
|
|
|
|
|
|
|
|
|
|
|
| Cookies |
|
|
|
|
The Shockwave
applications that are included in the Portal and in its adjacent |
|
|
|
|
|
|
|
| |
|
|
|
|
application
pages (Workbench, Sound Trips) creating and maintaining text |
|
|
|
|
|
|
|
| |
|
|
|
|
files on your
computers (like cookies) while you are operating. These text files |
|
|
|
|
|
|
|
| |
|
|
|
|
are
automatically stored in two locations like the following: |
|
|
|
|
|
|
|
|
|
|
| |
|
|
|
|
|
|
|
|
|
|
|
|
|
|
|
|
|
|
|
|
|
|
|
|
|
| Cookies Location |
|
|
|
|
1. |
Sound Page
control: |
|
|
|
|
|
|
|
|
|
|
|
|
|
|
|
|
| |
|
|
|
|
|
|
|
|
|
|
|
|
|
|
|
|
|
|
|
|
|
|
|
|
|
| |
|
|
|
|
|
C:\Documents
and Settings\<your name>\Application Data\Macromedia |
|
|
|
|
|
|
| |
|
|
|
|
|
\Shockwave
Player\Prefs\Q93Z43LF |
|
|
|
|
|
|
|
|
|
|
|
|
|
| |
|
|
|
|
|
|
|
|
|
|
|
|
|
|
|
|
|
|
|
|
|
|
|
|
|
| |
|
|
|
|
2. |
FleX Publisher
control |
|
|
|
|
|
|
|
|
|
|
|
|
|
|
|
| |
|
|
|
|
|
|
|
|
|
|
|
|
|
|
|
|
|
|
|
|
|
|
|
|
|
| |
|
|
|
|
|
C:\Documents
and Settings\<your name>\Application Data\Macromedia |
|
|
|
|
|
|
| |
|
|
|
|
|
\Director MX
2004\FleXPublisher\Prefs\ |
|
|
|
|
|
|
|
|
|
|
|
|
| |
|
|
|
|
|
|
|
|
|
|
|
|
|
|
|
|
|
|
|
|
|
|
|
|
|
| Clipboard |
|
|
|
|
While the
Portal or related Sound Pages are active (open in a browser), the |
|
|
|
|
|
|
|
| |
|
|
|
|
Clipboard is
used by Shockwave functions and cannot be used for other |
|
|
|
|
|
|
|
|
| |
|
|
|
|
applications.
If you need to use the Clipboard, close first the Portal and all open |
|
|
|
|
|
|
| |
|
|
|
|
Sound Pages. |
|
|
|
|
|
|
|
|
|
|
|
|
|
|
|
|
|
|
| |
|
|
|
|
|
|
|
|
|
|
|
|
|
|
|
|
|
|
|
|
|
|
|
|
|
| Performance |
|
|
|
|
The Freesound
Music Portal and its related Sound Pages demanding high |
|
|
|
|
|
|
|
| |
|
|
|
|
and permanent
computing power. You should close other performance consuming |
|
|
|
|
|
|
| |
|
|
|
|
programs and
applications before executing sound pages. Since the current |
|
|
|
|
|
|
|
| |
|
|
|
|
version is a
prototype implementation only, you must be aware of rarely possible |
|
|
|
|
|
|
| |
|
|
|
|
browser
window freezes and other malfunctions that are usually simple recovered |
|
|
|
|
|
|
| |
|
|
|
|
by restarting
the relevant pages or applications. |
|
|
|
|
|
|
|
|
|
|
|
|
| |
|
|
|
|
|
|
|
|
|
|
|
|
|
|
|
|
|
|
|
|
|
|
|
|
|
| Sound Channels |
|
|
|
|
The Animated
Sounds play is restricted to a concurrent play of 8 stereo channels. |
|
|
|
|
|
|
| |
|
|
|
|
However, much
more Animated Sounds can be loaded at once (for example, visit |
|
|
|
|
|
|
| |
|
|
|
|
the
"Matrix" project that opens 88 Animated Sounds concurrently). This
allows a very |
|
|
|
|
|
| |
|
|
|
|
flexible
selection and switch ability of sounds. To support this flexibility, the 8
sound |
|
|
|
|
|
|
| |
|
|
|
|
channels are
assigned dynamically. Sound channel display and fixed assignment |
|
|
|
|
|
|
| |
|
|
|
|
of the
channels are possible as well (see below for more information). |
|
|
|
|
|
|
|
|
| |
|
|
|
|
|
|
|
|
|
|
|
|
|
|
|
|
|
|
|
|
|
|
|
|
|
| Internal Download |
|
|
|
|
Some Internet
related operations may require heavy download time. However, those |
|
|
|
|
|
| |
|
|
|
|
downloads
will be stored in the browsers' cache for later use allowing much |
|
|
|
|
|
|
|
| |
|
|
|
|
faster
performance. Please execute Animated Sounds only after they are fully |
|
|
|
|
|
|
|
| |
|
|
|
|
downloaded.
For further information visit the information about Animated Sounds: |
|
|
|
|
|
|
| |
|
|
|
|
|
|
|
|
|
|
|
|
|
|
|
|
|
|
|
|
|
|
|
|
|
| |
|
|
|
|
> |
Animated
Sounds Introduction |
|
|
|
|
|
|
|
|
>> |
|
|
|
|
|
| |
|
|
|
|
|
|
|
|
|
|
|
|
|
|
|
|
|
|
|
|
|
|
|
|
|
| |
|
|
|
|
> |
Animated
Sounds Tutorial |
|
|
|
|
|
|
|
|
|
>> |
|
|
|
|
|
| |
|
|
|
|
|
|
|
|
|
|
|
|
|
|
|
|
|
|
|
|
|
|
|
|
|
| |
|
|
|
|
|
|
|
|
|
|
|
|
|
|
|
|
|
|
|
|
|
|
|
|
|
| Navigation |
|
|
|
The Freesound
Music portal consists of 4 areas that can be navigated one after |
|
|
|
|
|
|
|
| |
|
|
|
the other
(full page navigation) or simultaneously (tiled page navigation). |
|
|
|
|
|
|
|
|
|
| |
|
|
|
|
|
|
|
|
|
|
|
|
|
|
|
|
|
|
|
|
|
|
|
|
|
| Full Page Navigation |
|
|
|
1. |
Full Page
Navigation |
|
|
|
|
|
|
|
|
|
|
|
|
|
|
|
|
| |
|
|
|
|
|
|
|
|
|
|
|
|
|
|
|
|
|
|
|
|
|
|
|
|
|
| |
|
|
|
|
|
|
|
|
|
|
|
|
|
|
|
|
|
|
|
|
|
|
|
|
|
| |
|
|
|
|
|
|
12. Page Indicator |
|
|
|
|
7. Link to CC License |
|
|
|
|
|
|
|
|
| |
|
|
|
11. Link to Workbench |
10. Link to Page Info |
6. Link to Freesound |
8. Link to Portal Help |
|
|
|
|
|
|
|
|
|
|
|
|
|
|
|
|
|
|
|
|
|
|
|
|
|
|
|
|
|
|
|
|
| |
|
|
|
|
|
|
|
|
|
|
|
|
|
|
|
|
|
|
|
|
|
|
|
|
|
| 14. Stop Demo Sound |
|
|
|
|
|
|
|
|
|
|
|
|
|
|
|
|
|
|
|
|
|
|
|
|
|
| 13. Play Demo Sound |
|
|
|
|
|
|
|
|
|
|
|
|
|
|
|
|
|
|
|
|
|
|
|
|
|
| 5. Links to Projects |
|
|
|
|
|
|
|
|
|
|
|
|
|
|
|
|
|
|
|
|
|
|
|
|
|
| |
|
|
|
|
|
|
|
|
|
|
|
|
|
|
|
|
|
|
|
|
|
|
|
|
|
| |
|
|
|
|
|
|
|
|
|
|
|
|
|
|
|
|
|
|
|
|
|
|
|
|
|
| 15. Page Recorder |
|
|
|
|
|
|
|
|
|
|
|
|
|
|
|
|
|
|
|
|
|
|
|
|
|
| (displayed in 3rd |
|
|
|
|
|
|
|
|
|
|
|
|
|
|
|
|
|
|
|
|
|
|
|
|
|
| Section "Sound |
|
|
|
|
|
|
|
|
|
|
|
|
|
|
|
|
|
|
|
|
|
|
|
|
|
| Pages") |
|
|
|
|
|
|
|
|
|
|
|
|
|
|
|
|
|
|
|
|
|
|
|
|
|
| |
|
|
|
|
|
|
|
|
|
|
|
|
|
|
|
|
|
|
|
|
|
|
|
|
|
| 1. Link to 2nd Section |
|
|
|
|
|
|
|
|
|
|
|
|
|
|
|
|
|
|
|
|
|
|
|
|
|
| 2. Link to 3rd Section |
|
|
|
|
|
|
|
|
|
|
|
|
|
|
|
|
|
|
|
|
|
|
|
|
|
| 9. Link to FleX Guide |
|
|
|
|
|
|
|
|
|
|
|
|
|
|
|
|
|
|
|
|
|
|
|
|
|
| 3. Link to 4th Section |
|
|
|
|
|
|
|
|
|
|
|
|
|
|
|
|
|
|
|
|
|
|
|
|
|
| |
|
|
|
|
|
|
|
|
|
|
|
|
|
|
|
|
|
|
|
|
|
|
|
|
|
| |
|
|
|
|
|
|
|
|
|
|
|
|
|
|
|
|
|
|
|
|
|
|
|
|
|
| 4. Open all Sections |
|
|
|
|
|
|
|
|
|
|
|
|
|
|
|
|
|
|
|
|
|
|
|
|
|
| 7. Link to CC License |
|
|
|
|
|
|
|
|
|
|
|
|
|
|
|
|
|
|
|
|
|
|
|
|
|
| |
|
|
|
|
|
|
|
|
|
|
|
|
|
|
|
|
|
|
|
|
|
|
|
|
|
| |
|
|
|
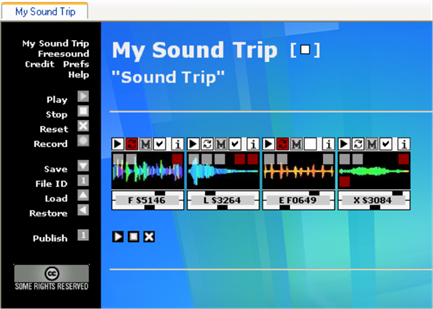
Figure 1:
Freesound Music Portal, "Sound Trips" section, full page display
(1-Sep-06) |
|
|
|
|
|
|
|
|
|
| |
|
|
|
|
|
|
|
|
|
|
|
|
|
|
|
|
|
|
|
|
|
|
|
|
|
| |
|
|
|
|
|
|
|
|
|
|
|
|
|
|
|
|
|
|
|
|
|
|
|
|
|
| Portal |
|
|
|
Portal Links: |
|
|
|
|
|
|
|
|
|
|
|
|
|
|
|
|
|
|
|
| |
|
|
|
|
|
|
|
|
|
|
|
|
|
|
|
|
|
|
|
|
|
|
|
|
|
| |
|
|
|
1. Link to 2nd Section |
> |
Opens second
section of portal that is dedicated to sound installations. |
|
|
|
|
| |
|
|
|
2. Link to 3rd Section |
> |
Opens third
section of portal that is dedicated to joint work. |
|
|
|
|
|
|
| |
|
|
|
3. Link to 4th Section |
> |
Opens fourth
section of portal that is dedicated to workshops. |
|
|
|
|
|
|
| |
|
|
|
4. Open all Sections |
> |
Opens all
sections at once. When using Maxthon browser, press Ctrl+T |
|
|
|
|
| |
|
|
|
|
|
|
|
|
to arrange
all four windows automatically once they are loaded. |
|
|
|
|
|
| |
|
|
|
|
|
|
|
|
|
|
|
|
|
|
|
|
|
|
|
|
|
|
|
|
|
| Projects |
|
|
|
Project Links: |
|
|
|
|
|
|
|
|
|
|
|
|
|
|
|
|
|
|
|
| |
|
|
|
|
|
|
|
|
|
|
|
|
|
|
|
|
|
|
|
|
|
|
|
|
|
| |
|
|
|
5. Links to Projects |
> |
Opens all
projects or project sub pages that are dedicated to this |
|
|
|
|
|
| |
|
|
|
|
|
|
|
|
section of
the portal (here: Performances of Freesound Music). |
|
|
|
|
|
| |
|
|
|
|
|
|
|
> |
Usually, a
project is introduced by a project description page where |
|
|
|
|
| |
|
|
|
|
|
|
|
|
you can find
further useful information about the content and the |
|
|
|
|
|
| |
|
|
|
|
|
|
|
|
use of the
project. |
|
|
|
|
|
|
|
|
|
|
|
|
|
| |
|
|
|
|
|
|
|
|
|
|
|
|
|
|
|
|
|
|
|
|
|
|
|
|
|
| Resources |
|
|
|
Resource Links: |
|
|
|
|
|
|
|
|
|
|
|
|
|
|
|
|
|
|
| |
|
|
|
|
|
|
|
|
|
|
|
|
|
|
|
|
|
|
|
|
|
|
|
|
|
| |
|
|
|
6. Link to Freesound |
> |
Opens home
page of Freesound site. See there for more information. |
|
|
|
|
| |
|
|
|
7. Link to CC License |
> |
Opens
Creative Common License that is valid for the complete |
|
|
|
|
|
| |
|
|
|
|
|
|
|
|
music
projects. |
|
|
|
|
|
|
|
|
|
|
|
|
|
|
| |
|
|
|
8. Link to Portal Help |
> |
Opens this
help starting from the "Setup" section. |
|
|
|
|
|
|
|
|
| |
|
|
|
9. Link to FleX Guide |
> |
Opens this
site (see "Home" tab at the bottom of this page). |
|
|
|
|
|
|
| |
|
|
|
10. Link to Page Info |
> |
Opens page
related project information in the "Presentation" section |
|
|
|
|
| |
|
|
|
|
|
|
|
|
of this site
(see "Presentation" tab at the bottom of this page). |
|
|
|
|
|
|
| |
|
|
|
|
|
|
|
|
|
|
|
|
|
|
|
|
|
|
|
|
|
|
|
|
|
| Interactive |
|
|
|
Interactive Links: |
|
|
|
|
|
|
|
|
|
|
|
|
|
|
|
|
|
|
| |
|
|
|
|
|
|
|
|
|
|
|
|
|
|
|
|
|
|
|
|
|
|
|
|
|
| |
|
|
|
11. Link to Workbench |
> |
Opens
corresponding "Figures" Sound Park entry page. Together |
|
|
|
|
|
| |
|
|
|
|
|
|
|
|
with the
remaining Workbench pages, Sound Trips can be created. |
|
|
|
|
| |
|
|
|
12. Page Indicator |
> |
Indicates
whether the download of Animated Sounds of a page |
|
|
|
|
|
| |
|
|
|
|
|
|
|
|
into the
browsers cache is still in process (red) or has been |
|
|
|
|
|
|
| |
|
|
|
|
|
|
|
|
finished
(white) and the page is ready for play. |
|
|
|
|
|
|
|
|
| |
|
|
|
|
|
|
|
|
During
download displayed Animated Sounds can be already |
|
|
|
|
|
| |
|
|
|
|
|
|
|
|
played
(restricted performance may apply). |
|
|
|
|
|
|
|
|
|
| |
|
|
|
|
|
|
|
|
Once you open
the same Sound Page again, the downloaded |
|
|
|
|
|
| |
|
|
|
|
|
|
|
|
sounds will
still be stored in the cache and the activation time is |
|
|
|
|
|
| |
|
|
|
|
|
|
|
|
reduced to a
minimum. |
|
|
|
|
|
|
|
|
|
|
|
|
| |
|
|
|
|
|
|
|
> |
Pages can be
selected and included in a Sound Trip publication. |
|
|
|
|
|
| |
|
|
|
13. Play Demo Sound |
> |
An Animated
Sound will be played. |
|
|
|
|
|
|
|
|
|
|
| |
|
|
|
14. Stop Demo Sound |
> |
An Animated
Sound will be stopped. |
|
|
|
|
|
|
|
|
|
|
| |
|
|
|
15. Page Recorder |
> |
The play of
Animated Sounds on various pages (i.e., of the demo |
|
|
|
|
|
| |
|
|
|
|
|
|
|
|
sounds of all
portal pages) can be recorded, stored, and being |
|
|
|
|
|
| |
|
|
|
|
|
|
|
|
replayed. The
portal's page recorder is accessible from the "Sound |
|
|
|
|
| |
|
|
|
|
|
|
|
|
Pages"
section of the portal. |
|
|
|
|
|
|
|
|
|
|
|
| |
|
|
|
|
|
|
|
|
|
|
|
|
|
|
|
|
|
|
|
|
|
|
|
|
|
| |
|
|
|
The use of
the interactive functions is described in the "Sound Park" and the
"Publishing" |
|
|
|
|
|
|
| |
|
|
|
chapters
below. |
|
|
|
|
|
|
|
|
|
|
|
|
|
|
|
|
|
|
|
| |
|
|
|
|
|
|
|
|
|
|
|
|
|
|
|
|
|
|
|
|
|
|
|
|
|
| Tiled Navigation |
|
|
|
2. |
Tiled Page
Navigation |
|
|
|
|
|
|
|
|
|
|
|
|
|
|
|
|
| |
|
|
|
|
|
|
|
|
|
|
|
|
|
|
|
|
|
|
|
|
|
|
|
|
|
| |
|
|
|
The most
convenient way to surf the Freesound Music portal is to arrange all 4 portal
areas |
|
|
|
|
|
| |
|
|
|
in a tiled
fashion as shown below: |
|
|
|
|
|
|
|
|
|
|
|
|
|
|
|
| |
|
|
|
|
|
|
|
|
|
|
|
|
|
|
|
|
|
|
|
|
|
|
|
|
|
| |
|
|
|
|
|
|
|
|
|
| |
|
|
|
|
|
|
|
|
| |
|
|
|
|
|
|
|
|
| |
|
|
|
|
|
|
|
|
| |
|
|
|
|
|
|
|
|
| |
|
|
|
|
|
|
|
|
| |
|
|
|
|
|
|
|
|
| |
|
|
|
|
|
|
|
|
| |
|
|
|
|
|
|
|
|
| |
|
|
|
|
|
|
|
|
| |
|
|
|
|
|
|
|
|
| |
|
|
|
|
|
|
|
|
| |
|
|
|
|
|
|
|
|
| |
|
|
|
|
|
|
|
|
| |
|
|
|
|
|
|
|
|
| |
|
|
|
|
|
|
|
|
| |
|
|
|
|
|
|
|
|
| |
|
|
|
|
|
|
|
|
| |
|
|
|
|
|
|
|
|
|
|
|
|
|
|
|
|
|
|
|
|
|
|
|
|
|
| |
|
|
|
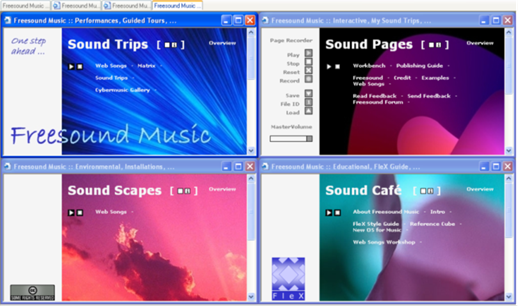
Figure 2: Freesound
Music Portal, four tiled windows display (3-Sep-06) |
|
|
|
|
|
|
|
|
|
|
|
| |
|
|
|
|
|
|
|
|
|
|
|
|
|
|
|
|
|
|
|
|
|
|
|
|
|
| ARRANGE PORTAL |
|
|
|
To arrange
the Freesound Music portal with equally tiled windows using Maxthon: |
|
|
|
|
|
|
|
| AUTOMATICALLY |
|
|
|
|
|
|
|
|
|
|
|
|
|
|
|
|
|
|
|
|
|
|
|
|
|
| |
|
|
|
1. Close all
open browser windows. |
|
|
|
|
|
|
|
|
|
|
|
|
|
|
|
| |
|
|
|
2. Open the "Sound
Trips" portal window (you can use the link to the right). |
|
|
>> |
|
|
|
|
|
| |
|
|
|
3. Click the
"Open complete portal" link at the left bottom of the "Sound
Trips" portal window. |
|
|
|
|
|
| |
|
|
|
4. Wait until
all 4 windows are opened. |
|
|
|
|
|
|
|
|
|
|
|
|
|
|
|
| |
|
|
|
5. Press
Ctrl+T. All four windows are now automatically tiled. |
|
|
|
|
|
|
|
|
|
|
|
| |
|
|
|
|
|
|
|
|
|
|
|
|
|
|
|
|
|
|
|
|
|
|
|
|
|
| ARRANGE PORTAL |
|
|
|
To arrange
the Freesound Music portal with equally tiled windows using Internet
Explorer: |
|
|
|
|
|
|
| MANUALLY |
|
|
|
|
|
|
|
|
|
|
|
|
|
|
|
|
|
|
|
|
|
|
|
|
|
| |
|
|
|
1. Close all
open browser windows. |
|
|
|
|
|
|
|
|
|
|
|
|
|
|
|
| |
|
|
|
2. Open the "Sound
Trips" portal window (you can use the link to the right). |
|
|
>> |
|
|
|
|
|
| |
|
|
|
3. Click the
"Open complete portal" link at the left bottom of the "Sound
Trips" portal window. |
|
|
|
|
|
| |
|
|
|
4. Wait until
all 4 windows are opened. |
|
|
|
|
|
|
|
|
|
|
|
|
|
|
|
| |
|
|
|
5. Resize the
four browser windows by 50 % horizontally and vertically and arrange
them |
|
|
|
|
|
|
| |
|
|
|
manually on the screen
using standard window functions. |
|
|
|
|
|
|
|
|
|
|
|
| |
|
|
|
|
|
|
|
|
|
|
|
|
|
|
|
|
|
|
|
|
|
|
|
|
|
| |
|
|
|
Now you can
navigate through the portal as described above (see 1. "Full Page
Navigation"). |
|
|
|
|
|
| |
|
|
|
|
|
|
|
|
|
|
|
|
|
|
|
|
|
|
|
|
|
|
|
|
|
| |
|
|
|
TIP |
1 |
|
|
|
|
|
|
|
|
|
|
|
|
|
|
|
|
|
|
|
|
| |
|
|
|
|
You can
transform the portal into the Workbench to create Sound Trips by clicking |
|
|
|
|
|
|
| |
|
|
|
|
each window's
title. For further information on how to create Sound Trips, see the |
|
|
|
|
|
|
| |
|
|
|
|
"Sound
Park" and "Publishing" chapters below. |
|
|
|
|
|
|
|
|
|
|
|
|
| |
|
|
|
|
|
|
|
|
|
|
|
|
|
|
|
|
|
|
|
|
|
|
|
|
|
| |
|
|
|
|
|
|
|
|
|
|
|
|
|
|
|
|
|
|
|
|
|
|
|
|
|
| |
|
Sound Park |
|
|
|
|
|
|
|
|
|
|
|
|
|
|
|
|
|
|
| |
|
|
|
|
|
|
|
|
|
|
|
|
|
|
|
|
|
|
|
|
|
|
|
|
|
| |
|
|
|
|
|
|
|
|
|
|
|
|
|
|
|
|
|
|
|
|
|
|
|
|
|
| |
|
|
|
Preparation |
|
My first Sound Trip |
Playing Sound Trips |
|
Tips |
|
|
|
|
|
| |
|
|
|
|
|
|
|
|
|
|
|
|
|
|
|
|
|
|
|
|
|
|
|
|
|
| Introduction |
|
|
|
The
"Sound Park" is a collection of Animated Sounds built of Freesound
samples. |
|
|
|
|
|
|
|
| |
|
|
|
It is split
into four sound characteristics, a "Figures", "Layers",
"Events", and "Xpressions" |
|
|
|
|
|
|
| |
|
|
|
catalogue.
The front end of these four areas is called "Workbench". It
consists of four |
|
|
|
|
|
|
| |
|
|
|
browser
windows each with a table of contents for the respective area and some |
|
|
|
|
|
|
|
| |
|
|
|
interactive
Sound Trip publishing and playing functions as described below. |
|
|
|
|
|
|
|
|
| |
|
|
|
|
|
|
|
|
|
|
|
|
|
|
|
|
|
|
|
|
|
|
|
|
|
| |
|
|
|
The following
chapter describes the method on how to create a simple Sound Trip |
|
|
|
|
|
|
|
| |
|
|
|
using the
Workbench. The "Publishing" chapter introduces in extended
possibilities |
|
|
|
|
|
|
|
| |
|
|
|
with the Sound
Park and related functions. |
|
|
|
|
|
|
|
|
|
|
|
|
|
|
| |
|
|
|
|
|
|
|
|
|
|
|
|
|
|
|
|
|
|
|
|
|
|
|
|
|
| |
|
|
|
|
|
|
|
|
|
|
|
|
|
|
|
|
|
|
|
|
|
|
|
|
|
| Preparation |
|
|
|
You can
either prepare the Workbench through the Portal or accessing it via this
help. |
|
|
|
|
|
|
| |
|
|
|
|
|
|
|
|
|
|
|
|
|
|
|
|
|
|
|
|
|
|
|
|
|
| ACCESS VIA PORTAL |
|
|
|
To prepare
the Workbench for a new Sound Trip creation accessing via the portal: |
|
|
|
|
|
|
|
| |
|
|
|
|
|
|
|
|
|
|
|
|
|
|
|
|
|
|
|
|
|
|
|
|
|
| |
|
|
|
1. From the
"Sound Pages" are of the Portal, click the "Workbench"
link and follow the |
|
|
|
|
|
|
| |
|
|
|
instructions. |
|
|
|
|
|
|
|
|
|
|
|
|
|
|
|
|
|
|
|
| |
|
|
|
2.
Alternatively you can click each of the four portals' headlines to convert it
into the Workbench. |
|
|
|
|
| |
|
|
|
|
|
|
|
|
|
|
|
|
|
|
|
|
|
|
|
|
|
|
|
|
|
| ACCESS VIA LINK |
|
|
|
To prepare
the Workbench for a new Sound Trip creation accessing via this help: |
|
|
|
|
|
|
|
| |
|
|
|
|
|
|
|
|
|
|
|
|
|
|
|
|
|
|
|
|
|
|
|
|
|
| |
|
|
|
1. Close all
open browser windows. |
|
|
|
|
|
|
|
|
|
|
|
|
|
|
|
| |
|
|
|
2. Open all Workbench
browser windows at once using the link to the right. |
|
|
>> |
|
|
|
|
|
| |
|
|
|
3. Wait until
all 4 windows are opened. |
|
|
|
|
|
|
|
|
|
|
|
|
|
|
|
| |
|
|
|
4. If you are
using Maxthon, press Ctrl+T. All four windows are now automatically tiled. |
|
|
|
|
|
|
| |
|
|
|
If you are using
Internet Explorer, it is recommended to arrange the windows manually |
|
|
|
|
|
|
| |
|
|
|
as shown below using
standard Windows resizing functions. |
|
|
|
|
|
|
|
|
|
|
| |
|
|
|
|
|
|
|
|
|
|
|
|
|
|
|
|
|
|
|
|
|
|
|
|
|
| |
|
|
|
|
|
|
|
|
|
|
|
|
|
|
|
|
|
|
|
|
|
|
|
|
|
| |
|
|
|
|
|
8. Page Indicator |
|
|
|
|
|
|
2. Page Headline |
|
|
|
|
|
|
|
|
| |
|
|
|
4. Page Header Link |
13. Link to Page Info |
|
7. Sound Selector |
|
3. Page Navigation |
|
|
|
|
|
|
| |
|
|
|
|
|
|
|
|
|
|
|
|
|
|
|
|
|
|
|
|
|
|
|
|
|
| |
|
|
|
|
|
|
|
|
|
|
|
|
|
|
|
|
|
|
|
|
|
|
|
|
|
| |
|
|
|
|
|
|
|
|
|
|
|
|
|
|
|
|
|
|
|
|
|
|
|
|
|
| 14. Workbench Menu |
|
|
|
|
|
|
|
|
|
|
|
|
|
|
|
|
|
|
|
|
|
|
|
|
|
| |
|
|
|
|
|
|
|
|
|
|
|
|
|
|
|
|
|
|
|
|
|
|
|
|
|
| 5. Animated Sound |
|
|
|
|
|
|
|
|
|
|
|
|
|
|
|
|
|
|
|
|
|
|
|
|
|
| 9. Publishing Area |
|
|
|
|
|
|
|
|
|
|
|
|
|
|
|
|
|
|
|
|
|
|
|
|
|
| 11. Recorder Area |
|
|
|
|
|
|
|
|
|
|
|
|
|
|
|
|
|
|
|
|
|
|
|
|
|
| 6. Group Control |
|
|
|
|
|
|
|
|
|
|
|
|
|
|
|
|
|
|
|
|
|
|
|
|
|
| |
|
|
|
|
|
|
|
|
|
|
|
|
|
|
|
|
|
|
|
|
|
|
|
|
|
| |
|
|
|
|
|
|
|
|
|
|
|
|
|
|
|
|
|
|
|
|
|
|
|
|
|
| |
|
|
|
|
|
|
|
|
|
|
|
|
|
|
|
|
|
|
|
|
|
|
|
|
|
| |
|
|
|
|
|
|
|
|
|
|
|
|
|
|
|
|
|
|
|
|
|
|
|
|
|
| |
|
|
|
|
|
|
|
|
|
|
|
|
|
|
|
|
|
|
|
|
|
|
|
|
|
| 10. Layout Area |
|
|
|
|
|
|
|
|
|
|
|
|
|
|
|
|
|
|
|
|
|
|
|
|
|
| 12. Customize Area |
|
|
|
|
|
|
|
|
|
|
|
|
|
|
|
|
|
|
|
|
|
|
|
|
|
| 1. Table of Contents |
|
|
|
|
|
|
|
|
|
|
|
|
|
|
|
|
|
|
|
|
|
|
|
|
|
| |
|
|
|
|
|
|
|
|
|
|
|
|
|
|
|
|
|
|
|
|
|
|
|
|
|
| |
|
|
|
|
|
|
|
|
|
|
|
|
|
|
|
|
|
|
|
|
|
|
|
|
|
| 15. Link to CC License |
|
|
|
|
|
|
|
|
|
|
|
|
|
|
|
|
|
|
|
|
|
|
|
|
|
| |
|
|
|
|
|
|
|
|
|
|
|
|
|
|
|
|
|
|
|
|
|
|
|
|
|
| |
|
|
|
Figure 3:
Workbench, four tiled windows display (4-Sep-06) |
|
|
|
|
|
|
|
|
|
|
|
|
|
| |
|
|
|
|
|
|
|
|
|
|
|
|
|
|
|
|
|
|
|
|
|
|
|
|
|
| |
|
|
|
|
|
|
|
|
|
|
|
|
|
|
|
|
|
|
|
|
|
|
|
|
|
| Navigation |
|
|
|
Navigation: |
|
|
|
|
|
|
|
|
|
|
|
|
|
|
|
|
|
|
|
| |
|
|
|
|
|
|
|
|
|
|
|
|
|
|
|
|
|
|
|
|
|
|
|
|
|
| |
|
|
|
1. Table of Contents |
> |
Opens page of
up to 8 Animated Sounds for your selection. |
|
|
|
|
|
|
| |
|
|
|
2. Page Headline |
> |
Indicates
current page title (as shown in table of contents). |
|
|
|
|
|
|
| |
|
|
|
3. Page Navigation |
> |
Access to
previous/next page (Workbench and Catalogue pages). |
|
|
|
|
| |
|
|
|
|
|
|
|
|
Allows
numeric access at the bottom of the page (Catalogue pages). |
|
|
|
|
| |
|
|
|
4. Page Header Link |
> |
When
Workbench page (displayed), opens corresponding portal |
|
|
|
|
|
| |
|
|
|
|
|
|
|
|
page. |
|
|
|
|
|
|
|
|
|
|
|
|
|
|
|
| |
|
|
|
|
|
|
|
|
When
Catalogue page (accessed through table of contents), links |
|
|
|
|
|
| |
|
|
|
|
|
|
|
|
back to
corresponding Workbench page. |
|
|
|
|
|
|
|
|
|
| |
|
|
|
|
|
|
|
|
|
|
|
|
|
|
|
|
|
|
|
|
|
|
|
|
|
| Selection |
|
|
|
Selection: |
|
|
|
|
|
|
|
|
|
|
|
|
|
|
|
|
|
|
|
|
| |
|
|
|
|
|
|
|
|
|
|
|
|
|
|
|
|
|
|
|
|
|
|
|
|
|
| |
|
|
|
5. Animated Sound |
> |
Click into
sound graphics will play the sound. |
|
|
|
|
|
|
|
|
| |
|
|
|
|
|
|
|
> |
For further
information on how to play Animated Sounds |
|
>> |
|
|
|
|
|
| |
|
|
|
|
|
|
|
|
click the
button to the right. |
|
|
|
|
|
|
|
|
|
|
|
|
| |
|
|
|
6. Group Control |
> |
Use the group
control "Stop" button to stop all playing Animated |
|
|
|
|
|
| |
|
|
|
|
|
|
|
|
Sounds. Group
Controls are mainly used within a published |
|
|
|
|
|
|
| |
|
|
|
|
|
|
|
|
Sound Trip. |
|
|
|
|
|
|
|
|
|
|
|
|
|
|
| |
|
|
|
|
|
|
|
> |
For further
information on how to use Group Controls |
|
>> |
|
|
|
|
|
| |
|
|
|
|
|
|
|
|
click the
button to the right. |
|
|
|
|
|
|
|
|
|
|
|
|
| |
|
|
|
7. Sound Selector |
> |
Click the
Sound Selector check box to select the sound for your |
|
|
|
|
|
| |
|
|
|
|
|
|
|
|
Sound Trip
project. Sounds are entered into the project in the order |
|
|
|
|
| |
|
|
|
|
|
|
|
|
you select
them. For further information follow the tutorial below. |
|
|
|
|
|
| |
|
|
|
8. Page Indicator |
> |
Click the
Page Selector check box if you want to collect pages for |
|
|
|
|
|
| |
|
|
|
|
|
|
|
|
your Sound
Trip project. Pages are entered into the project in the |
|
|
|
|
|
| |
|
|
|
|
|
|
|
|
order you
select them. For further information follow the tutorial |
|
|
|
|
|
| |
|
|
|
|
|
|
|
|
below. |
|
|
|
|
|
|
|
|
|
|
|
|
|
|
|
| |
|
|
|
|
|
|
|
> |
The Page
Indicator is also used to watch the download to cache |
|
|
|
|
|
| |
|
|
|
|
|
|
|
|
status of the
Sound Page as described in the "Freesound Music" |
|
|
|
|
|
| |
|
|
|
|
|
|
|
|
chapter,
"Navigator" section above. |
|
|
|
|
|
|
|
|
|
|
| |
|
|
|
|
|
|
|
|
|
|
|
|
|
|
|
|
|
|
|
|
|
|
|
|
|
| Publishing |
|
|
|
Publishing: |
|
|
|
|
|
|
|
|
|
|
|
|
|
|
|
|
|
|
|
| |
|
|
|
|
|
|
|
|
|
|
|
|
|
|
|
|
|
|
|
|
|
|
|
|
|
| |
|
|
|
9. Publishing Area |
> |
The
publishing area allows you to publish your sound collection |
|
|
|
|
|
| |
|
|
|
|
|
|
|
|
instantly as
an executable Sound Trip (standard browser pages that |
|
|
|
|
| |
|
|
|
|
|
|
|
|
can be saved
on your computer and send to friends while linking |
|
|
|
|
|
| |
|
|
|
|
|
|
|
|
to the
Freesound Music server for sound and functional access). |
|
|
|
|
|
| |
|
|
|
10. Layout Area |
|
> |
In the layout
area you can design your Sound Trip prior to publishing. |
|
|
|
|
| |
|
|
|
11. Recorder Area |
> |
In the
recorder area you can record, store, and replay your play with |
|
|
|
|
| |
|
|
|
|
|
|
|
|
Animated
Sounds. Records can be included into the publishing. |
|
|
|
|
|
| |
|
|
|
|
|
|
|
|
For more
information visit the "Publishing" chapter below. |
|
|
|
|
|
|
| |
|
|
|
12. Customize Area |
> |
In the
customize area you define the master volume and which of |
|
|
|
|
|
| |
|
|
|
|
|
|
|
|
FleX
indication, Sound ID, and Sound channel information should |
|
|
|
|
|
| |
|
|
|
|
|
|
|
|
be displayed.
This is valid throughout the complete system for the |
|
|
|
|
|
| |
|
|
|
|
|
|
|
|
Workbench and
all Sound Trips you are displaying. |
|
|
|
|
|
|
|
| |
|
|
|
|
|
|
|
|
|
|
|
|
|
|
|
|
|
|
|
|
|
|
|
|
|
| Resources |
|
|
|
Information Resources: |
|
|
|
|
|
|
|
|
|
|
|
|
|
|
|
|
|
| |
|
|
|
|
|
|
|
|
|
|
|
|
|
|
|
|
|
|
|
|
|
|
|
|
|
| |
|
|
|
13. Link to Page Info |
> |
Opens page
related project information in the "Presentation" section |
|
|
|
|
| |
|
|
|
|
|
|
|
|
of this site
(see "Presentation" tab at the bottom of this page). |
|
|
|
|
|
|
| |
|
|
|
14. Workbench Menu |
> |
My Sound
Trip: Opens general information about the Freesound |
|
|
|
|
|
| |
|
|
|
|
|
|
|
|
Music project. |
|
|
|
|
|
|
|
|
|
|
|
|
|
|
| |
|
|
|
|
|
|
|
|
Freesound:
Opens Freesound site (resources of Animated Sounds). |
|
|
|
|
| |
|
|
|
|
|
|
|
|
Credit:
Important information about project credits. |
|
|
|
|
|
|
|
| |
|
|
|
|
|
|
|
|
Prefs: Opens
complete set of publishing options that exceeds the |
|
|
|
|
|
| |
|
|
|
|
|
|
|
|
limited set
of publishing options presented in the Workbench. |
|
|
|
|
|
|
| |
|
|
|
|
|
|
|
|
For more
information visit the "Publishing" chapter below. |
|
|
|
|
|
|
| |
|
|
|
|
|
|
|
|
Help: Opens
this help. |
|
|
|
|
|
|
|
|
|
|
|
|
| |
|
|
|
15. Link to CC License |
> |
Opens
Creative Common License that is valid for all of the music |
|
|
|
|
|
| |
|
|
|
|
|
|
|
|
projects. |
|
|
|
|
|
|
|
|
|
|
|
|
|
|
|
| |
|
|
|
|
|
|
|
|
|
|
|
|
|
|
|
|
|
|
|
|
|
|
|
|
|
| |
|
|
|
|
|
|
|
|
|
|
|
|
|
|
|
|
|
|
|
|
|
|
|
|
|
| My first Trip |
|
|
|
The following
tutorial describes a specific way on how to create instantly a first Sound |
|
|
|
|
|
|
| |
|
|
|
Trip.
Settings may vary from the screens displayed below. Please feel free to vary |
|
|
|
|
|
|
|
| |
|
|
|
any step as
you like to create your really own first Sound Trip. After you went through |
|
|
|
|
|
|
| |
|
|
|
all the
information above - you will see how easy it is! |
|
|
|
|
|
|
|
|
|
|
|
|
| |
|
|
|
|
|
|
|
|
|
|
|
|
|
|
|
|
|
|
|
|
|
|
|
|
|
| CREATE SOUND |
|
|
|
To create
your first Sound Trip: |
|
|
|
|
|
|
|
|
|
|
|
|
|
|
|
|
| TRIP |
|
|
|
|
|
|
|
|
|
|
|
|
|
|
|
|
|
|
|
|
|
|
|
|
|
| Prepare |
|
|
|
1. Open the
Workbench as described above and wait until the Page Indicator at the top |
|
|
|
|
|
|
| |
|
|
|
turns into white color. |
|
|
|
|
|
|
|
|
|
|
|
|
|
|
|
|
|
| |
|
|
|
|
|
|
|
|
|
|
|
|
|
|
|
|
|
|
|
|
|
|
|
|
|
| |
|
|
|
2. Lets
create a Sound Trip with rather technical and electronic sounds
("Labmusic"): |
|
|
|
|
|
|
| |
|
|
|
Click the
"Create" button on the left of the "Figures" Workbench
page in order to create a new |
|
|
|
|
|
| |
|
|
|
Sound Trip (see figure
below). |
|
|
|
|
|
|
|
|
|
|
|
|
|
|
|
|
| |
|
|
|
|
|
|
|
|
|
|
|
|
|
|
|
|
|
|
|
|
|
|
|
|
|
| Define Figure |
|
|
|
3. First lets
define a rhythmical pattern that will drive our Sound Trip: |
|
|
|
|
|
|
|
|
|
| |
|
|
|
From the table of
contents area of the "Figures" Workbench page, select the
"Bass Figures" |
|
|
|
|
|
| |
|
|
|
item. The "Bass
Figures" page opens. |
|
|
|
|
|
|
|
|
|
|
|
|
|
|
| |
|
|
|
|
|
|
|
|
|
|
|
|
|
|
|
|
|
|
|
|
|
|
|
|
|
| |
|
|
|
|
|
|
|
|
|
|
|
|
|
|
|
|
|
|
|
|
|
|
|
|
|
| |
|
|
|
|
|
|
|
|
|
|
|
|
|
|
|
|
|
|
|
|
|
|
|
|
|
| |
|
|
|
|
|
|
|
|
|
|
|
|
|
|
|
|
|
|
|
|
|
|
|
|
|
| |
|
|
|
|
|
|
|
|
|
|
|
|
|
|
|
|
|
|
|
|
|
|
|
|
|
| |
|
|
|
|
|
|
|
|
|
|
|
|
|
|
|
|
|
|
|
|
|
|
|
|
|
| |
|
|
|
|
|
|
|
|
|
|
|
|
|
|
|
|
|
|
|
|
|
|
|
|
|
| |
|
|
|
|
|
|
|
|
|
|
|
|
|
|
|
|
|
|
|
|
|
|
|
|
|
| |
|
|
|
|
|
|
|
|
|
|
|
|
|
|
|
|
|
|
|
|
|
|
|
|
|
| |
|
|
|
|
|
|
|
|
|
|
|
|
|
|
|
|
|
|
|
|
|
|
|
|
|
| |
|
|
|
|
|
|
|
|
|
|
|
|
|
|
|
|
|
|
|
|
|
|
|
|
|
| |
|
|
|
|
|
|
|
|
|
|
|
|
|
|
|
|
|
|
|
|
|
|
|
|
|
| |
|
|
|
|
|
|
|
|
|
|
|
|
|
|
|
|
|
|
|
|
|
|
|
|
|
| |
|
|
|
|
|
|
|
|
|
|
|
|
|
|
|
|
|
|
|
|
|
|
|
|
|
| |
|
|
|
|
|
|
|
|
|
|
|
|
|
|
|
|
|
|
|
|
|
|
|
|
|
| |
|
|
|
|
|
|
|
|
|
|
|
|
|
|
|
|
|
|
|
|
|
|
|
|
|
| |
|
|
|
|
|
|
|
|
|
|
|
|
|
|
|
|
|
|
|
|
|
|
|
|
|
| |
|
|
|
Figure 4:
"Bass Figures" Sound Park page (4-Sep-06) |
|
|
|
|
|
|
|
|
|
|
|
|
|
|
| |
|
|
|
|
|
|
|
|
|
|
|
|
|
|
|
|
|
|
|
|
|
|
|
|
|
| |
|
|
|
4. Click into
the sound graphics of the second animated sound in order to listen to it. |
|
|
|
|
|
|
|
| |
|
|
|
After listening, click
the gray "M" button of the sound to stop playing. |
|
|
|
|
|
|
|
|
|
| |
|
|
|
|
|
|
|
|
|
|
|
|
|
|
|
|
|
|
|
|
|
|
|
|
|
| |
|
|
|
5. Click the
empty sound selector check box right to the gray "M" button in
order to |
|
|
|
|
|
|
|
| |
|
|
|
select this sound for
the first sound group of your Sound Trip. |
|
|
|
|
|
|
|
|
|
|
| |
|
|
|
|
|
|
|
|
|
|
|
|
|
|
|
|
|
|
|
|
|
|
|
|
|
| Define Layer |
|
|
|
6. Now lets
find a "Layer" that fits the rhythmical "Figures"
pattern: |
|
|
|
|
|
|
|
|
|
|
| |
|
|
|
From the table of
contents area of the "Layer" Workbench page, select the
"Voice |
|
|
|
|
|
|
| |
|
|
|
Sounds" item. The
"Voice Sounds" page opens. |
|
|
|
|
|
|
|
|
|
|
|
|
| |
|
|
|
|
|
|
|
|
|
|
|
|
|
|
|
|
|
|
|
|
|
|
|
|
|
| |
|
|
|

|
|
|
|
|
|
|
|
|
|
|
|
|
|
|
|
|
|
|
|
|
|
| |
|
|
|
|
|
|
|
|
|
|
|
|
|
|
|
|
|
|
|
|
|
|
|
|
|
| |
|
|
|
|
|
|
|
|
|
|
|
|
|
|
|
|
|
|
|
|
|
|
|
|
|
| |
|
|
|
|
|
|
|
|
|
|
|
|
|
|
|
|
|
|
|
|
|
|
|
|
|
| |
|
|
|
|
|
|
|
|
|
|
|
|
|
|
|
|
|
|
|
|
|
|
|
|
|
| |
|
|
|
|
|
|
|
|
|
|
|
|
|
|
|
|
|
|
|
|
|
|
|
|
|
| |
|
|
|
|
|
|
|
|
|
|
|
|
|
|
|
|
|
|
|
|
|
|
|
|
|
| |
|
|
|
|
|
|
|
|
|
|
|
|
|
|
|
|
|
|
|
|
|
|
|
|
|
| |
|
|
|
|
|
|
|
|
|
|
|
|
|
|
|
|
|
|
|
|
|
|
|
|
|
| |
|
|
|
|
|
|
|
|
|
|
|
|
|
|
|
|
|
|
|
|
|
|
|
|
|
| |
|
|
|
|
|
|
|
|
|
|
|
|
|
|
|
|
|
|
|
|
|
|
|
|
|
| |
|
|
|
|
|
|
|
|
|
|
|
|
|
|
|
|
|
|
|
|
|
|
|
|
|
| |
|
|
|
|
|
|
|
|
|
|
|
|
|
|
|
|
|
|
|
|
|
|
|
|
|
| |
|
|
|
|
|
|
|
|
|
|
|
|
|
|
|
|
|
|
|
|
|
|
|
|
|
| |
|
|
|
|
|
|
|
|
|
|
|
|
|
|
|
|
|
|
|
|
|
|
|
|
|
| |
|
|
|
|
|
|
|
|
|
|
|
|
|
|
|
|
|
|
|
|
|
|
|
|
|
| |
|
|
|
Figure 5:
"Voice Sounds" Sound Park page (4-Sep-06) |
|
|
|
|
|
|
|
|
|
|
|
|
|
| |
|
|
|
|
|
|
|
|
|
|
|
|
|
|
|
|
|
|
|
|
|
|
|
|
|
| |
|
|
|
7. From the
fourth animated sound, click the empty sound selector check box right to the
gray |
|
|
|
|
|
| |
|
|
|
"M" button in
order to add this sound to the first sound group of your Sound Trip. |
|
|
|
|
|
|
|
| |
|
|
|
|
|
|
|
|
|
|
|
|
|
|
|
|
|
|
|
|
|
|
|
|
|
| |
|
|
|
8. On the
left pane of the "Layers" window you can set layout parameters for
your Sound Trip. |
|
|
|
|
|
| |
|
|
|
For the purpose of this
tutorial, click each of the control buttons where needed to reach |
|
|
|
|
|
|
| |
|
|
|
the status as displayed
at the above figure. For more information about layout settings |
|
|
|
|
|
|
| |
|
|
|
refer to the
"Publishing" chapter below. |
|
|
|
|
|
|
|
|
|
|
|
|
|
|
| |
|
|
|
|
|
|
|
|
|
|
|
|
|
|
|
|
|
|
|
|
|
|
|
|
|
| Define Event |
|
|
|
9. Now lets
find an "Event" that can complement the sounds that we've chosen so
far. |
|
|
|
|
|
|
| |
|
|
|
|
|
|
|
|
|
|
|
|
|
|
|
|
|
|
|
|
|
|
|
|
|
| |
|
|
|
TIP |
1 |
|
|
|
|
|
|
|
|
|
|
|
|
|
|
|
|
|
|
|
|
| |
|
|
|
|
Take
advantage of continuously listening to the sounds you have already
selected |
|
|
|
|
|
|
| |
|
|
|
|
while you are
searching for the next sound. |
|
|
|
|
|
|
|
|
|
|
|
|
|
| |
|
|
|
|
|
|
|
|
|
|
|
|
|
|
|
|
|
|
|
|
|
|
|
|
|
| |
|
|
|
From the table of
contents area of the "Events" Workbench page, select the "Bell |
|
|
|
|
|
|
|
| |
|
|
|
Sounds" item. The
"Bell Sounds" page opens. |
|
|
|
|
|
|
|
|
|
|
|
|
|
| |
|
|
|
|
|
|
|
|
|
|
|
|
|
|
|
|
|
|
|
|
|
|
|
|
|
| |
|
|
|
10. From the
eighth animated sound, click the empty sound selector check box right to the
gray |
|
|
|
|
|
| |
|
|
|
"M" button in
order to add this sound to the first sound group of your Sound Trip. |
|
|
|
|
|
|
|
| |
|
|
|
|
|
|
|
|
|
|
|
|
|
|
|
|
|
|
|
|
|
|
|
|
|
| Define Xpression |
|
|
|
11. Now lets
find an "Xpression" that will complete the given sound scenario: |
|
|
|
|
|
|
|
|
| |
|
|
|
From the table of
contents area of the "Xpressions" Workbench page, select the
"Voice |
|
|
|
|
|
| |
|
|
|
Tracks 2" item.
The "Voice Tracks 2" page opens. |
|
|
|
|
|
|
|
|
|
|
|
|
| |
|
|
|
|
|
|
|
|
|
|
|
|
|
|
|
|
|
|
|
|
|
|
|
|
|
| |
|
|
|
12. From the
first animated sound, click the empty sound selector check box right to the
gray |
|
|
|
|
|
| |
|
|
|
"M" button in
order to select this sound for the first sound group of your Sound Trip. |
|
|
|
|
|
|
| |
|
|
|
|
|
|
|
|
|
|
|
|
|
|
|
|
|
|
|
|
|
|
|
|
|
| |
|
|
|
Following is a summary
of the sounds we used for the first group: |
|
|
|
|
|
|
|
|
|
|
| |
|
|
|
|
|
|
|
|
|
|
|
|
|
|
|
|
|
|
|
|
|
|
|
|
|
| |
|
|
|
1st Group |
Catalogue Page |
Sound Position |
Sound # |
|
|
|
|
|
|
|
|
|
| |
|
|
|
|
|
|
|
|
|
|
|
|
|
|
|
|
|
|
|
|
|
|
|
|
|
| |
|
|
|
Figures |
|
Bass Figures |
|
2nd |
|
S9344 |
|
|
|
|
|
|
|
|
|
| |
|
|
|
Layers |
|
Voice Sounds |
|
4th |
|
S19754 |
|
|
|
|
|
|
|
|
|
| |
|
|
|
Events |
|
Bell Sounds |
|
8th |
|
S18371 |
|
|
|
|
|
|
|
|
|
| |
|
|
|
Xpressions |
Voice Tracks 2 |
|
1st |
|
S3408 |
|
|
|
|
|
|
|
|
|
| |
|
|
|
|
|
|
|
|
|
|
|
|
|
|
|
|
|
|
|
|
|
|
|
|
|
| |
|
|
|
TIP |
2 |
|
|
|
|
|
|
|
|
|
|
|
|
|
|
|
|
|
|
|
|
| |
|
|
|
|
The sound
numbers are original Freesound registration numbers. Clicking the |
|
|
|
|
|
|
|
| |
|
|
|
|
"i"
icon at the upper right corner of an animated sound will link directly to
the |
|
|
|
|
|
|
|
| |
|
|
|
|
original
Freesound sound page, including information about the sound, author, |
|
|
|
|
|
|
| |
|
|
|
|
etc. |
|
|
|
|
|
|
|
|
|
|
|
|
|
|
|
|
|
|
|
|
| |
|
|
|
|
|
|
|
|
|
|
|
|
|
|
|
|
|
|
|
|
|
|
|
|
|
| Define 2nd Group |
|
|
|
13. Now it
becomes fairly simple since we are repeating our group selection steps. |
|
|
|
|
|
|
|
| |
|
|
|
For the purpose of our
tutorial, we will plan two further groups that will follow the first one. |
|
|
|
|
|
|
| |
|
|
|
Before we are starting
to do so, in the Figures Workbench page, click the "Add Group" |
|
|
|
|
|
|
| |
|
|
|
function. This will
automatically start a new group at a new line position and add the |
|
|
|
|
|
|
| |
|
|
|
required group controls
as you will see at the end of this tutorial. |
|
|
|
|
|
|
|
|
|
|
| |
|
|
|
|
|
|
|
|
|
|
|
|
|
|
|
|
|
|
|
|
|
|
|
|
|
| |
|
|
|
14. Build the
second group using the below catalogue windows and sounds. For selecting |
|
|
|
|
|
| |
|
|
|
an Animated Sound
again, you need to de-select it first while pressing the right mouse |
|
|
|
|
|
|
| |
|
|
|
button, then select the
sound a second time with the left mouse button (see S18371, which |
|
|
|
|
|
| |
|
|
|
is repeated from Group
1). |
|
|
|
|
|
|
|
|
|
|
|
|
|
|
|
|
| |
|
|
|
|
|
|
|
|
|
|
|
|
|
|
|
|
|
|
|
|
|
|
|
|
|
| |
|
|
|
2nd Group |
Catalogue Page |
Sound Position |
Sound # |
|
|
|
|
|
|
|
|
|
| |
|
|
|
|
|
|
|
|
|
|
|
|
|
|
|
|
|
|
|
|
|
|
|
|
|
| |
|
|
|
Figures |
|
Voice Tracks 2 |
|
3rd |
|
S19731 |
|
|
|
|
|
|
|
|
|
| |
|
|
|
Layers |
|
Noise Tones |
|
3rd |
|
S3998 |
|
|
|
|
|
|
|
|
|
| |
|
|
|
Events |
|
Bell Sounds |
|
8th |
|
S18371 |
|
|
|
|
|
|
|
|
|
| |
|
|
|
Xpressions |
Physical Sounds |
|
3rd |
|
S19694 |
|
|
|
|
|
|
|
|
|
| |
|
|
|
|
|
|
|
|
|
|
|
|
|
|
|
|
|
|
|
|
|
|
|
|
|
| Define 3rd Group |
|
|
|
15. Build the
third group using the below catalogue windows and sounds (don't forget |
|
|
|
|
|
|
| |
|
|
|
activating the
"Add Group" button first). In order to reach a sound that is
currently not |
|
|
|
|
|
|
| |
|
|
|
displayed at the
indicated position (see Xpressions, 3rd sound below, where S19693 is |
|
|
|
|
|
| |
|
|
|
required), scroll
through the Animated Sound using the left second gray button on the |
|
|
|
|
|
|
| |
|
|
|
sound graphics (see
Figure below). For more information about playing Animated |
|
|
|
|
|
|
| |
|
|
|
Sounds visit the
"Playing Sound Trips" section below. |
|
|
|
|
|
|
|
|
|
|
|
| |
|
|
|

|
|
|
|
|
|
|
|
|
|
|
|
|
|
|
|
|
|
|
|
|
|
| |
|
|
|
|
|
|
Scrolling through
Animated Sounds |
|
|
|
|
|
|
|
|
|
|
|
|
|
| |
|
|
|
|
|
|
|
|
|
|
|
|
|
|
|
|
|
|
|
|
|
|
|
|
|
| |
|
|
|
|
|
|
|
|
|
|
|
|
|
|
|
|
|
|
|
|
|
|
|
|
|
| |
|
|
|
|
|
|
|
|
|
|
|
|
|
|
|
|
|
|
|
|
|
|
|
|
|
| |
|
|
|
Figure 6: Animated Sound
(5-Sep-06) |
|
|
|
|
|
|
|
|
|
|
|
|
|
|
|
|
| |
|
|
|
|
|
|
|
|
|
|
|
|
|
|
|
|
|
|
|
|
|
|
|
|
|
| |
|
|
|
3rd Group |
Catalogue Page |
Sound Position |
Sound # |
|
|
|
|
|
|
|
|
|
| |
|
|
|
|
|
|
|
|
|
|
|
|
|
|
|
|
|
|
|
|
|
|
|
|
|
| |
|
|
|
Figures |
|
Bass Figures |
|
2nd |
|
S9344 |
|
|
|
|
|
|
|
|
|
| |
|
|
|
Layers |
|
Noise Tones |
|
3rd |
|
S3998 |
|
|
|
|
|
|
|
|
|
| |
|
|
|
Events |
|
Bell Sounds |
|
8th |
|
S18371 |
|
|
|
|
|
|
|
|
|
| |
|
|
|
Xpressions |
Physical Sounds |
|
3rd |
|
S19693 |
|
|
|
|
|
|
|
|
|
| |
|
|
|
|
|
|
|
|
|
|
|
|
|
|
|
|
|
|
|
|
|
|
|
|
|
| Publish |
|
|
|
16. Now we
are ready for publishing. Just click the "Publish" button on the
left of the "Figures" |
|
|
|
|
|
| |
|
|
|
window. After a little
while, the FleXPublisher download warning window will be displayed: |
|
|
|
|
|
| |
|
|
|

|
|
|
|
|
|
|
|
|
|
|
|
|
|
|
|
|
|
|
|
|
|
| Download |
|
|
|
|
|
|
|
|
|
|
|
|
|
|
|
|
|
|
|
|
|
|
|
|
|
| |
|
|
|
|
|
|
|
|
|
|
|
|
|
|
|
|
|
|
|
|
|
|
|
|
|
| |
|
|
|
|
|
|
|
|
|
|
|
|
|
|
|
|
|
|
|
|
|
|
|
|
|
| |
|
|
|
|
|
|
|
|
|
|
|
|
|
|
|
|
|
|
|
|
|
|
|
|
|
| |
|
|
|
|
|
|
|
|
|
|
|
|
|
|
|
|
|
|
|
|
|
|
|
|
|
| |
|
|
|
|
|
|
|
|
|
|
|
|
|
|
|
|
|
|
|
|
|
|
|
|
|
| |
|
|
|
|
|
|
|
|
|
|
|
|
|
|
|
|
|
|
|
|
|
|
|
|
|
| |
|
|
|
|
|
|
|
|
|
|
|
|
|
|
|
|
|
|
|
|
|
|
|
|
|
| |
|
|
|
|
|
|
|
|
|
|
|
|
|
|
|
|
|
|
|
|
|
|
|
|
|
| |
|
|
|
|
|
|
|
|
|
|
|
|
|
|
|
|
|
|
|
|
|
|
|
|
|
| |
|
|
|
|
|
|
|
|
|
|
|
|
|
|
|
|
|
|
|
|
|
|
|
|
|
| |
|
|
|
|
|
|
|
|
|
|
|
|
|
|
|
|
|
|
|
|
|
|
|
|
|
| |
|
|
|
|
|
|
|
|
|
|
|
|
|
|
|
|
|
|
|
|
|
|
|
|
|
| |
|
|
|
|
|
|
|
|
|
|
|
|
|
|
|
|
|
|
|
|
|
|
|
|
|
| |
|
|
|
Figure 7: Download
warning window for FleXPublisher |
|
|
|
|
|
|
|
|
|
|
|
|
|
| |
|
|
|
|
|
|
|
|
|
|
|
|
|
|
|
|
|
|
|
|
|
|
|
|
|
| |
|
|
|
TIP |
3 |
|
|
|
|
|
|
|
|
|
|
|
|
|
|
|
|
|
|
|
|
| |
|
|
|
|
Make sure
that all Animated Sounds stopped playing before you start publishing. |
|
|
|
|
|
|
| |
|
|
|
|
(Interfering
clipboard functions may impact publishing functions.) |
|
|
|
|
|
|
|
|
|
| |
|
|
|
|
|
|
|
|
|
|
|
|
|
|
|
|
|
|
|
|
|
|
|
|
|
| |
|
|
|
17. Press the
"Run" button to launch the FleXPublisher download that will allow
to |
|
|
|
|
|
|
|
| |
|
|
|
execute the program on
your computer. The File Download window appears: |
|
|
|
|
|
|
|
| |
|
|
|
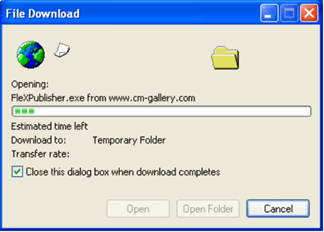
|
|
|
|
|
|
|
|
|
|
|
|
|
|
|
|
|
|
|
|
|
|
| |
|
|
|
|
|
|
|
|
|
|
|
|
|
|
|
|
|
|
|
|
|
|
|
|
|
| |
|
|
|
|
|
|
|
|
|
|
|
|
|
|
|
|
|
|
|
|
|
|
|
|
|
| |
|
|
|
|
|
|
|
|
|
|
|
|
|
|
|
|
|
|
|
|
|
|
|
|
|
| |
|
|
|
|
|
|
|
|
|
|
|
|
|
|
|
|
|
|
|
|
|
|
|
|
|
| |
|
|
|
|
|
|
|
|
|
|
|
|
|
|
|
|
|
|
|
|
|
|
|
|
|
| |
|
|
|
|
|
|
|
|
|
|
|
|
|
|
|
|
|
|
|
|
|
|
|
|
|
| |
|
|
|
|
|
|
|
|
|
|
|
|
|
|
|
|
|
|
|
|
|
|
|
|
|
| |
|
|
|
|
|
|
|
|
|
|
|
|
|
|
|
|
|
|
|
|
|
|
|
|
|
| |
|
|
|
|
|
|
|
|
|
|
|
|
|
|
|
|
|
|
|
|
|
|
|
|
|
| |
|
|
|
|
|
|
|
|
|
|
|
|
|
|
|
|
|
|
|
|
|
|
|
|
|
| |
|
|
|
|
|
|
|
|
|
|
|
|
|
|
|
|
|
|
|
|
|
|
|
|
|
| |
|
|
|
|
|
|
|
|
|
|
|
|
|
|
|
|
|
|
|
|
|
|
|
|
|
| |
|
|
|
|
|
|
|
|
|
|
|
|
|
|
|
|
|
|
|
|
|
|
|
|
|
| |
|
|
|
|
|
|
|
|
|
|
|
|
|
|
|
|
|
|
|
|
|
|
|
|
|
| |
|
|
|
Figure 8: File Download
window for FleXPublisher |
|
|
|
|
|
|
|
|
|
|
|
|
|
|
| |
|
|
|
|
|
|
|
|
|
|
|
|
|
|
|
|
|
|
|
|
|
|
|
|
|
| |
|
|
|
Wait until the download has been finished. Then,
the browsers' security warning |
|
|
|
|
|
|
|
| |
|
|
|
window will appear (may
vary if you use another browser): |
|
|
|
|
|
|
|
|
|
|
|
| |
|
|
|
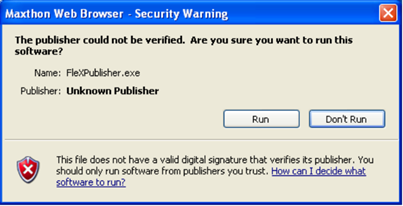
|
|
|
|
|
|
|
|
|
|
|
|
|
|
|
|
|
|
|
|
|
|
| Execute |
|
|
|
|
|
|
|
|
|
|
|
|
|
|
|
|
|
|
|
|
|
|
|
|
|
| |
|
|
|
|
|
|
|
|
|
|
|
|
|
|
|
|
|
|
|
|
|
|
|
|
|
| |
|
|
|
|
|
|
|
|
|
|
|
|
|
|
|
|
|
|
|
|
|
|
|
|
|
| |
|
|
|
|
|
|
|
|
|
|
|
|
|
|
|
|
|
|
|
|
|
|
|
|
|
| |
|
|
|
|
|
|
|
|
|
|
|
|
|
|
|
|
|
|
|
|
|
|
|
|
|
| |
|
|
|
|
|
|
|
|
|
|
|
|
|
|
|
|
|
|
|
|
|
|
|
|
|
| |
|
|
|
|
|
|
|
|
|
|
|
|
|
|
|
|
|
|
|
|
|
|
|
|
|
| |
|
|
|
|
|
|
|
|
|
|
|
|
|
|
|
|
|
|
|
|
|
|
|
|
|
| |
|
|
|
|
|
|
|
|
|
|
|
|
|
|
|
|
|
|
|
|
|
|
|
|
|
| |
|
|
|
|
|
|
|
|
|
|
|
|
|
|
|
|
|
|
|
|
|
|
|
|
|
| |
|
|
|
|
|
|
|
|
|
|
|
|
|
|
|
|
|
|
|
|
|
|
|
|
|
| |
|
|
|
|
|
|
|
|
|
|
|
|
|
|
|
|
|
|
|
|
|
|
|
|
|
| |
|
|
|
Figure 9: Maxthon Web
Browser security warning window for FleXPublisher |
|
|
|
|
|
|
|
|
|
|
| |
|
|
|
|
|
|
|
|
|
|
|
|
|
|
|
|
|
|
|
|
|
|
|
|
|
| |
|
|
|
TIP |
4 |
|
|
|
|
|
|
|
|
|
|
|
|
|
|
|
|
|
|
|
|
| |
|
|
|
|
The second
time you request the FleX Publisher, a locally stored version will be |
|
|
|
|
|
|
| |
|
|
|
|
automatically
opened, saving you the first time downloading time. |
|
|
|
|
|
|
|
|
|
| |
|
|
|
|
|
|
|
|
|
|
|
|
|
|
|
|
|
|
|
|
|
|
|
|
|
| |
|
|
|
18. Press the
"Run" button to launch the FleXPublisher application that will
allow you to |
|
|
|
|
|
|
| |
|
|
|
store your Sound Trip
onto your computer. After a little while, the "Save My Sound Trip" |
|
|
|
|
|
|
| |
|
|
|
window appears: |
|
|
|
|
|
|
|
|
|
|
|
|
|
|
|
|
|
|
| |
|
|
|
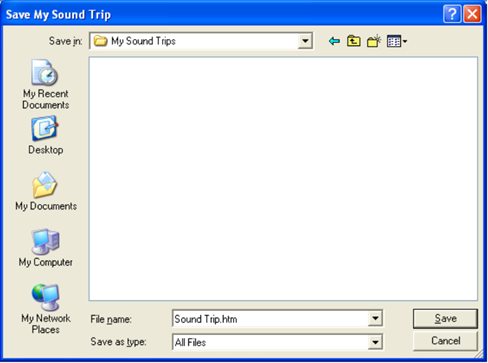
|
|
|
|
|
|
|
|
|
|
|
|
|
|
|
|
|
|
|
|
|
|
| Save |
|
|
|
|
|
|
|
|
|
|
|
|
|
|
|
|
|
|
|
|
|
|
|
|
|
| |
|
|
|
|
|
|
|
|
|
|
|
|
|
|
|
|
|
|
|
|
|
|
|
|
|
| |
|
|
|
|
|
|
|
|
|
|
|
|
|
|
|
|
|
|
|
|
|
|
|
|
|
| |
|
|
|
|
|
|
|
|
|
|
|
|
|
|
|
|
|
|
|
|
|
|
|
|
|
| |
|
|
|
|
|
|
|
|
|
|
|
|
|
|
|
|
|
|
|
|
|
|
|
|
|
| |
|
|
|
|
|
|
|
|
|
|
|
|
|
|
|
|
|
|
|
|
|
|
|
|
|
| |
|
|
|
|
|
|
|
|
|
|
|
|
|
|
|
|
|
|
|
|
|
|
|
|
|
| |
|
|
|
|
|
|
|
|
|
|
|
|
|
|
|
|
|
|
|
|
|
|
|
|
|
| |
|
|
|
|
|
|
|
|
|
|
|
|
|
|
|
|
|
|
|
|
|
|
|
|
|
| |
|
|
|
|
|
|
|
|
|
|
|
|
|
|
|
|
|
|
|
|
|
|
|
|
|
| |
|
|
|
|
|
|
|
|
|
|
|
|
|
|
|
|
|
|
|
|
|
|
|
|
|
| |
|
|
|
|
|
|
|
|
|
|
|
|
|
|
|
|
|
|
|
|
|
|
|
|
|
| |
|
|
|
|
|
|
|
|
|
|
|
|
|
|
|
|
|
|
|
|
|
|
|
|
|
| |
|
|
|
|
|
|
|
|
|
|
|
|
|
|
|
|
|
|
|
|
|
|
|
|
|
| |
|
|
|
|
|
|
|
|
|
|
|
|
|
|
|
|
|
|
|
|
|
|
|
|
|
| |
|
|
|
|
|
|
|
|
|
|
|
|
|
|
|
|
|
|
|
|
|
|
|
|
|
| |
|
|
|
|
|
|
|
|
|
|
|
|
|
|
|
|
|
|
|
|
|
|
|
|
|
| |
|
|
|
|
|
|
|
|
|
|
|
|
|
|
|
|
|
|
|
|
|
|
|
|
|
| |
|
|
|
|
|
|
|
|
|
|
|
|
|
|
|
|
|
|
|
|
|
|
|
|
|
| |
|
|
|
|
|
|
|
|
|
|
|
|
|
|
|
|
|
|
|
|
|
|
|
|
|
| |
|
|
|
|
|
|
|
|
|
|
|
|
|
|
|
|
|
|
|
|
|
|
|
|
|
| |
|
|
|
Figure 10: "Save My
Sound Trip" window |
|
|
|
|
|
|
|
|
|
|
|
|
|
|
|
| |
|
|
|
|
|
|
|
|
|
|
|
|
|
|
|
|
|
|
|
|
|
|
|
|
|
| |
|
|
|
Browse to the required
location, change the file name into "Here we go.htm" and press the |
|
|
|
|
|
| |
|
|
|
"Save"
button. Your Sound Trip will be saved to your hard drive and the Sound Trip
will be |
|
|
|
|
|
| |
|
|
|
automatically opened by
the browser. Note that the Sound Trip title will be automatically set |
|
|
|
|
|
| |
|
|
|
to the file name unlike
presented by the "Title Option" which will be described in the |
|
|
|
|
|
|
| |
|
|
|
Publishing chapter. |
|
|
|
|
|
|
|
|
|
|
|
|
|
|
|
|
|
|
| |
|
|
|
|
|
|
|
|
|
|
|
|
|
|
|
|
|
|
|
|
|
|
|
|
|
| |
|
|
|
The resulting screen is
shown in the following "Playing Sound Trips" section. There you
will |
|
|
|
|
|
| |
|
|
|
also learn how to
instantly listen to and control your Sound Trip. |
|
|
|
|
|
|
|
|
|
|
| |
|
|
|
|
|
|
|
|
|
|
|
|
|
|
|
|
|
|
|
|
|
|
|
|
|
| |
|
|
|
An Internet copy of the
sound trip is available through the link on the right side. |
|
>> |
|
|
|
|
|
| |
|
|
|
You may open it to
compare it with your own creation. |
|
|
|
|
|
|
|
|
|
|
|
|
| |
|
|
|
|
|
|
|
|
|
|
|
|
|
|
|
|
|
|
|
|
|
|
|
|
|
| |
|
|
|
|
|
|
|
|
|
|
|
|
|
|
|
|
|
|
|
|
|
|
|
|
|
| Playing Trips |
|
|
|
After you
saved your Sound Trip as described above, the Sound Trip will automatically |
|
|
|
|
|
|
| |
|
|
|
be opened by
your browser and be ready for play (your display may differ according to |
|
|
|
|
|
|
| |
|
|
|
varying
preferences that can be changed as described in the following
"Publishing" |
|
|
|
|
|
|
| |
|
|
|
chapter): |
|
|
|
|
|
|
|
|
|
|
|
|
|
|
|
|
|
|
|
|
| |
|
|
|
|
|
|
|
|
|
|
|
|
|
|
|
|
|
|
|
|
|
|
|
|
|
| |
|
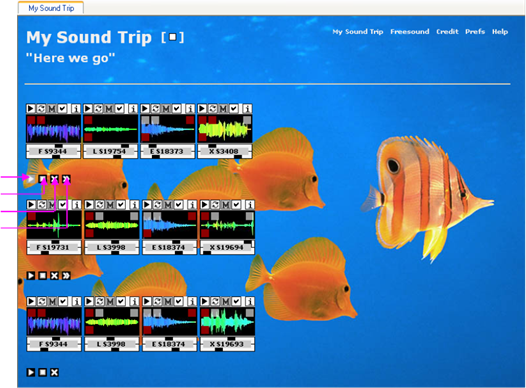
|
|
|
|
|
|
|
|
|
|
|
|
|
|
|
|
|
|
|
|
|
|
|
|
| |
|
|
|
|
|
|
|
|
|
|
|
|
|
|
|
|
|
|
|
|
|
|
|
|
|
| |
|
|
|
|
|
|
|
|
|
|
|
|
|
|
|
|
|
|
|
|
|
|
|
|
|
| |
|
|
|
|
|
|
|
|
|
|
|
|
|
|
|
|
|
|
|
|
|
|
|
|
|
| |
|
|
|
|
|
|
|
|
|
|
|
|
|
|
|
|
|
|
|
|
|
|
|
|
|
| |
|
|
|
|
|
|
|
|
|
|
|
|
|
|
|
|
|
|
|
|
|
|
|
|
|
| |
|
|
|
|
|
|
|
|
|
|
|
|
|
|
|
|
|
|
|
|
|
|
|
|
|
| |
|
|
|
|
|
|
|
|
|
|
|
|
|
|
|
|
|
|
|
|
|
|
|
|
|
| |
|
|
|
|
|
|
|
|
|
|
|
|
|
|
|
|
|
|
|
|
|
|
|
|
|
| |
|
|
|
|
|
|
|
|
|
|
|
|
|
|
|
|
|
|
|
|
|
|
|
|
|
| Play Group |
|
|
|
|
|
|
|
|
|
|
|
|
|
|
|
|
|
|
|
|
|
|
|
|
|
| Stop Group |
|
|
|
|
|
|
|
|
|
|
|
|
|
|
|
|
|
|
|
|
|
|
|
|
|
| Reset Group |
|
|
|
|
|
|
|
|
|
|
|
|
|
|
|
|
|
|
|
|
|
|
|
|
|
| Forward
Group |
|
|
|
|
|
|
|
|
|
|
|
|
|
|
|
|
|
|
|
|
|
|
|
|
| |
|
|
|
|
|
|
|
|
|
|
|
|
|
|
|
|
|
|
|
|
|
|
|
|
|
| |
|
|
|
|
|
|
|
|
|
|
|
|
|
|
|
|
|
|
|
|
|
|
|
|
|
| |
|
|
|
|
|
|
|
|
|
|
|
|
|
|
|
|
|
|
|
|
|
|
|
|
|
| |
|
|
|
|
|
|
|
|
|
|
|
|
|
|
|
|
|
|
|
|
|
|
|
|
|
| |
|
|
|
|
|
|
|
|
|
|
|
|
|
|
|
|
|
|
|
|
|
|
|
|
|
| |
|
|
|
|
|
|
|
|
|
|
|
|
|
|
|
|
|
|
|
|
|
|
|
|
|
| |
|
|
|
|
|
|
|
|
|
|
|
|
|
|
|
|
|
|
|
|
|
|
|
|
|
| |
|
|
|
|
|
|
|
|
|
|
|
|
|
|
|
|
|
|
|
|
|
|
|
|
|
| |
|
|
|
|
|
|
|
|
|
|
|
|
|
|
|
|
|
|
|
|
|
|
|
|
|
| |
|
|
|
Figure 11: Sound Trip
publishing result |
|
|
|
|
|
|
|
|
|
|
|
|
|
|
|
|
| |
|
|
|
|
|
|
|
|
|
|
|
|
|
|
|
|
|
|
|
|
|
|
|
|
|
| PLAY SOUND TRIP |
|
|
|
To play your
first Sound Trip: |
|
|
|
|
|
|
|
|
|
|
|
|
|
|
|
|
| |
|
|
|
|
|
|
|
|
|
|
|
|
|
|
|
|
|
|
|
|
|
|
|
|
|
| |
|
|
|
1. The
easiest way to play a Sound Trip is to play one group after the other. By
default, the first |
|
|
|
|
|
| |
|
|
|
"Play Group"
button blinks as soon as the Sound Page is loaded. Click this button to play
the |
|
|
|
|
|
| |
|
|
|
first group. The first
"Forward Group" button starts now blinking. |
|
|
|
|
|
|
|
|
|
|
| |
|
|
|
|
|
|
|
|
|
|
|
|
|
|
|
|
|
|
|
|
|
|
|
|
|
| |
|
|
|
2. Click the
first "Forward Group" button (blinking). The first group stops and
the second group |
|
|
|
|
|
| |
|
|
|
starts playing. The
second "Forward Group" button starts blinking. |
|
|
|
|
|
|
|
|
|
| |
|
|
|
|
|
|
|
|
|
|
|
|
|
|
|
|
|
|
|
|
|
|
|
|
|
| |
|
|
|
3. Click the
second "Forward Group" button (blinking). The second group stops
and the third |
|
|
|
|
|
| |
|
|
|
group starts playing.
The last (third) "Stop Group" button starts blinking. |
|
|
|
|
|
|
|
|
| |
|
|
|
|
|
|
|
|
|
|
|
|
|
|
|
|
|
|
|
|
|
|
|
|
|
| |
|
|
|
4. Click the
last "Stop Group" button (blinking). The third group stops - the
Sound Trip has being |
|
|
|
|
| |
|
|
|
played. To play the
Sound Trip again, press the buttons again as described above (without |
|
|
|
|
|
| |
|
|
|
blinking). You can also
refresh the browser window first while pressing the F5 key. |
|
|
|
|
|
|
|
| |
|
|
|
|
|
|
|
|
|
|
|
|
|
|
|
|
|
|
|
|
|
|
|
|
|
| Stop with "Play
Group" |
|
|
|
TIP |
1 |
|
|
|
|
|
|
|
|
|
|
|
|
|
|
|
|
|
|
|
|
| |
|
|
|
|
In order to
stop a group, you can also press the "Play Group" button again. |
|
|
|
|
|
|
|
| |
|
|
|
|
|
|
|
|
|
|
|
|
|
|
|
|
|
|
|
|
|
|
|
|
|
| |
|
|
|
For further information
on how to play Sound Pages or Animated Sounds visit the following |
|
|
|
|
|
| |
|
|
|
"Tips"
section and the "Publishing" chapter below. |
|
|
|
|
|
|
|
|
|
|
|
|
| |
|
|
|
|
|
|
|
|
|
|
|
|
|
|
|
|
|
|
|
|
|
|
|
|
|
| |
|
|
|
|
|
|
|
|
|
|
|
|
|
|
|
|
|
|
|
|
|
|
|
|
|
| Further Tips |
|
|
|
The following are a few
recommendations for assembling Animated Sounds with |
|
|
|
|
|
|
|
| |
|
|
|
the Workbench: |
|
|
|
|
|
|
|
|
|
|
|
|
|
|
|
|
|
|
|
| |
|
|
|
|
|
|
|
|
|
|
|
|
|
|
|
|
|
|
|
|
|
|
|
|
|
| Assembling Sounds |
|
|
|
TIP |
1 |
|
|
|
|
|
|
|
|
|
|
|
|
|
|
|
|
|
|
|
|
| |
|
|
|
|
Take your
time browsing through the Sound Park in order to know better |
|
|
|
|
|
|
|
|
| |
|
|
|
|
each of the
Animated Sounds. It requires patience to find really good |
|
|
|
|
|
|
|
|
| |
|
|
|
|
combinations. |
|
|
|
|
|
|
|
|
|
|
|
|
|
|
|
|
|
|
| |
|
|
|
|
|
|
|
|
|
|
|
|
|
|
|
|
|
|
|
|
|
|
|
|
|
| |
|
|
|
TIP |
2 |
|
|
|
|
|
|
|
|
|
|
|
|
|
|
|
|
|
|
|
|
| |
|
|
|
|
Building simultaneous
groups of each of the four FleX categories will help you |
|
|
|
|
|
|
|
| |
|
|
|
|
to find a
good sounding musical panorama. However, feel free to play |
|
|
|
|
|
|
|
|
| |
|
|
|
|
around with any
combination you may like. Consider using the same sound |
|
|
|
|
|
|
|
| |
|
|
|
|
multiple times. |
|
|
|
|
|
|
|
|
|
|
|
|
|
|
|
|
|
|
| |
|
|
|
|
|
|
|
|
|
|
|
|
|
|
|
|
|
|
|
|
|
|
|
|
|
| |
|
|
|
TIP |
3 |
|
|
|
|
|
|
|
|
|
|
|
|
|
|
|
|
|
|
|
|
| |
|
|
|
|
You can
preselect sound groups while publishing intermediate Sound |
|
|
|
|
|
|
|
|
| |
|
|
|
|
Pages. This
will ease the access to your preferred combinations for later |
|
|
|
|
|
|
|
| |
|
|
|
|
combinations.
You should use also your browsers' Favorites function. |
|
|
|
|
|
|
|
|
| |
|
|
|
|
|
|
|
|
|
|
|
|
|
|
|
|
|
|
|
|
|
|
|
|
|
| Playing Sounds |
|
|
|
The following
are a few recommendations on how to extend your playing experiences |
|
|
|
|
|
|
| |
|
|
|
with Animated
Sounds and Sound Pages: |
|
|
|
|
|
|
|
|
|
|
|
|
|
|
| |
|
|
|
|
|
|
|
|
|
|
|
|
|
|
|
|
|
|
|
|
|
|
|
|
|
| |
|
|
|
TIP |
4 |
|
|
|
|
|
|
|
|
|
|
|
|
|
|
|
|
|
|
|
|
| |
|
|
|
|
You can
change the order of sound group play by individually controlling the |
|
|
|
|
|
|
|
| |
|
|
|
|
sound group
buttons as displayed in the above figure. |
|
|
|
|
|
|
|
|
|
|
|
| |
|
|
|
|
|
|
|
|
|
|
|
|
|
|
|
|
|
|
|
|
|
|
|
|
|
| |
|
|
|
TIP |
5 |
|
|
|
|
|
|
|
|
|
|
|
|
|
|
|
|
|
|
|
|
| |
|
|
|
|
You can
control each of the sounds individual using a broad set of interactive |
|
|
|
|
|
|
|
| |
|
|
|
|
functions. In
order to learn about these functions, a simple tutorial is available |
|
|
|
|
|
|
|
| |
|
|
|
|
(8 pages)
that allows to interactively experience the given possibilities. |
|
|
|
|
|
|
|
|
| |
|
|
|
|
|
|
|
|
|
|
|
|
|
|
|
|
|
|
|
|
|
|
|
|
|
| |
|
|
|
|
To access the
Animated Sounds tutorial click the button to the right: |
|
|
>> |
|
|
|
|
|
| |
|
|
|
|
|
|
|
|
|
|
|
|
|
|
|
|
|
|
|
|
|
|
|
|
|
| Page Recorder |
|
|
|
TIP |
6 |
|
|
|
|
|
|
|
|
|
|
|
|
|
|
|
|
|
|
|
|
| |
|
|
|
|
You will be
able to record, store, and replay a sequence that you played on the |
|
|
|
|
|
|
| |
|
|
|
|
Sound Page.
For more information visit the "Page Recorder" section of the |
|
|
|
|
|
|
|
| |
|
|
|
|
Publishing
chapter below. |
|
|
|
|
|
|
|
|
|
|
|
|
|
|
|
|
| |
|
|
|
|
|
|
|
|
|
|
|
|
|
|
|
|
|
|
|
|
|
|
|
|
|
| HTML Customizations |
|
|
|
TIP |
7 |
|
|
|
|
|
|
|
|
|
|
|
|
|
|
|
|
|
|
|
|
| |
|
|
|
|
If you are
familiar with HTML programming, you will find useful tips in the following |
|
|
|
|
|
|
| |
|
|
|
|
"Publishing"
chapter on how to influence the playing conditions. You will be able |
|
|
|
|
|
|
| |
|
|
|
|
to: |
|
|
|
|
|
|
|
|
|
|
|
|
|
|
|
|
|
|
|
|
| |
|
|
|
|
|
|
|
|
|
|
|
|
|
|
|
|
|
|
|
|
|
|
|
|
|
| |
|
|
|
|
> |
Change the
initial reference to an Animated Sound manually. |
|
|
|
|
|
|
|
|
|
| |
|
|
|
|
> |
Apply a fixed
sound channel to a playing position. |
|
|
|
|
|
|
|
|
|
|
|
| |
|
|
|
|
> |
Limit a
certain volume maximum value to a playing position. |
|
|
|
|
|
|
|
|
|
| |
|
|
|
|
> |
Define the
"Group button guidance", i.e. the sequence in which blinking |
|
|
|
|
|
|
|
| |
|
|
|
|
|
buttons will
follow one each other. |
|
|
|
|
|
|
|
|
|
|
|
|
|
| |
|
|
|
|
> |
Including a
recorded sequence into your Sound Trip publication. |
|
|
|
|
|
|
|
|
| |
|
|
|
|
> |
Define a set
of Sound Pages to be loaded simultaneously. |
|
|
|
|
|
|
|
|
|
| |
|
|
|
|
|
|
|
|
|
|
|
|
|
|
|
|
|
|
|
|
|
|
|
|
|
| |
|
|
|
|
Other HTML editing
possibilities include: |
|
|
|
|
|
|
|
|
|
|
|
|
|
| |
|
|
|
|
|
|
|
|
|
|
|
|
|
|
|
|
|
|
|
|
|
|
|
|
|
| |
|
|
|
|
> |
Implementation
of Page Info link (only through contact provided below). |
|
|
|
|
|
|
|
| |
|
|
|
|
|
|
|
|
|
|
|
|
|
|
|
|
|
|
|
|
|
|
|
|
|
| Advanced Publishing |
|
|
|
Beside the
above possibilities, a large number of publishing conditions is directly |
|
|
|
|
|
|
|
| |
|
|
|
accessible
using the "Preferences" window as described in the following
chapter. |
|
|
|
|
|
|
|
| |
|
|
|
|
|
|
|
|
|
|
|
|
|
|
|
|
|
|
|
|
|
|
|
|
|
| |
|
|
|
|
|
|
|
|
|
|
|
|
|
|
|
|
|
|
|
|
|
|
|
|
|
| |
|
Publishing |
|
|
|
|
|
|
|
|
|
|
|
|
|
|
|
|
|
|
| |
|
|
|
|
|
|
|
|
|
|
|
|
|
|
|
|
|
|
|
|
|
|
|
|
|
| |
|
|
|
|
|
|
|
|
|
|
|
|
|
|
|
|
|
|
|
|
|
|
|
|
|
| |
|
|
|
Page
Recorder |
|
Preferences |
|
HTML |
|
Shockwave |
|
|
|
|
|
|
|
| |
|
|
|
|
|
|
|
|
|
|
|
|
|
|
|
|
|
|
|
|
|
|
|
|
|
| Introduction |
|
|
|
Further to
the project status as prototype/demo version, the below information is
reduced |
|
|
|
|
|
|
| |
|
|
|
to essential
statements and might be incomplete. The same is valid for the degree of |
|
|
|
|
|
|
| |
|
|
|
testing that
applies to each of the described features. You are expressively invited
to |
|
|
|
|
|
|
| |
|
|
|
contact via
the "Contact" tab at the bottom of the page for any information
that the following |
|
|
|
|
|
| |
|
|
|
chapter
cannot sufficiently provide or for any issues that arise from using the
system. |
|
|
|
|
|
|
| |
|
|
|
|
|
|
|
|
|
|
|
|
|
|
|
|
|
|
|
|
|
|
|
|
|
| |
|
|
|
The chapter
is segmented according to the degree of customization that can be applied |
|
|
|
|
|
|
| |
|
|
|
to the
prototype. These customization levels are sorted by the degree of the
required |
|
|
|
|
|
|
| |
|
|
|
competency: |
|
|
|
|
|
|
|
|
|
|
|
|
|
|
|
|
|
|
|
| |
|
|
|
|
|
|
|
|
|
|
|
|
|
|
|
|
|
|
|
|
|
|
|
|
|
| Expertise Levels |
|
|
|
Level |
Technique |
Expertise |
|
|
|
|
|
|
|
|
|
|
|
|
|
|
|
| |
|
|
|
|
|
|
|
|
|
|
|
|
|
|
|
|
|
|
|
|
|
|
|
|
|
| |
|
|
|
1 |
|
Recording |
Shockwave
applets directly applied through the browser. |
|
|
|
|
|
|
| |
|
|
|
2 |
|
Preferences |
Shockwave
applets directly applied through the browser. |
|
|
|
|
|
|
| |
|
|
|
3 |
|
HTML |
|
Advanced HTML
changes. |
|
|
|
|
|
|
|
|
|
|
|
|
| |
|
|
|
4 |
|
Shockwave |
Parameter
changes within fixed Shockwave movie model. |
|
|
|
|
|
|
| |
|
|
|
|
|
|
|
|
|
|
|
|
|
|
|
|
|
|
|
|
|
|
|
|
|
| |
|
|
|
5 |
|
Programming |
Lingo, sound
programming references, etc., see "Library" |
|
|
|
|
|
|
| |
|
|
|
|
|
|
|
|
chapter. |
|
|
|
|
|
|
|
|
|
|
|
|
|
|
|
| |
|
|
|
|
|
|
|
|
|
|
|
|
|
|
|
|
|
|
|
|
|
|
|
|
|
| |
|
|
|
|
|
|
|
|
|
|
|
|
|
|
|
|
|
|
|
|
|
|
|
|
|
| Page Recorder |
|
|
|
The following
tutorial describes how to instantly record, play, and store any Sound |
|
|
|
|
|
|
|
| |
|
|
|
Trip that you
create through your interaction with simultaneously opened Sound Pages. |
|
|
|
|
|
|
| |
|
|
|
|
|
|
|
|
|
|
|
|
|
|
|
|
|
|
|
|
|
|
|
|
|
| Introduction |
|
|
|
For the sake
of the tour, the Workbench will be used to demonstrate the functionality |
|
|
|
|
|
|
|
| |
|
|
|
of the Page
Recorder. Settings may vary from the screens displayed below. Please
feel |
|
|
|
|
|
|
| |
|
|
|
free to vary
any step described below and to experiment with the Page Recorder |
|
|
|
|
|
|
|
| |
|
|
|
on your own
Sound Pages you published before as described above. |
|
|
|
|
|
|
|
|
|
| |
|
|
|
|
|
|
|
|
|
|
|
|
|
|
|
|
|
|
|
|
|
|
|
|
|
| RECORD |
|
|
|
To record
your first Sound Trip (using the Workbench main pages as example): |
|
|
|
|
|
|
|
| |
|
|
|
|
|
|
|
|
|
|
|
|
|
|
|
|
|
|
|
|
|
|
|
|
|
| Open Pages |
|
|
|
1. Open the
Workbench as described in the "Sound Park"/"Preparation"
chapter. From the four |
|
|
|
|
|
| |
|
|
|
main pages, click
anywhere onto the "Xpressions" window to prepare it for your first
action. |
|
|
|
|
|
| |
|
|
|
The top bar will be
displayed in the activated color (here dark blue): |
|
|
|
|
|
|
|
|
|
| |
|
|
|
|
|
|
|
|
|
|
|
|
| |
|
|
|
|
|
|
|
|
|
|
|
| |
|
|
|
|
|
|
|
|
|
|
|
| |
|
|
|
|
|
|
|
|
|
|
|
| |
|
|
|
|
|
|
|
|
|
|
|
| |
|
|
|
|
|
|
|
|
|
|
|
| |
|
|
|
|
|
|
|
|
|
|
|
| |
|
|
|
|
|
|
|
|
|
|
|
| |
|
|
|
|
|
|
|
|
|
|
|
| |
|
|
|
|
|
|
|
|
|
|
|
| |
|
|
|
|
|
|
|
|
|
|
|
| |
|
|
|
|
|
|
|
|
|
|
|
| |
|
|
|
|
|
|
|
|
|
|
|
| |
|
|
|
|
|
|
|
|
|
|
|
| |
|
|
|
|
|
|
|
|
|
|
|
| |
|
|
|
|
|
|
|
|
|
|
|
| |
|
|
|
Figure 12: Page
Recorder accessed by the Workbench (Xpressions Table of Contents, 10-Sep-06) |
|
|
|
|
|
|
|
| |
|
|
|
|
|
|
|
|
|
|
|
|
|
|
|
|
|
|
|
|
|
|
|
|
|
| Click "Record" |
|
|
|
2. Now you
can click the "Record" button in order to make the Page Recorder
ready to start |
|
|
|
|
|
| |
|
|
|
your first record. |
|
|
|
|
|
|
|
|
|
|
|
|
|
|
|
|
|
|
| |
|
|
|
|
|
|
|
|
|
|
|
|
|
|
|
|
|
|
|
|
|
|
|
|
|
| |
|
|
|
TIP |
1 |
|
|
|
|
|
|
|
|
|
|
|
|
|
|
|
|
|
|
|
|
| |
|
|
|
|
By default -
after loading a page or page set (like the Workbench) - the |
|
|
|
|
|
|
|
|
| |
|
|
|
|
"Record"
button is enabled. However, as soon as any action has been taken, |
|
|
|
|
|
|
|
| |
|
|
|
|
the
"Record" button disables and the "Reset" button must be
used in order |
|
|
|
|
|
|
|
| |
|
|
|
|
to make sure
that all elements are set back to their original position. |
|
|
|
|
|
|
|
|
| |
|
|
|
|
|
|
|
|
|
|
|
|
|
|
|
|
|
|
|
|
|
|
|
|
|
| |
|
|
|
|
Playing from an
undefined status of the elements would not allow to reproduce |
|
|
|
|
|
|
| |
|
|
|
|
correctly the sequence
that has been recorded. |
|
|
|
|
|
|
|
|
|
|
|
|
| |
|
|
|
|
|
|
|
|
|
|
|
|
|
|
|
|
|
|
|
|
|
|
|
|
|
| |
|
|
|
|
In case, the
"Record" button is disabled after you opened the Workbench, |
|
|
|
|
|
|
|
| |
|
|
|
|
you can reset
the page containing the Page Recorder (here "Xpressions"). |
|
|
|
|
|
|
|
| |
|
|
|
|
This will
enable the "Record" button and allow you also in later sessions |
|
|
|
|
|
|
|
|
| |
|
|
|
|
to record
from any page set you want without turning back to the configuration of a |
|
|
|
|
|
|
| |
|
|
|
|
former
recording when clicking on "Reset". You can reset a page using the
F5 button. |
|
|
|
|
|
| |
|
|
|
|
|
|
|
|
|
|
|
|
|
|
|
|
|
|
|
|
|
|
|
|
|
| Play Sequence |
|
|
|
3. As soon as
you start the first action, for instance, if you click into the Animated
Sound |
|
|
|
|
|
|
| |
|
|
|
graphics to let the
sound playing, the Page Recorder starts recording your sequence. |
|
|
|
|
|
|
| |
|
|
|
|
|
|
|
|
|
|
|
|
|
|
|
|
|
|
|
|
|
|
|
|
|
| |
|
|
|
TIP |
2 |
|
|
|
|
|
|
|
|
|
|
|
|
|
|
|
|
|
|
|
|
| |
|
|
|
|
While
recording, you can play on different Sound Pages. For example, you start with |
|
|
|
|
|
| |
|
|
|
|
a Figure from
the Figure page. Once the Figure is running, you move to the Layers |
|
|
|
|
|
|
| |
|
|
|
|
window to add
an Animated Sound for the background. Please note that with |
|
|
|
|
|
|
|
| |
|
|
|
|
each change
to a new page, you must click first anywhere into the window in order to |
|
|
|
|
|
| |
|
|
|
|
activate it.
Then you click for the desired action. |
|
|
|
|
|
|
|
|
|
|
|
|
| |
|
|
|
|
|
|
|
|
|
|
|
|
|
|
|
|
|
|
|
|
|
|
|
|
|
| |
|
|
|
|
Although a
multi-page environment is demonstrated in this tour to show the full |
|
|
|
|
|
|
|
| |
|
|
|
|
capabilities
of the Page Recorder, in most cases, you will probably record from a |
|
|
|
|
|
|
| |
|
|
|
|
single page. |
|
|
|
|
|
|
|
|
|
|
|
|
|
|
|
|
|
|
| |
|
|
|
|
|
|
|
|
|
|
|
|
|
|
|
|
|
|
|
|
|
|
|
|
|
| Click "Stop" |
|
|
|
4. For the
sake of this tour, just activate all four Animated Sounds of the Workbench, |
|
|
|
|
|
|
|
| |
|
|
|
move back to the
Xpressions window and press the "Stop" button on the Page |
|
|
|
|
|
|
|
| |
|
|
|
Recorder pane. Your
first Sound Trip has been recorded. |
|
|
|
|
|
|
|
|
|
|
|
| |
|
|
|
|
|
|
|
|
|
|
|
|
|
|
|
|
|
|
|
|
|
|
|
|
|
| |
|
|
|
TIP |
3 |
|
|
|
|
|
|
|
|
|
|
|
|
|
|
|
|
|
|
|
|
| |
|
|
|
|
After you
recorded a sequence, you can: |
|
|
|
|
|
|
|
|
|
|
|
|
|
| |
|
|
|
|
|
|
|
|
|
|
|
|
|
|
|
|
|
|
|
|
|
|
|
|
|
| |
|
|
|
|
> |
either reset
the Sound Pages in order to play the sequence you just recorded, |
|
|
|
|
|
|
| |
|
|
|
|
> |
or reset the
Sound Pages in order to overdub another sequence to an existing one, |
|
|
|
|
|
| |
|
|
|
|
> |
or store the
sequence you just recorded into one of 10 storage places that are |
|
|
|
|
|
|
| |
|
|
|
|
|
attached to
each Sound Page project. |
|
|
|
|
|
|
|
|
|
|
|
|
|
| |
|
|
|
|
|
|
|
|
|
|
|
|
|
|
|
|
|
|
|
|
|
|
|
|
|
| RESET |
|
|
|
To reset Sound Pages of your first Sound Trip: |
|
|
|
|
|
|
|
|
|
|
|
|
|
| |
|
|
|
|
|
|
|
|
|
|
|
|
|
|
|
|
|
|
|
|
|
|
|
|
|
| Open Pages if needed |
|
|
|
1. Open the
Workbench as described above if it is not already open. |
|
|
|
|
|
|
|
|
|
| |
|
|
|
|
|
|
|
|
|
|
|
|
|
|
|
|
|
|
|
|
|
|
|
|
|
| |
|
|
|
TIP |
4 |
|
|
|
|
|
|
|
|
|
|
|
|
|
|
|
|
|
|
|
|
| |
|
|
|
|
If you reopen
a page set where you recorded a sequence, the Page Recorder that is |
|
|
|
|
|
| |
|
|
|
|
included in
the page set will 'remember' the last sequence you recorded together with
the |
|
|
|
|
| |
|
|
|
|
page set. |
|
|
|
|
|
|
|
|
|
|
|
|
|
|
|
|
|
|
|
| |
|
|
|
|
|
|
|
|
|
|
|
|
|
|
|
|
|
|
|
|
|
|
|
|
|
| Click "Reset" |
|
|
|
2. Click the
"Reset" button to make the Sound Pages ready for play or a new
recording. |
|
|
|
|
|
|
| |
|
|
|
|
|
|
|
|
|
|
|
|
|
|
|
|
|
|
|
|
|
|
|
|
|
| |
|
|
|
TIP |
5 |
|
|
|
|
|
|
|
|
|
|
|
|
|
|
|
|
|
|
|
|
| |
|
|
|
|
The Page
Recorder 'remembers' all Sound Pages that have been involved in a |
|
|
|
|
|
|
| |
|
|
|
|
recording. If
you click the "Reset" button and pages would be missing, the
Page |
|
|
|
|
|
|
| |
|
|
|
|
Recorder will
automatically open them. In the same manner a numbered page will |
|
|
|
|
|
|
| |
|
|
|
|
navigate back
to the original page number that was valid when the recording has been |
|
|
|
|
|
| |
|
|
|
|
started. |
|
|
|
|
|
|
|
|
|
|
|
|
|
|
|
|
|
|
|
| |
|
|
|
|
|
|
|
|
|
|
|
|
|
|
|
|
|
|
|
|
|
|
|
|
|
| |
|
|
|
TIP |
6 |
|
|
|
|
|
|
|
|
|
|
|
|
|
|
|
|
|
|
|
|
| |
|
|
|
|
In order to
start a new recording from a new set of Sound Pages you need to refresh |
|
|
|
|
|
|
| |
|
|
|
|
the Sound
Page that includes the Page Recorder after you opened the new page set. |
|
|
|
|
|
| |
|
|
|
|
Press
"Record" instead of "Reset" and the new set will be
recorded together with the |
|
|
|
|
|
| |
|
|
|
|
new sequence. |
|
|
|
|
|
|
|
|
|
|
|
|
|
|
|
|
|
|
| |
|
|
|
|
|
|
|
|
|
|
|
|
|
|
|
|
|
|
|
|
|
|
|
|
|
| |
|
|
|
TIP |
7 |
|
|
|
|
|
|
|
|
|
|
|
|
|
|
|
|
|
|
|
|
| |
|
|
|
|
If you
navigate pages during your recording, those navigation actions will be
recorded |
|
|
|
|
|
| |
|
|
|
|
and played as
well. However, you must consider download time that applies and that |
|
|
|
|
|
| |
|
|
|
|
may cause
timely mismatches. |
|
|
|
|
|
|
|
|
|
|
|
|
|
|
|
| |
|
|
|
|
|
|
|
|
|
|
|
|
|
|
|
|
|
|
|
|
|
|
|
|
|
| Page Indicator |
|
|
|
3. Watch the
Page Indicator to make sure that all elements of the Pages are downloaded |
|
|
|
|
|
|
| |
|
|
|
into the cache. |
|
|
|
|
|
|
|
|
|
|
|
|
|
|
|
|
|
|
| |
|
|
|
|
|
|
|
|
|
|
|
|
|
|
|
|
|
|
|
|
|
|
|
|
|
| |
|
|
|
TIP |
8 |
|
|
|
|
|
|
|
|
|
|
|
|
|
|
|
|
|
|
|
|
| |
|
|
|
|
If you are
working with multiple pages as in our Workbench example, you must watch |
|
|
|
|
|
| |
|
|
|
|
the Page
Indicator of each Sound Pages simultaneously. As long as a Sound Page is
still |
|
|
|
|
| |
|
|
|
|
in the
process of downloading, other pages still may function with restricted
performance. |
|
|
|
|
|
| |
|
|
|
|
|
|
|
|
|
|
|
|
|
|
|
|
|
|
|
|
|
|
|
|
|
| |
|
|
|
|
Once you open
the same Sound Page again, the downloaded sounds are still stored |
|
|
|
|
|
| |
|
|
|
|
in the cache
and the activation time will be reduced to a minimum. |
|
|
|
|
|
|
|
|
|
| |
|
|
|
|
|
|
|
|
|
|
|
|
|
|
|
|
|
|
|
|
|
|
|
|
|
| PLAY |
|
|
|
To play the
sequence of your first Sound Trip: |
|
|
|
|
|
|
|
|
|
|
|
|
|
| |
|
|
|
|
|
|
|
|
|
|
|
|
|
|
|
|
|
|
|
|
|
|
|
|
|
| Click "Play" to
play |
|
|
|
1. Click the
"Play" button to play the sequence you recorded. During this time
you can further |
|
|
|
|
|
| |
|
|
|
apply actions to
Animated Sounds and Sound Pages. |
|
|
|
|
|
|
|
|
|
|
|
| |
|
|
|
|
|
|
|
|
|
|
|
|
|
|
|
|
|
|
|
|
|
|
|
|
|
| |
|
|
|
TIP |
9 |
|
|
|
|
|
|
|
|
|
|
|
|
|
|
|
|
|
|
|
|
| |
|
|
|
|
Scheduled
(automated) links of Animated Sounds are disabled during play. |
|
|
|
|
|
|
|
| |
|
|
|
|
|
|
|
|
|
|
|
|
|
|
|
|
|
|
|
|
|
|
|
|
|
| Click "Play" to
pause |
|
|
|
2. Click the
"Play" button again if you want to pause the current play. The
"Play" button |
|
|
|
|
|
|
| |
|
|
|
turns into the
"Pause" symbol and the sequence is on hold. During this period of
time you |
|
|
|
|
|
| |
|
|
|
still can continue
playing manually and all automated functions of the Animated Sounds are |
|
|
|
|
|
| |
|
|
|
enabled. |
|
|
|
|
|
|
|
|
|
|
|
|
|
|
|
|
|
|
|
| |
|
|
|
|
|
|
|
|
|
|
|
|
|
|
|
|
|
|
|
|
|
|
|
|
|
| Click "Play"
to |
|
|
|
3. Click the
"Play" button again if you want to continue the current play. The
"Play" button |
|
|
|
|
|
|
| continue |
|
|
|
turns back into the
"Play" symbol and the sequence is being continued. |
|
|
|
|
|
|
|
|
| |
|
|
|
|
|
|
|
|
|
|
|
|
|
|
|
|
|
|
|
|
|
|
|
|
|
| Click "Stop" to
end |
|
|
|
4. Click the
"Stop" button if you want to
stop the current play. If you want to play the sequence |
|
|
|
|
|
| |
|
|
|
again from the
beginning, you must first click the "Reset" key as described above. |
|
|
|
|
|
|
| |
|
|
|
|
|
|
|
|
|
|
|
|
|
|
|
|
|
|
|
|
|
|
|
|
|
| |
|
|
|
TIP |
10 |
|
|
|
|
|
|
|
|
|
|
|
|
|
|
|
|
|
|
|
|
| |
|
|
|
|
The sequence
stops automatically when its end is reached. |
|
|
|
|
|
|
|
|
|
|
| |
|
|
|
|
|
|
|
|
|
|
|
|
|
|
|
|
|
|
|
|
|
|
|
|
|
| OVERDUB |
|
|
|
To overdub a
new track to your existing sequence: |
|
|
|
|
|
|
|
|
|
|
|
|
| |
|
|
|
|
|
|
|
|
|
|
|
|
|
|
|
|
|
|
|
|
|
|
|
|
|
| Click "Record" |
|
|
|
1. Click the
"Record" button in order to make the Page Recorder ready to start
the overdub |
|
|
|
|
|
| |
|
|
|
recording. |
|
|
|
|
|
|
|
|
|
|
|
|
|
|
|
|
|
|
|
| |
|
|
|
|
|
|
|
|
|
|
|
|
|
|
|
|
|
|
|
|
|
|
|
|
|
| Click "Play"
to |
|
|
|
2. Before
undertaking any other action on the pages, click immediately the
"Play" button |
|
|
|
|
|
|
| start overdub |
|
|
|
to record the new track
to your existing sequence. The "Play" button will turn into red in
order |
|
|
|
|
|
| |
|
|
|
to indicate that a
overdub recording is taking place. |
|
|
|
|
|
|
|
|
|
|
|
|
| |
|
|
|
|
|
|
|
|
|
|
|
|
|
|
|
|
|
|
|
|
|
|
|
|
|
| |
|
|
|
3. Now play
the new sequence that will be merged into the existing recording. All
automated |
|
|
|
|
|
| |
|
|
|
functions of the
Animated Sounds are being disabled. |
|
|
|
|
|
|
|
|
|
|
|
| |
|
|
|
|
|
|
|
|
|
|
|
|
|
|
|
|
|
|
|
|
|
|
|
|
|
| Click "Play" to
pause |
|
|
|
4. Click the
"Play" button again if you want to pause the current play. The
"Play" button |
|
|
|
|
|
|
| |
|
|
|
turns into a red
"Pause" symbol and the sequence is on hold. During this period of
time you |
|
|
|
|
|
| |
|
|
|
can still continue
recording manually while all automated functions of the Animated Sounds |
|
|
|
|
|
| |
|
|
|
are enabled. |
|
|
|
|
|
|
|
|
|
|
|
|
|
|
|
|
|
|
|
| |
|
|
|
|
|
|
|
|
|
|
|
|
|
|
|
|
|
|
|
|
|
|
|
|
|
| Click "Play"
to |
|
|
|
5. Click the
"Play" button again if you want to continue to insert the paused
sequence into |
|
|
|
|
|
|
| continue |
|
|
|
the current overdub
recording. The "Play" button turns back into the "Play"
symbol and the |
|
|
|
|
|
| |
|
|
|
sequence is being
continued. |
|
|
|
|
|
|
|
|
|
|
|
|
|
|
|
|
| |
|
|
|
|
|
|
|
|
|
|
|
|
|
|
|
|
|
|
|
|
|
|
|
|
|
| Click "Stop" to
end |
|
|
|
6. Click
"Stop" to finish the overdub recording. |
|
|
|
|
|
|
|
|
|
|
|
|
|
| |
|
|
|
|
|
|
|
|
|
|
|
|
|
|
|
|
|
|
|
|
|
|
|
|
|
| |
|
|
|
TIP |
11 |
|
|
|
|
|
|
|
|
|
|
|
|
|
|
|
|
|
|
|
|
| |
|
|
|
|
The sequence
that is played during an overdub recording will not cause an automatic
stop |
|
|
|
|
| |
|
|
|
|
when its end
is reached. This allows you to continue with the recording as long as you
wish. |
|
|
|
|
| |
|
|
|
|
|
|
|
|
|
|
|
|
|
|
|
|
|
|
|
|
|
|
|
|
|
| |
|
|
|
|
You can
perform as many overdub sessions onto the same recording as you want. This |
|
|
|
|
|
| |
|
|
|
|
might be
especially useful if you plan to add further control to existing playing
sounds, for |
|
|
|
|
|
| |
|
|
|
|
example by
adding various panorama values or to limit the overall amplitude (right mouse |
|
|
|
|
| |
|
|
|
|
click into the
volume bar). |
|
|
|
|
|
|
|
|
|
|
|
|
|
|
|
|
| |
|
|
|
|
|
|
|
|
|
|
|
|
|
|
|
|
|
|
|
|
|
|
|
|
|
| |
|
|
|
|
However,
there is no undo available for overdub sessions. If you want to keep the
version |
|
|
|
|
| |
|
|
|
|
of your
former sequence, you need to save it first. For more information about
storing and |
|
|
|
|
|
| |
|
|
|
|
retrieving a
recorded sequence, see the following sections. |
|
|
|
|
|
|
|
|
|
|
| |
|
|
|
|
|
|
|
|
|
|
|
|
|
|
|
|
|
|
|
|
|
|
|
|
|
| SAVE |
|
|
|
To save the
sequence of your first Sound Trip: |
|
|
|
|
|
|
|
|
|
|
|
|
|
| |
|
|
|
|
|
|
|
|
|
|
|
|
|
|
|
|
|
|
|
|
|
|
|
|
|
| |
|
|
|
After you
finished recording a sequence you can directly store your sequence together
with |
|
|
|
|
|
| |
|
|
|
the page set
you are working on. |
|
|
|
|
|
|
|
|
|
|
|
|
|
|
|
|
| |
|
|
|
|
|
|
|
|
|
|
|
|
|
|
|
|
|
|
|
|
|
|
|
|
|
| Select Location |
|
|
|
1. Click the
numbered "File ID" button in order to determine the storage
location you would like |
|
|
|
|
|
| |
|
|
|
to place your recording
in. Each click will move the current number one toward, counting from |
|
|
|
|
|
| |
|
|
|
0 to 9 and jumping back
to 0. |
|
|
|
|
|
|
|
|
|
|
|
|
|
|
|
|
| |
|
|
|
|
|
|
|
|
|
|
|
|
|
|
|
|
|
|
|
|
|
|
|
|
|
| |
|
|
|
TIP |
12 |
|
|
|
|
|
|
|
|
|
|
|
|
|
|
|
|
|
|
|
|
| |
|
|
|
|
With each
storage location you are scrolling through and that contains already a |
|
|
|
|
|
|
| |
|
|
|
|
recording,
the "Load" button will be enabled. This indication will prevent you
from |
|
|
|
|
|
|
| |
|
|
|
|
accidentally
overriding a former recording when intending to save a new one. |
|
|
|
|
|
|
|
| |
|
|
|
|
|
|
|
|
|
|
|
|
|
|
|
|
|
|
|
|
|
|
|
|
|
| Click "Save" |
|
|
|
2. Click the
"Save" button in order to store your recording. |
|
|
|
|
|
|
|
|
|
|
|
| |
|
|
|
|
|
|
|
|
|
|
|
|
|
|
|
|
|
|
|
|
|
|
|
|
|
| |
|
|
|
TIP |
13 |
|
|
|
|
|
|
|
|
|
|
|
|
|
|
|
|
|
|
|
|
| |
|
|
|
|
A Page
Recorder is related to the browser page that contains it. This means that for |
|
|
|
|
|
|
| |
|
|
|
|
each Page
Recorder 10 storage locations are available. |
|
|
|
|
|
|
|
|
|
|
| |
|
|
|
|
|
|
|
|
|
|
|
|
|
|
|
|
|
|
|
|
|
|
|
|
|
| |
|
|
|
|
The
"Save" button is disabled if no recording has been created or
loaded that could |
|
|
|
|
|
| |
|
|
|
|
be saved at
the moment. |
|
|
|
|
|
|
|
|
|
|
|
|
|
|
|
|
| |
|
|
|
|
|
|
|
|
|
|
|
|
|
|
|
|
|
|
|
|
|
|
|
|
|
| LOAD |
|
|
|
To load the
sequence of your first Sound Trip: |
|
|
|
|
|
|
|
|
|
|
|
|
|
| |
|
|
|
|
|
|
|
|
|
|
|
|
|
|
|
|
|
|
|
|
|
|
|
|
|
| Select Location |
|
|
|
1. Click the
numbered "File ID" button in order to determine the storage
location you would like |
|
|
|
|
|
| |
|
|
|
to load a recording
from. Each click will move the current number one toward, counting from |
|
|
|
|
|
| |
|
|
|
0 to 9 and jumping back
to 0. |
|
|
|
|
|
|
|
|
|
|
|
|
|
|
|
|
| |
|
|
|
|
|
|
|
|
|
|
|
|
|
|
|
|
|
|
|
|
|
|
|
|
|
| Click "Load" |
|
|
|
2. Click the
"Load" button to load the recording for playing, overdub recording,
or publishing. |
|
|
|
|
|
| |
|
|
|
|
|
|
|
|
|
|
|
|
|
|
|
|
|
|
|
|
|
|
|
|
|
| |
|
|
|
TIP |
14 |
|
|
|
|
|
|
|
|
|
|
|
|
|
|
|
|
|
|
|
|
| |
|
|
|
|
The
"Load" button will be disabled if there was no recording saved into
the relevant |
|
|
|
|
|
|
| |
|
|
|
|
storage
location. |
|
|
|
|
|
|
|
|
|
|
|
|
|
|
|
|
|
| |
|
|
|
|
|
|
|
|
|
|
|
|
|
|
|
|
|
|
|
|
|
|
|
|
|
| |
|
|
|
|
In order to
play the loaded recording, you need to reset the page set first (see
description |
|
|
|
|
|
| |
|
|
|
|
above). |
|
|
|
|
|
|
|
|
|
|
|
|
|
|
|
|
|
|
|
| |
|
|
|
|
|
|
|
|
|
|
|
|
|
|
|
|
|
|
|
|
|
|
|
|
|
| PUBLISH |
|
|
|
To publish
the sequence with a new Sound Trip project (advanced users): |
|
|
|
|
|
|
|
|
| |
|
|
|
|
|
|
|
|
|
|
|
|
|
|
|
|
|
|
|
|
|
|
|
|
|
| Introduction |
|
|
|
You can
publish your sequence with a new Sound Trip project. That will allow everyone
that |
|
|
|
|
|
| |
|
|
|
opens your
Sound Trip to exactly follow the Sound Trip sequence as you intended it to
be. |
|
|
|
|
|
| |
|
|
|
To enable
your audience to play the sequence you will need to include the Page Recorder |
|
|
|
|
|
| |
|
|
|
into your
publication as well. |
|
|
|
|
|
|
|
|
|
|
|
|
|
|
|
|
| |
|
|
|
|
|
|
|
|
|
|
|
|
|
|
|
|
|
|
|
|
|
|
|
|
|
| |
|
|
|
The general
way to achieve this powerful way of publishing is to define first your Sound
Trip, |
|
|
|
|
|
| |
|
|
|
to publish it
together with the Page Recorder, to record your sequence within the new
published |
|
|
|
|
| |
|
|
|
Sound Trip
and to re-publish it again including your recorded sequence. |
|
|
|
|
|
|
|
|
|
| |
|
|
|
|
|
|
|
|
|
|
|
|
|
|
|
|
|
|
|
|
|
|
|
|
|
| Tools |
|
|
|
In order to
publish a sequence and the recorder with your Sound Trip, you must use
extended |
|
|
|
|
|
| |
|
|
|
publication
features that are provided by the Preferences page as described below. For
more |
|
|
|
|
|
| |
|
|
|
information
about extended publication features you can also visit the
"Preferences" section |
|
|
|
|
|
| |
|
|
|
following the
current section. |
|
|
|
|
|
|
|
|
|
|
|
|
|
|
|
|
| |
|
|
|
|
|
|
|
|
|
|
|
|
|
|
|
|
|
|
|
|
|
|
|
|
|
| Define Sound Trip |
|
|
|
1. From the
Workbench page set, define a new Sound Trip as described in the "Sound
Park" |
|
|
|
|
|
| |
|
|
|
chapter, "My first
Trip" section. Don't publish the Sound Trip yet. |
|
|
|
|
|
|
|
|
|
|
| |
|
|
|
|
|
|
|
|
|
|
|
|
|
|
|
|
|
|
|
|
|
|
|
|
|
| Click on "Prefs" |
|
|
|
2. In the
left upper corner of the "Figures" window, click the
"Prefs" link. The Prefs access page |
|
|
|
|
|
| |
|
|
|
opens. |
|
|
|
|
|
|
|
|
|
|
|
|
|
|
|
|
|
|
|
|
| |
|
|
|
|
|
|
|
|
|
|
|
|
|
|
|
|
|
|
|
|
|
|
|
|
|
| Close Workbench |
|
|
|
3. Close all
four windows of the Workbench. |
|
|
|
|
|
|
|
|
|
|
|
|
|
|
| |
|
|
|
|
|
|
|
|
|
|
|
|
|
|
|
|
|
|
|
|
|
|
|
|
|
| Open "Prefs" |
|
|
|
4. Click the
"Preferences" link (title) in the Prefs access page. The
Preferences page opens. |
|
|
|
|
|
| |
|
|
|
|
|
|
|
|
|
|
|
|
|
|
|
|
|
|
|
|
|
|
|
|
|
| Define menu |
|
|
|
5. Include
the Page recorder into your Sound Trip publication. This requires the
following steps: |
|
|
|
|
|
| |
|
|
|
|
|
|
|
|
|
|
|
|
|
|
|
|
|
|
|
|
|
|
|
|
|
| |
|
|
|
> |
In the
"Customize Layout" section, locate the "Component
Placements" line. |
|
|
|
|
|
|
|
| |
|
|
|
> |
Click the
third button to bring the bar symbol to the left side. |
|
|
|
|
|
|
|
|
|
|
| |
|
|
|
> |
In the
"Control Left Menu Prefs" line, click the "R" button. |
|
|
|
|
|
|
|
|
|
|
|
| |
|
|
|
> |
In the
"Record and Play" section, right-click the first four buttons (will
be grayed). |
|
|
|
|
|
|
| |
|
|
|
> |
In the
"Control Left Menu Prefs" line, left-click the "E"
button. |
|
|
|
|
|
|
|
|
|
|
| |
|
|
|
> |
In the
"Record and Play" section, right-click the last four buttons (will
be grayed). |
|
|
|
|
|
|
| |
|
|
|
> |
In the
"Control Left Menu Prefs" line, left-click the "E" button
again. |
|
|
|
|
|
|
|
|
|
| |
|
|
|
> |
In the
"Create Sound Trips" section, right-click the "Publish"
button. |
|
|
|
|
|
|
|
|
|
| |
|
|
|
|
|
|
|
|
|
|
|
|
|
|
|
|
|
|
|
|
|
|
|
|
|
| Publish Sound Trip |
|
|
|
6. In the
"Create Sound Trips" section, left-click the "Publish"
button to publish your Sound Trip. |
|
|
|
|
|
| |
|
|
|
|
|
|
|
|
|
|
|
|
|
|
|
|
|
|
|
|
|
|
|
|
|
| Close Preferences page |
|
|
|
7. Close the
Preferences page and reset your Sound Trip (F5) to enable the Page Recorder. |
|
|
|
|
|
| |
|
|
|
|
|
|
|
|
|
|
|
|
|
|
|
|
|
|
|
|
|
|
|
|
|
| |
|
|
|
TIP |
15 |
|
|
|
|
|
|
|
|
|
|
|
|
|
|
|
|
|
|
|
|
| |
|
|
|
|
The system
allows only one Page Recorder to be active at a time. This means that |
|
|
|
|
|
|
| |
|
|
|
|
following Page Recorders
are disabled. In order to activate them you must make sure |
|
|
|
|
|
| |
|
|
|
|
that all other Page
Recorders are closed and refresh the current Page Recorder you |
|
|
|
|
|
| |
|
|
|
|
want to work with. |
|
|
|
|
|
|
|
|
|
|
|
|
|
|
|
|
|
| |
|
|
|
|
|
|
|
|
|
|
|
|
|
|
|
|
|
|
|
|
|
|
|
|
|
| Record Sequence |
|
|
|
8. Play and
record a page that you want to publish as described above. |
|
|
|
|
|
|
|
|
|
| |
|
|
|
|
|
|
|
|
|
|
|
|
|
|
|
|
|
|
|
|
|
|
|
|
|
| Publish Sound Trip |
|
|
|
9. In your
Sound Trip left menu, click the "Publish" button. Follow the
Publishing instructions as |
|
|
|
|
|
| again |
|
|
|
described in the
"Sound Park" chapter, "My first Trip" section and save
the Sound Trip under |
|
|
|
|
| |
|
|
|
the same name again. |
|
|
|
|
|
|
|
|
|
|
|
|
|
|
|
|
|
| |
|
|
|
|
|
|
|
|
|
|
|
|
|
|
|
|
|
|
|
|
|
|
|
|
|
| |
|
|
|
TIP |
16 |
|
|
|
|
|
|
|
|
|
|
|
|
|
|
|
|
|
|
|
|
| |
|
|
|
|
You may
change the set of functions provided to your Sound Trip audience again before |
|
|
|
|
|
| |
|
|
|
|
the final
publication. For example, you may want to publish only play functions but not |
|
|
|
|
|
| |
|
|
|
|
record
functions, suppressing the "Record" and the "Save"
button. |
|
|
|
|
|
|
|
|
|
| |
|
|
|
|
|
|
|
|
|
|
|
|
|
|
|
|
|
|
|
|
|
|
|
|
|
| |
|
|
|
|
In this case
you will use the Preferences page again to change the settings and
publish |
|
|
|
|
|
| |
|
|
|
|
your Sound Trip from
there. For more information about using the Preferences page, visit |
|
|
|
|
|
| |
|
|
|
|
the
"Preferences" section below. |
|
|
|
|
|
|
|
|
|
|
|
|
|
|
|
| |
|
|
|
|
|
|
|
|
|
|
|
|
|
|
|
|
|
|
|
|
|
|
|
|
|
| |
|
|
|
|
The sequence is stored
within the new published HTML. Make sure that your audience will |
|
|
|
|
| |
|
|
|
|
have access to all
pages, in case you recorded a multiple pages project (see following |
|
|
|
|
|
| |
|
|
|
|
section). |
|
|
|
|
|
|
|
|
|
|
|
|
|
|
|
|
|
|
|
| |
|
|
|
|
|
|
|
|
|
|
|
|
|
|
|
|
|
|
|
|
|
|
|
|
|
| Close older Version |
|
|
|
10. Close the
older version of your Sound Trip. Refresh the new Sound Trip page if
necessary, |
|
|
|
|
|
| |
|
|
|
i.e., if the Page
Recorder buttons are disabled. |
|
|
|
|
|
|
|
|
|
|
|
|
|
| |
|
|
|
|
|
|
|
|
|
|
|
|
|
|
|
|
|
|
|
|
|
|
|
|
|
| Verify Sequence |
|
|
|
11. In your
Sound Trip left menu, click the "Reset" button to activate the
sequence you have |
|
|
|
|
|
| |
|
|
|
published. Click
"Play" to verify your published recording. |
|
|
|
|
|
|
|
|
|
|
|
| |
|
|
|
|
|
|
|
|
|
|
|
|
|
|
|
|
|
|
|
|
|
|
|
|
|
| |
|
|
|
|
|
|
|
|
|
|
|
|
| Example |
|
|
|
|
|
|
|
|
|
|
|
| |
|
|
|
|
|
|
|
|
|
|
|
| |
|
|
|
|
|
|
|
|
|
|
|
| |
|
|
|
|
|
|
|
|
|
|
|
| |
|
|
|
|
|
|
|
|
|
|
|
| |
|
|
|
|
|
|
|
|
|
|
|
| |
|
|
|
|
|
|
|
|
|
|
|
| |
|
|
|
|
|
|
|
|
|
|
|
| |
|
|
|
|
|
|
|
|
|
|
|
| |
|
|
|
|
|
|
|
|
|
|
|
| |
|
|
|
|
|
|
|
|
|
|
|
| |
|
|
|
|
|
|
|
|
|
|
|
| |
|
|
|
|
|
|
|
|
|
|
|
| |
|
|
|
|
|
|
|
|
|
|
|
| |
|
|
|
|
|
|
|
|
|
|
|
| |
|
|
|
|
|
|
|
|
|
|
|
| |
|
|
|
|
|
|
|
|
|
|
|
| |
|
|
|
|
|
|
|
|
|
|
|
| |
|
|
|
Figure 13: Published
Sound Trip including Page Recorder and pre-recorded sequence (13-Sep-06) |
|
|
|
|
|
|
|
| |
|
|
|
|
|
|
|
|
|
|
|
|
|
|
|
|
|
|
|
|
|
|
|
|
|
| Send to Friend |
|
|
|
12. Send your
Sound Page to a friend. |
|
|
|
|
|
|
|
|
|
|
|
|
|
|
|
| |
|
|
|
|
|
|
|
|
|
|
|
|
|
|
|
|
|
|
|
|
|
|
|
|
|
| |
|
|
|
TIP |
17 |
|
|
|
|
|
|
|
|
|
|
|
|
|
|
|
|
|
|
|
|
| |
|
|
|
|
A Sound Page
that has a left side menu consists of three HTML pages with the |
|
|
|
|
|
|
| |
|
|
|
|
following
naming convention: |
|
|
|
|
|
|
|
|
|
|
|
|
|
|
|
| |
|
|
|
|
|
|
|
|
|
|
|
|
|
|
|
|
|
|
|
|
|
|
|
|
|
| |
|
|
|
|
> |
<name>.htm |
|
|
|
|
|
|
|
|
|
|
|
|
|
|
|
|
|
| |
|
|
|
|
> |
<name>Menu.htm |
|
|
|
|
|
|
|
|
|
|
|
|
|
|
|
|
| |
|
|
|
|
> |
<name>Frame.htm |
|
|
|
|
|
|
|
|
|
|
|
|
|
|
|
|
| |
|
|
|
|
|
|
|
|
|
|
|
|
|
|
|
|
|
|
|
|
|
|
|
|
|
| |
|
|
|
|
All files must reside in
one folder. The <name>Frame.htm file is the file to start from. |
|
|
|
|
|
|
| |
|
|
|
|
|
|
|
|
|
|
|
|
|
|
|
|
|
|
|
|
|
|
|
|
|
| |
|
|
|
|
If you published
multiple pages by using the "Add Page" feature, additional files |
|
|
|
|
|
|
| |
|
|
|
|
will need to be enclosed
in your delivery, following the convention: |
|
|
|
|
|
|
|
|
|
| |
|
|
|
|
|
|
|
|
|
|
|
|
|
|
|
|
|
|
|
|
|
|
|
|
|
| |
|
|
|
|
> |
<name>.htm |
|
|
|
|
|
|
|
|
|
|
|
|
|
|
|
|
|
| |
|
|
|
|
> |
<name>_2.htm |
|
|
|
|
|
|
|
|
|
|
|
|
|
|
|
|
|
| |
|
|
|
|
> |
<name>_3.htm |
|
|
|
|
|
|
|
|
|
|
|
|
|
|
|
|
|
| |
|
|
|
|
> |
<name>_4.htm |
|
|
|
|
|
|
|
|
|
|
|
|
|
|
|
|
|
| |
|
|
|
|
|
|
|
|
|
|
|
|
|
|
|
|
|
|
|
|
|
|
|
|
|
| PUBLISH |
|
|
|
To record a
sequence from a multi-page Sound Trip project: |
|
|
|
|
|
|
|
|
|
|
|
| MULTI-PAGE |
|
|
|
|
|
|
|
|
|
|
|
|
|
|
|
|
|
|
|
|
|
|
|
|
|
| |
|
|
|
You can
publish a sequence with a set of multiple pages that will be re-load
automatically |
|
|
|
|
|
|
| |
|
|
|
once you
operate the "Reset" button. |
|
|
|
|
|
|
|
|
|
|
|
|
|
|
|
| |
|
|
|
|
|
|
|
|
|
|
|
|
|
|
|
|
|
|
|
|
|
|
|
|
|
| Open Recorder Page |
|
|
|
1. Open your
last Sound Trip that includes a Page Recorder. |
|
|
|
|
|
|
|
|
|
|
|
| |
|
|
|
|
|
|
|
|
|
|
|
|
|
|
|
|
|
|
|
|
|
|
|
|
|
| Open additional Pages |
|
|
|
2. Open
further pages that you would like to include into your recording. |
|
|
|
|
|
|
|
|
|
| |
|
|
|
|
|
|
|
|
|
|
|
|
|
|
|
|
|
|
|
|
|
|
|
|
|
| Reset Recorder Page |
|
|
|
3. Reset the
first page containing the Page Recorder (F5) in order to activate the
"Record" |
|
|
|
|
|
| |
|
|
|
button. The
"Record" button turns from gray into white. |
|
|
|
|
|
|
|
|
|
|
|
|
| |
|
|
|
|
|
|
|
|
|
|
|
|
|
|
|
|
|
|
|
|
|
|
|
|
|
| |
|
|
|
TIP |
18 |
|
|
|
|
|
|
|
|
|
|
|
|
|
|
|
|
|
|
|
|
| |
|
|
|
|
If you would
click the "Reset" button instead of resetting the page, pages from
former |
|
|
|
|
|
| |
|
|
|
|
multiple Sound
Trip projects could be re-opened. |
|
|
|
|
|
|
|
|
|
|
|
|
| |
|
|
|
|
|
|
|
|
|
|
|
|
|
|
|
|
|
|
|
|
|
|
|
|
|
| Record Sequence |
|
|
|
4. Play and
record a sequence across different pages as you like. |
|
|
|
|
|
|
|
|
|
|
| |
|
|
|
|
|
|
|
|
|
|
|
|
|
|
|
|
|
|
|
|
|
|
|
|
|
| Save Sequence |
|
|
|
5. Your
recorded sequence is temporarily saved and will be re-opened automatically as
soon |
|
|
|
|
|
| |
|
|
|
as you open the page
again that includes the Page Recorder. However, you may also store |
|
|
|
|
|
| |
|
|
|
or publish the sequence
as described above. |
|
|
|
|
|
|
|
|
|
|
|
|
|
| |
|
|
|
|
|
|
|
|
|
|
|
|
|
|
|
|
|
|
|
|
|
|
|
|
|
| |
|
|
|
TIP |
19 |
|
|
|
|
|
|
|
|
|
|
|
|
|
|
|
|
|
|
|
|
| |
|
|
|
|
Please
remember that you can assemble page links for a multi-page project also
by |
|
|
|
|
|
| |
|
|
|
|
using the
Page Indicator. The below Figures show how various Workbench pages are |
|
|
|
|
|
| |
|
|
|
|
assembled
into a multi-page reference page from where they can be re-opened again. |
|
|
|
|
|
| |
|
|
|
|
|
|
|
|
|
|
|
|
|
|
|
|
|
|
|
|
|
|
|
|
|
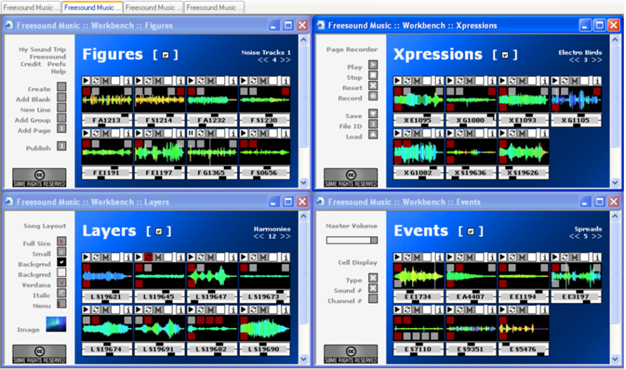
|
|
|
|
|
|
|
|
|
|
|
|
|
|
|
|
|
|
|
|
|
|
|
|
|
|
| |
|
|
|
|
|
|
|
|
|
|
|
|
|
|
|
|
|
|
|
|
|
|
|
|
|
| |
|
|
|
|
|
|
|
|
|
|
|
|
|
|
|
|
|
|
|
|
|
|
|
|
|
| |
|
|
|
|
|
|
|
|
|
|
|
|
|
|
|
|
|
|
|
|
|
|
|
|
|
| |
|
|
|
|
|
|
|
|
|
|
|
|
|
|
|
|
|
|
|
|
|
|
|
|
|
| |
|
|
|
|
|
|
|
|
|
|
|
|
|
|
|
|
|
|
|
|
|
|
|
|
|
| |
|
|
|
|
|
|
|
|
|
|
|
|
|
|
|
|
|
|
|
|
|
|
|
|
|
| |
|
|
|
|
|
|
|
|
|
|
|
|
|
|
|
|
|
|
|
|
|
|
|
|
|
| |
|
|
|
|
|
|
|
|
|
|
|
|
|
|
|
|
|
|
|
|
|
|
|
|
|
| |
|
|
|
|
|
|
|
|
|
|
|
|
|
|
|
|
|
|
|
|
|
|
|
|
|
| |
|
|
|
|
|
|
|
|
|
|
|
|
|
|
|
|
|
|
|
|
|
|
|
|
|
| |
|
|
|
|
|
|
|
|
|
|
|
|
|
|
|
|
|
|
|
|
|
|
|
|
|
| |
|
|
|
|
|
|
|
|
|
|
|
|
|
|
|
|
|
|
|
|
|
|
|
|
|
| |
|
|
|
|
|
|
|
|
|
|
|
|
|
|
|
|
|
|
|
|
|
|
|
|
|
| |
|
|
|
|
|
|
|
|
|
|
|
|
|
|
|
|
|
|
|
|
|
|
|
|
|
| |
|
|
|
|
|
|
|
|
|
|
|
|
|
|
|
|
|
|
|
|
|
|
|
|
|
| |
|
|
|
|
|
|
|
|
|
|
|
|
|
|
|
|
|
|
|
|
|
|
|
|
|
| |
|
|
|
|
|
|
|
|
|
|
|
|
|
|
|
|
|
|
|
|
|
|
|
|
|
| |
|
|
|
|
|
|
|
|
|
|
|
|
|
|
|
|
|
|
|
|
|
|
|
|
|
| |
|
|
|
|
|
|
|
|
|
|
|
|
|
|
|
|
|
|
|
|
|
|
|
|
|
| |
|
|
|
|
|
|
|
|
|
|
|
|
|
|
|
|
|
|
|
|
|
|
|
|
|
| |
|
|
|
|
|
|
|
|
|
|
|
|
|
|
|
|
|
|
|
|
|
|
|
|
|
| |
|
|
|
|
|
|
|
|
|
|
|
|
|
|
|
|
|
|
|
|
|
|
|
|
|
| |
|
|
|
Figure 14: Selection of
Workbench pages (14-Sep-06) |
|
|
|
|
|
|
|
|
|
|
|
|
|
|
| |
|
|
|
|
|
|
|
|
|
|
|
|
|
|
|
|
|
|
|
|
|
|
|
|
|
| |
|
|
|
|
|
|
|
|
|
| |
|
|
|
|
|
|
|
|
| |
|
|
|
|
|
|
|
|
| |
|
|
|
|
|
|
|
|
| |
|
|
|
|
|
|
|
|
| |
|
|
|
|
|
|
|
|
| |
|
|
|
|
|
|
|
|
| |
|
|
|
|
|
|
|
|
| |
|
|
|
|
|
|
|
|
| |
|
|
|
|
|
|
|
|
| |
|
|
|
|
|
|
|
|
| |
|
|
|
|
|
|
|
|
| |
|
|
|
|
|
|
|
|
| |
|
|
|
Figure 15: Publication
of Workbench pages links (14-Sep-06) |
|
|
|
|
|
|
|
|
|
|
|
|
|
| |
|
|
|
|
|
|
|
|
|
|
|
|
|
|
|
|
|
|
|
|
|
|
|
|
|
| |
|
|
|
TIP |
20 |
|
|
|
|
|
|
|
|
|
|
|
|
|
|
|
|
|
|
|
|
| |
|
|
|
|
The page
titles that are shown in the above figure are appearing each in a new line. |
|
|
|
|
|
|
| |
|
|
|
|
You can
achieve this by clicking the "New Line" button in the
"Figures" window of the |
|
|
|
|
|
| |
|
|
|
|
Workbench. If
you don't use "New Line", the titles will appear in one line. If
you use |
|
|
|
|
|
|
| |
|
|
|
|
it every
second time, you will create a table with two columns. This method applies |
|
|
|
|
|
|
| |
|
|
|
|
of course
also to the Animated Sounds as you have learned above. |
|
|
|
|
|
|
|
|
| |
|
|
|
|
|
|
|
|
|
|
|
|
|
|
|
|
|
|
|
|
|
|
|
|
|
| RESTORE PRESET |
|
|
|
To restore
the preset sequence of your first Sound Trip publication: |
|
|
|
|
|
|
|
|
|
| |
|
|
|
|
|
|
|
|
|
|
|
|
|
|
|
|
|
|
|
|
|
|
|
|
|
| |
|
|
|
The sequence
that you published within a Sound Trip project can be restored using the |
|
|
|
|
|
|
| |
|
|
|
"Restore"
button (see Figure 13 above) any time after other recordings have taken
place. |
|
|
|
|
|
|
| |
|
|
|
If you want
to make sure that your audience will be able to restore your suggested
recording, |
|
|
|
|
|
| |
|
|
|
you must
include the "Restore" button into your publication as described
above. |
|
|
|
|
|
|
|
| |
|
|
|
|
|
|
|
|
|
|
|
|
|
|
|
|
|
|
|
|
|
|
|
|
|
| |
|
|
|
More options
about publications beyond those are offered in the Workbench, and additional |
|
|
|
|
|
| |
|
|
|
explanations
can be found in the following "Preferences" section. |
|
|
|
|
|
|
|
|
|
|
| |
|
|
|
|
|
|
|
|
|
|
|
|
|
|
|
|
|
|
|
|
|
|
|
|
|
| |
|
|
|
|
|
|
|
|
|
|
|
|
|
|
|
|
|
|
|
|
|
|
|
|
|
| Preferences |
|
|
|
If you like
the idea of publishing sound pages, then you might want to dive deeper into
the |
|
|
|
|
|
|
| |
|
|
|
possibilities
that are offered by the Workbench and the extended Preferences set. |
|
|
|
|
|
|
|
| |
|
|
|
|
|
|
|
|
|
|
|
|
|
|
|
|
|
|
|
|
|
|
|
|
|
| |
|
|
|
The best way
to learn about the complete possibilities is to follow the descriptions laid
out |
|
|
|
|
|
| |
|
|
|
in the
Preferences page and to experiment right away. A lot of combinations are
offered |
|
|
|
|
|
|
| |
|
|
|
using these
settings. |
|
|
|
|
|
|
|
|
|
|
|
|
|
|
|
|
|
|
| |
|
|
|
|
|
|
|
|
|
|
|
|
|
|
|
|
|
|
|
|
|
|
|
|
|
| Access Preferences |
|
|
|
Access to the
Preferences page is provided at the right link, and through the |
|
|
>> |
|
|
|
|
|
| |
|
|
|
standard menu
of sound pages ("Prefs" link). |
|
|
|
|
|
|
|
|
|
|
|
|
|
| |
|
|
|
|
|
|
|
|
|
|
|
|
|
|
|
|
|
|
|
|
|
|
|
|
|
| Add Page |
|
|
|
TIP |
1 |
|
|
|
|
|
|
|
|
|
|
|
|
|
|
|
|
|
|
|
|
| |
|
|
|
|
In the
"Create Sound Trips" section, use the "Add Page" feature
in order to include |
|
|
|
|
|
|
| |
|
|
|
|
multiple
pages into your project that will be published automatically with an
appropriate |
|
|
|
|
|
| |
|
|
|
|
page
navigation scheme you can place at different locations in the page. |
|
|
|
|
|
|
|
| |
|
|
|
|
|
|
|
|
|
|
|
|
|
|
|
|
|
|
|
|
|
|
|
|
|
| Layout Options |
|
|
|
TIP |
2 |
|
|
|
|
|
|
|
|
|
|
|
|
|
|
|
|
|
|
|
|
| and Objects |
|
|
|
|
In the
"Customize Layout" section, play with size, color, fonts and
placements of the |
|
|
|
|
|
|
| |
|
|
|
|
various page
objects. Pay especially attention to the question, which objects you |
|
|
|
|
|
|
| |
|
|
|
|
would like to
include, as provided by the "Component Selection" and
"Component |
|
|
|
|
|
|
| |
|
|
|
|
Placement"
lines. |
|
|
|
|
|
|
|
|
|
|
|
|
|
|
|
|
|
| |
|
|
|
|
|
|
|
|
|
|
|
|
|
|
|
|
|
|
|
|
|
|
|
|
|
| Personal Images |
|
|
|
TIP |
3 |
|
|
|
|
|
|
|
|
|
|
|
|
|
|
|
|
|
|
|
|
| |
|
|
|
|
In the
"Customize Layout" section, scroll through the
"Background" icons until you get to |
|
|
|
|
|
| |
|
|
|
|
the
"Local" window. Now you can include personal backgrounds from your
computer |
|
|
|
|
|
| |
|
|
|
|
into your
projects. Unlike preset backgrounds, personal images will be loaded for each |
|
|
|
|
|
| |
|
|
|
|
page
separately. |
|
|
|
|
|
|
|
|
|
|
|
|
|
|
|
|
|
| |
|
|
|
|
|
|
|
|
|
|
|
|
|
|
|
|
|
|
|
|
|
|
|
|
|
| Publish Preferences |
|
|
|
TIP |
4 |
|
|
|
|
|
|
|
|
|
|
|
|
|
|
|
|
|
|
|
|
| |
|
|
|
|
If you decide to use the side menu as
provided with the left menu option of the third button |
|
|
|
|
|
| |
|
|
|
|
of the
"Component Placement" line, then you will be able to publish any
combination of |
|
|
|
|
|
| |
|
|
|
|
preference
buttons into your new project. For this reason, use the "Control Left
Menu Prefs" |
|
|
|
|
| |
|
|
|
|
line to
manage those settings and create them simply by right-clicking the required |
|
|
|
|
|
|
| |
|
|
|
|
preference
buttons one after the other. This process is also described in the above
"Page |
|
|
|
|
| |
|
|
|
|
Recorder"
section. |
|
|
|
|
|
|
|
|
|
|
|
|
|
|
|
|
|
| |
|
|
|
|
|
|
|
|
|
|
|
|
|
|
|
|
|
|
|
|
|
|
|
|
|
| Use Greeting Option |
|
|
|
TIP |
5 |
|
|
|
|
|
|
|
|
|
|
|
|
|
|
|
|
|
|
|
|
| |
|
|
|
|
Use the
"Greetings" option (4th button of the "Component
Selection" line) in order to insert |
|
|
|
|
|
| |
|
|
|
|
text blocks
into your Sound Pages. If you use this option, a dialog will open during
the |
|
|
|
|
|
| |
|
|
|
|
publishing
process prompting you to enter your text. You can enter or copy any text
or |
|
|
|
|
|
| |
|
|
|
|
standard HTML
statement. The Greeting will appear on the first page of each Sound Trip |
|
|
|
|
|
| |
|
|
|
|
project. |
|
|
|
|
|
|
|
|
|
|
|
|
|
|
|
|
|
|
|
| |
|
|
|
|
|
|
|
|
|
|
|
|
|
|
|
|
|
|
| |
|
|
|
|
|
|
|
|
|
|
|
|
|
|
|
|
|
| |
|
|
|
|
|
|
|
|
|
|
|
|
|
|
|
|
|
| |
|
|
|
|
|
|
|
|
|
|
|
|
|
|
|
|
|
| |
|
|
|
|
|
|
|
|
|
|
|
|
|
|
|
|
|
| |
|
|
|
|
|
|
|
|
|
|
|
|
|
|
|
|
|
| |
|
|
|
|
|
|
|
|
|
|
|
|
|
|
|
|
|
| |
|
|
|
|
|
|
|
|
|
|
|
|
|
|
|
|
|
| |
|
|
|
|
|
|
|
|
|
|
|
|
|
|
|
|
|
| |
|
|
|
|
|
|
|
|
|
|
|
|
|
|
|
|
|
| |
|
|
|
|
|
|
|
|
|
|
|
|
|
|
|
|
|
| |
|
|
|
|
|
|
|
|
|
|
|
|
|
|
|
|
|
| |
|
|
|
|
|
|
|
|
|
|
|
|
|
|
|
|
|
| |
|
|
|
|
|
|
|
|
|
|
|
|
|
|
|
|
|
| |
|
|
|
|
|
|
|
|
|
|
|
|
|
|
|
|
|
| |
|
|
|
|
|
|
|
|
|
|
|
|
|
|
|
|
|
| |
|
|
|
|
Figure 16: "Enter
Sound Trip Info" dialog box |
|
|
|
|
|
|
|
|
|
|
|
|
|
|
| |
|
|
|
|
|
|
|
|
|
|
|
|
|
|
|
|
|
|
|
|
|
|
|
|
|
| Use Title Option |
|
|
|
TIP |
6 |
|
|
|
|
|
|
|
|
|
|
|
|
|
|
|
|
|
|
|
|
| |
|
|
|
|
Use the
"Title" option (2nd button of the "Component Selection"
line) in order to insert |
|
|
|
|
|
| |
|
|
|
|
a certain
title for your Sound Trip project which will be different from the file name
of |
|
|
|
|
|
|
| |
|
|
|
|
your project. |
|
|
|
|
|
|
|
|
|
|
|
|
|
|
|
|
|
|
| |
|
|
|
|
|
|
|
|
|
|
|
|
|
|
|
|
|
|
|
|
|
|
|
|
|
| |
|
|
|
|
If you don't
use this option, you are still able to provide a name of your choice in
the |
|
|
|
|
|
|
| |
|
|
|
|
"Save My
Sound Trip" dialog (see Figure 10 in the "My First Trip"
section, "Sound Park" |
|
|
|
|
|
| |
|
|
|
|
chapter).
However, in this case the title will be identical with the file name. |
|
|
|
|
|
|
|
|
| |
|
|
|
|
|
|
|
|
|
|
|
|
|
|
|
|
|
|
| |
|
|
|
|
|
|
|
|
|
|
|
|
|
|
|
|
|
| |
|
|
|
|
|
|
|
|
|
|
|
|
|
|
|
|
|
| |
|
|
|
|
|
|
|
|
|
|
|
|
|
|
|
|
|
| |
|
|
|
|
|
|
|
|
|
|
|
|
|
|
|
|
|
| |
|
|
|
|
|
|
|
|
|
|
|
|
|
|
|
|
|
| |
|
|
|
|
Figure 17: "Enter
Title" dialog box |
|
|
|
|
|
|
|
|
|
|
|
|
|
|
|
| |
|
|
|
|
|
|
|
|
|
|
|
|
|
|
|
|
|
|
|
|
|
|
|
|
|
| |
|
|
|
|
An example of
the insertion of Title and Greeting is shown in the following figure: |
|
|
|
|
|
|
| |
|
|
|
|
|
|
|
|
|
|
|
|
|
|
|
|
|
|
|
|
|
|
|
|
|
| |
|
|
|
|
|
| |
|
|
|
|
| |
|
|
|
|
| |
|
|
|
|
| |
|
|
|
|
| |
|
|
|
|
| |
|
|
|
|
| |
|
|
|
|
| |
|
|
|
|
| |
|
|
|
|
| |
|
|
|
|
Figure 18: Insertion of
customized title and greeting using the Title and the Greeting option |
|
|
|
|
|
|
|
|
| |
|
|
|
|
|
|
|
|
|
|
|
|
|
|
|
|
|
|
|
|
|
|
|
|
|
| |
|
|
|
|
|
|
|
|
|
|
|
|
|
|
|
|
|
|
|
|
|
|
|
|
|
| HTML |
|
|
|
For further
advanced customization of your projects you can also directly edit the HTML
source |
|
|
|
|
|
| |
|
|
|
files. The
following is a summary of the most important
page objects and their parameters |
|
|
|
|
|
| |
|
|
|
that can be
used to adapt Sound Page projects to your needs. |
|
|
|
|
|
|
|
|
|
|
| |
|
|
|
|
|
|
|
|
|
|
|
|
|
|
|
|
|
|
|
|
|
|
|
|
|
| ANIMATED SOUNDS |
|
|
|
1. |
Animated
Sounds Options (SoundID.dcr) |
|
|
|
|
|
|
|
|
|
|
|
|
| |
|
|
|
|
|
|
|
|
|
|
|
|
|
|
|
|
|
|
|
|
|
|
|
|
|
| |
|
|
|
|
Customization
of Animated Sound parameters can increase their flexibility and |
|
|
|
|
|
|
| |
|
|
|
|
performance. |
|
|
|
|
|
|
|
|
|
|
|
|
|
|
|
|
|
|
| |
|
|
|
|
|
|
|
|
|
|
|
|
|
|
|
|
|
|
|
|
|
|
|
|
|
| Change Reference |
|
|
|
|
> |
Change Sound
Reference |
|
|
|
|
|
|
|
|
|
|
|
|
|
|
| |
|
|
|
|
|
|
|
|
|
|
|
|
|
|
|
|
|
|
|
|
|
|
|
|
|
| |
|
|
|
|
|
> |
Parameter: src
and sw1 |
|
|
|
|
|
|
|
|
|
|
|
|
|
|
| |
|
|
|
|
|
> |
Example: |
<param
name="src" value="../S0649.dcr"> |
|
|
|
|
|
|
|
|
|
| |
|
|
|
|
|
|
|
|
<param
name="sw1" value="B"> |
|
|
|
|
|
|
|
|
|
|
|
| |
|
|
|
|
|
> |
Values: |
src =
"S" + 4-6 digits + ".dcr" |
|
|
|
|
|
|
|
|
|
|
|
| |
|
|
|
|
|
|
|
|
sw1 = any
letter [ + 4-6 digits ] |
|
|
|
|
|
|
|
|
|
|
|
| |
|
|
|
|
|
> |
Notes:
specific sw1 sound prefix must exist. Default: "S" |
|
|
|
|
|
|
|
|
|
| |
|
|
|
|
|
|
Change must
be applied to group objects at the relevant position |
|
|
|
|
|
|
|
| |
|
|
|
|
|
|
(identify
sound number with Find), whereas the prefix will be directly written |
|
|
|
|
|
| |
|
|
|
|
|
|
into all 3 or
4 group object lists, for example, "B0649", no extension. |
|
|
|
|
|
|
|
| |
|
|
|
|
|
> |
Indication:
<!-- F --> or similar tag introduces sound object. |
|
|
|
|
|
|
|
|
| |
|
|
|
|
|
|
<!--
GroupX --> or similar tag introduces group object. |
|
|
|
|
|
|
|
|
|
| |
|
|
|
|
|
|
at the bottom
of the page. |
|
|
|
|
|
|
|
|
|
|
|
|
|
|
| |
|
|
|
|
|
> |
Use cases:
Enhancing performance of specific sound where needed. |
|
|
|
|
|
|
| |
|
|
|
|
|
|
Member
variations for re-use of sounds in different environments. |
|
|
|
|
|
|
|
| |
|
|
|
|
|
|
If sw1
includes the full SoundID (letter plus digits), buttonguide focus |
|
|
|
|
|
|
| |
|
|
|
|
|
|
for Sound
Palettes is being suppressed. |
|
|
|
|
|
|
|
|
|
|
|
| |
|
|
|
|
|
|
|
|
|
|
|
|
|
|
|
|
|
|
|
|
|
|
|
|
|
| Set Placeholder |
|
|
|
|
> |
Set
Placeholder |
|
|
|
|
|
|
|
|
|
|
|
|
|
|
|
|
| |
|
|
|
|
|
|
|
|
|
|
|
|
|
|
|
|
|
|
|
|
|
|
|
|
|
| |
|
|
|
|
|
> |
Parameter: sw2 |
|
|
|
|
|
|
|
|
|
|
|
|
|
|
|
|
| |
|
|
|
|
|
> |
Example:
<param name="sw2" value="F1"> |
|
|
|
|
|
|
|
|
|
|
|
| |
|
|
|
|
|
> |
Values: any
string; F, L, E, X + 1|2; T1-T4 |
|
|
|
|
|
|
|
|
|
|
|
| |
|
|
|
|
|
> |
Notes: Used
for identifying location on HTML page including |
|
|
|
|
|
|
|
|
| |
|
|
|
|
|
|
record and
play. Special use case for using F1, F2, L1, L2, |
|
|
|
|
|
|
|
|
| |
|
|
|
|
|
|
E1, E2, X1,
X2 in Navigator applications to support play options; |
|
|
|
|
|
|
|
| |
|
|
|
|
|
|
Special use
case for using T1-T4 with large members (palettes) |
|
|
|
|
|
|
|
| |
|
|
|
|
|
> |
Indication:
Hidden. When using F, L, E, X placeholders, sw4 feature |
|
|
|
|
|
|
|
| |
|
|
|
|
|
|
can be used to
support type |
|
|
|
|
|
|
|
|
|
|
|
|
|
| |
|
|
|
|
|
> |
Use cases:
Page building, page recording, advanced Navigator and |
|
|
|
|
|
|
| |
|
|
|
|
|
|
Sound Palette
use. |
|
|
|
|
|
|
|
|
|
|
|
|
|
|
|
| |
|
|
|
|
|
|
|
|
|
|
|
|
|
|
|
|
|
|
|
|
|
|
|
|
|
| Set Channel |
|
|
|
|
> |
Set Fixed
Channel |
|
|
|
|
|
|
|
|
|
|
|
|
|
|
|
|
| |
|
|
|
|
|
|
|
|
|
|
|
|
|
|
|
|
|
|
|
|
|
|
|
|
|
| |
|
|
|
|
|
> |
Parameter: sw3 |
|
|
|
|
|
|
|
|
|
|
|
|
|
|
|
|
| |
|
|
|
|
|
> |
Example:
<param name="sw3" value="0"> |
|
|
|
|
|
|
|
|
|
|
|
| |
|
|
|
|
|
> |
Values: from
1 to 8 (fixed), and 0 (automatic = default) |
|
|
|
|
|
|
|
|
|
| |
|
|
|
|
|
> |
Notes: Fixed
channel will make sure that sound is played through this |
|
|
|
|
|
|
| |
|
|
|
|
|
|
channel and
does not depend on automatic channel assignment. |
|
|
|
|
|
|
|
| |
|
|
|
|
|
> |
Indication:
Shown in the Animated Sound display bar if activated. |
|
|
|
|
|
|
|
| |
|
|
|
|
|
|
Activation
can be done in Workbench Events window, or in Preferences |
|
|
|
|
|
|
| |
|
|
|
|
|
|
at the bottom
of the page. |
|
|
|
|
|
|
|
|
|
|
|
|
|
|
| |
|
|
|
|
|
> |
Use cases:
Enhancing performance of specific sound where needed. |
|
|
|
|
|
|
| |
|
|
|
|
|
|
|
|
|
|
|
|
|
|
|
|
|
|
|
|
|
|
|
|
|
| Preset Checkbox |
|
|
|
|
> |
Set checkbox
in advance |
|
|
|
|
|
|
|
|
|
|
|
|
|
|
| |
|
|
|
|
|
|
|
|
|
|
|
|
|
|
|
|
|
|
|
|
|
|
|
|
|
| |
|
|
|
|
|
> |
Parameter: sw3 |
|
|
|
|
|
|
|
|
|
|
|
|
|
|
|
|
| |
|
|
|
|
|
> |
Example:
<param name="sw3" value="check"> |
|
|
|
|
|
|
|
|
|
|
| |
|
|
|
|
|
> |
Values:
[channel] + "check" | "unche" |
|
|
|
|
|
|
|
|
|
|
|
|
| |
|
|
|
|
|
> |
Notes:
Checkbox will be checked or unchecked regardless |
|
|
|
|
|
|
|
|
| |
|
|
|
|
|
|
former
status. Fixed Channel can still be set putting number in advance. |
|
|
|
|
|
|
| |
|
|
|
|
|
> |
Indication:
Checkbox of sound member in upper 'toolbar' |
|
|
|
|
|
|
|
|
| |
|
|
|
|
|
|
Checkbox can
be operated regardless presetting. Reload of member |
|
|
|
|
|
|
| |
|
|
|
|
|
|
(also through
Link) will restore presetting. |
|
|
|
|
|
|
|
|
|
|
|
| |
|
|
|
|
|
> |
Use cases:
Preselection of members to be published. |
|
|
|
|
|
|
|
|
|
| |
|
|
|
|
|
|
Ongoing play
for Sound Palette members can be preset, the user can |
|
|
|
|
|
|
| |
|
|
|
|
|
|
immediately
start playing. |
|
|
|
|
|
|
|
|
|
|
|
|
|
|
| |
|
|
|
|
|
|
|
|
|
|
|
|
|
|
|
|
|
|
|
|
|
|
|
|
|
| Set Sound Label |
|
|
|
|
> |
Set Sound
Classification Label |
|
|
|
|
|
|
|
|
|
|
|
|
|
| |
|
|
|
|
|
|
|
|
|
|
|
|
|
|
|
|
|
|
|
|
|
|
|
|
|
| |
|
|
|
|
|
> |
Parameter: sw4 |
|
|
|
|
|
|
|
|
|
|
|
|
|
|
|
|
| |
|
|
|
|
|
> |
Example:
<param name="sw4" value="F"> |
|
|
|
|
|
|
|
|
|
|
|
| |
|
|
|
|
|
> |
Values: any
string; F, L, E, or X by default |
|
|
|
|
|
|
|
|
|
|
|
| |
|
|
|
|
|
> |
Indication:
Shown in the Animated Sound display bar if activated. |
|
|
|
|
|
|
|
| |
|
|
|
|
|
|
Activation
can be done in Workbench Events window, or in Preferences |
|
|
|
|
|
|
| |
|
|
|
|
|
|
at the bottom
of the page. |
|
|
|
|
|
|
|
|
|
|
|
|
|
|
| |
|
|
|
|
|
> |
Use cases:
Enhanced usability for sound selection through classification. |
|
|
|
|
|
| |
|
|
|
|
|
|
|
|
|
|
|
|
|
|
|
|
|
|
|
|
|
|
|
|
|
| Change Volume |
|
|
|
|
> |
Limit Overall
Volume Values for a given position in the page |
|
|
|
|
|
|
|
| |
|
|
|
|
|
|
|
|
|
|
|
|
|
|
|
|
|
|
|
|
|
|
|
|
|
| |
|
|
|
|
|
> |
Parameter: sw5 |
|
|
|
|
|
|
|
|
|
|
|
|
|
|
|
|
| |
|
|
|
|
|
> |
Example:
<param name="sw5" value="42"> |
|
|
|
|
|
|
|
|
|
|
|
| |
|
|
|
|
|
> |
Values: from 1
to 84 |
|
|
|
|
|
|
|
|
|
|
|
|
|
|
|
| |
|
|
|
|
|
> |
Notes: Will
be valid for all sounds that will be called from this position. |
|
|
|
|
|
|
| |
|
|
|
|
|
|
All values
that are issued by the relevant Animated Sound will be |
|
|
|
|
|
|
|
| |
|
|
|
|
|
|
reduced
according the set maximum (limiter) value. |
|
|
|
|
|
|
|
|
|
| |
|
|
|
|
|
> |
Indication:
Red color in the volume bar shows degree of reduction. |
|
|
|
|
|
|
|
| |
|
|
|
|
|
|
All moves of
volume slider are still shown in full range but executed |
|
|
|
|
|
|
|
| |
|
|
|
|
|
|
relatively to
upper limit. |
|
|
|
|
|
|
|
|
|
|
|
|
|
|
| |
|
|
|
|
|
> |
Use cases:
Pre-mix of presented sounds, presenting identical sounds |
|
|
|
|
|
|
| |
|
|
|
|
|
|
with different
base volume |
|
|
|
|
|
|
|
|
|
|
|
|
|
|
| |
|
|
|
|
|
|
|
|
|
|
|
|
|
|
|
|
|
|
|
|
|
|
|
|
|
| Preset Fade-In |
|
|
|
|
> |
Preset Fade-In
value for sound member |
|
|
|
|
|
|
|
|
|
|
|
| |
|
|
|
|
|
|
|
|
|
|
|
|
|
|
|
|
|
|
|
|
|
|
|
|
|
| |
|
|
|
|
|
> |
Parameter: sw5 |
|
|
|
|
|
|
|
|
|
|
|
|
|
|
|
|
| |
|
|
|
|
|
> |
Example:
<param name="sw5" value="$100"> |
|
|
|
|
|
|
|
|
|
|
| |
|
|
|
|
|
> |
Values: [
Volume + ] "$" + [ ms ] |
|
|
|
|
|
|
|
|
|
|
|
|
|
| |
|
|
|
|
|
> |
Notes:
Replaces the preset fadein value in the member definition. |
|
|
|
|
|
|
|
| |
|
|
|
|
|
|
Can be
combined with the above mixing setting. |
|
|
|
|
|
|
|
|
|
|
| |
|
|
|
|
|
> |
Indication:
Right-click 'Play' symbol. Value appears red in lower gray bar. |
|
|
|
|
|
| |
|
|
|
|
|
|
Click into the
bar can change the value again. |
|
|
|
|
|
|
|
|
|
|
| |
|
|
|
|
|
|
Right-click
again to remove display. |
|
|
|
|
|
|
|
|
|
|
|
|
| |
|
|
|
|
|
|
Right-click
again to see change. |
|
|
|
|
|
|
|
|
|
|
|
|
|
| |
|
|
|
|
|
> |
Use cases:
Preset Fade-In values for playing audience. |
|
|
|
|
|
|
|
|
| |
|
|
|
|
|
|
Change during
play. |
|
|
|
|
|
|
|
|
|
|
|
|
|
|
|
| |
|
|
|
|
|
|
|
|
|
|
|
|
|
|
|
|
|
|
|
|
|
|
|
|
|
| Change Panorama |
|
|
|
|
> |
Change
Overall Panorama Values for a given position in the page |
|
|
|
|
|
|
| |
|
|
|
|
|
|
|
|
|
|
|
|
|
|
|
|
|
|
|
|
|
|
|
|
|
| |
|
|
|
|
|
> |
Parameter: sw6 |
|
|
|
|
|
|
|
|
|
|
|
|
|
|
|
|
| |
|
|
|
|
|
> |
Example:
<param name="sw6" value="2"> |
|
|
|
|
|
|
|
|
|
|
|
| |
|
|
|
|
|
> |
Values: from
1 to 5 (left, left-center, center, right-center, right) |
|
|
|
|
|
|
|
|
| |
|
|
|
|
|
> |
Notes: Will
be valid for all sounds that will be called from this position. |
|
|
|
|
|
|
| |
|
|
|
|
|
|
All values
that are issued by the relevant Animated Sound are |
|
|
|
|
|
|
|
| |
|
|
|
|
|
|
reduced to
1/5 range and be placed at one of the 5 major positions. |
|
|
|
|
|
|
| |
|
|
|
|
|
> |
Indication:
Panorama button will be displayed in red. |
|
|
|
|
|
|
|
|
|
| |
|
|
|
|
|
|
Disable the
value with left mouse-click till new page reset. |
|
|
|
|
|
|
|
|
| |
|
|
|
|
|
> |
Use cases:
Pre-mix of presented sounds |
|
|
|
|
|
|
|
|
|
|
|
| |
|
|
|
|
|
|
|
|
|
|
|
|
|
|
|
|
|
|
|
|
|
|
|
|
|
| Preset Fade-Out |
|
|
|
|
> |
Preset
Fade-Out value for sound member |
|
|
|
|
|
|
|
|
|
|
|
| |
|
|
|
|
|
|
|
|
|
|
|
|
|
|
|
|
|
|
|
|
|
|
|
|
|
| |
|
|
|
|
|
> |
Parameter: sw6 |
|
|
|
|
|
|
|
|
|
|
|
|
|
|
|
|
| |
|
|
|
|
|
> |
Example:
<param name="sw6" value="$2000"> |
|
|
|
|
|
|
|
|
|
|
| |
|
|
|
|
|
> |
Values: [
Panorama + ] "$" + [ ms ] |
|
|
|
|
|
|
|
|
|
|
|
|
| |
|
|
|
|
|
> |
Notes:
Replaces the preset fadeout value in the member definition. |
|
|
|
|
|
|
| |
|
|
|
|
|
|
Can be
combined with the above panorama setting. |
|
|
|
|
|
|
|
|
|
| |
|
|
|
|
|
> |
Indication:
Right-click 'Mute' symbol. Value appears red in lower gray bar. |
|
|
|
|
|
| |
|
|
|
|
|
|
Click into the
bar can change the value again. |
|
|
|
|
|
|
|
|
|
|
| |
|
|
|
|
|
|
Right-click
again to remove display. |
|
|
|
|
|
|
|
|
|
|
|
|
| |
|
|
|
|
|
|
Right-click
again to see change. |
|
|
|
|
|
|
|
|
|
|
|
|
|
| |
|
|
|
|
|
> |
Use cases:
Preset Fade-Out values for playing audience. |
|
|
|
|
|
|
|
|
| |
|
|
|
|
|
|
Change during
play. |
|
|
|
|
|
|
|
|
|
|
|
|
|
|
|
| |
|
|
|
|
|
|
|
|
|
|
|
|
|
|
|
|
|
|
|
|
|
|
|
|
|
| Change Object Size |
|
|
|
|
> |
Change Display
Size of Aminated Sound |
|
|
|
|
|
|
|
|
|
|
|
| |
|
|
|
|
|
|
|
|
|
|
|
|
|
|
|
|
|
|
|
|
|
|
|
|
|
| |
|
|
|
|
|
> |
Parameter:
sw7, object |
|
|
|
|
|
|
|
|
|
|
|
|
|
|
| |
|
|
|
|
|
> |
Example:
<param name="sw7" value="large"> |
|
|
|
|
|
|
|
|
|
|
| |
|
|
|
|
|
|
<object ...
height="248" width="358"> |
|
|
|
|
|
|
|
|
|
|
|
|
| |
|
|
|
|
|
> |
Values:
"medium" | "big" | "palette" |
"large" | "large2" |
|
|
|
|
|
|
|
|
|
| |
|
|
|
|
|
|
Size values
see below. |
|
|
|
|
|
|
|
|
|
|
|
|
|
|
| |
|
|
|
|
|
|
|
|
|
|
|
|
|
|
|
|
|
|
|
|
|
|
|
|
|
| |
|
|
|
|
|
|
Display |
|
sw7 |
|
height |
width |
|
|
|
|
|
|
|
|
|
|
|
| |
|
|
|
|
|
|
|
|
|
|
|
|
|
|
|
|
|
|
|
|
|
|
|
|
|
| |
|
|
|
|
|
|
invisble |
|
|
|
1 |
|
1 |
|
|
|
|
|
|
|
|
|
|
|
| |
|
|
|
|
|
|
small |
|
|
|
13 |
|
14 |
|
|
|
|
|
|
|
|
|
|
|
| |
|
|
|
|
|
|
medium |
|
medium |
39 |
|
84 |
|
|
|
|
|
|
|
|
|
|
|
| |
|
|
|
|
|
|
big |
|
|
|
|
84 |
|
84 |
|
|
|
|
|
|
|
|
|
|
|
| |
|
|
|
|
|
|
palette |
|
palette |
170 |
|
84 |
|
|
|
|
|
|
|
|
|
|
|
| |
|
|
|
|
|
|
large |
|
large |
248 |
|
358 |
|
|
|
|
|
|
|
|
|
|
|
| |
|
|
|
|
|
|
touchscreen |
large2 |
496 |
|
716 |
|
|
|
|
|
|
|
|
|
|
|
| |
|
|
|
|
|
|
|
|
|
|
|
|
|
|
|
|
|
|
|
|
|
|
|
|
|
| |
|
|
|
|
|
> |
Notes: Not
all Animated Sounds are enabled for large display. |
|
|
|
|
|
|
|
| |
|
|
|
|
|
|
In this case,
you will get a distorted view of the small image. |
|
|
|
|
|
|
|
|
| |
|
|
|
|
|
|
Other sizes
are realized by changig only the "height" and
"width" |
|
|
|
|
|
|
|
| |
|
|
|
|
|
|
parameters of
the <object> tag (see values). |
|
|
|
|
|
|
|
|
|
|
| |
|
|
|
|
|
> |
Indication:
Change of Animated Sound display. |
|
|
|
|
|
|
|
|
|
|
| |
|
|
|
|
|
> |
Use cases:
Larger display allows more detailed control of cklicking |
|
|
|
|
|
|
| |
|
|
|
|
|
|
into the
sound graphics. This especially useful for larger sound files. |
|
|
|
|
|
|
| |
|
|
|
|
|
|
Very small or
invisible display allwos to add Animated Sounds |
|
|
|
|
|
|
|
| |
|
|
|
|
|
|
into a web
page in a more descrete way. |
|
|
|
|
|
|
|
|
|
|
|
| |
|
|
|
|
|
|
|
|
|
|
|
|
|
|
|
|
|
|
|
|
|
|
|
|
|
| BUTTON GUIDE |
|
|
|
2. |
Button Guide
and Group Control Options (Group...dcr) |
|
|
|
|
|
|
|
|
|
| GROUP CONTROL |
|
|
|
|
|
|
|
|
|
|
|
|
|
|
|
|
|
|
|
|
|
|
|
|
|
| |
|
|
|
|
The button
guide option allows users of Sound Pages to follow recommended |
|
|
|
|
|
|
| |
|
|
|
|
sequences of
button execution to support a certain musical flow as intended by |
|
|
|
|
|
|
| |
|
|
|
|
the
author. |
|
|
|
|
|
|
|
|
|
|
|
|
|
|
|
|
|
|
| |
|
|
|
|
|
|
|
|
|
|
|
|
|
|
|
|
|
|
|
|
|
|
|
|
|
| |
|
|
|
|
In addition,
the Group control buttons (Play, Stop, Reset, and Forward) can be |
|
|
|
|
|
|
| |
|
|
|
|
customized to
play, stop, or reset a different set of Animated Sounds or to include |
|
|
|
|
|
|
| |
|
|
|
|
sub sequences
derived from the Page Recorder. |
|
|
|
|
|
|
|
|
|
|
|
|
| |
|
|
|
|
|
|
|
|
|
|
|
|
|
|
|
|
|
|
|
|
|
|
|
|
|
| Set Sequence Label |
|
|
|
|
> |
Set Sequence
Label for Button |
|
|
|
|
|
|
|
|
|
|
|
|
|
| |
|
|
|
|
|
|
|
|
|
|
|
|
|
|
|
|
|
|
|
|
|
|
|
|
|
| |
|
|
|
|
|
> |
Parameter: sw5
(Group Controls) |
|
|
|
|
|
|
|
|
|
|
|
|
|
| |
|
|
|
|
|
> |
Example:
<param name="sw5" value="%init!0:1%w2!2000:reset"> |
|
|
|
|
|
|
|
| |
|
|
|
|
|
> |
Values:
"%" + Listen Label + "!" Delay Time + ":" +
Follow Label |
|
|
|
|
|
|
|
| |
|
|
|
|
|
|
[multiple
times] |
|
|
|
|
|
|
|
|
|
|
|
|
|
|
|
|
| |
|
|
|
|
|
|
Listen Label
and Follow Label are alphanumeric strings. Delay Time is |
|
|
|
|
|
|
| |
|
|
|
|
|
|
numeric
string expressing milliseconds. The initial default label is
"init". |
|
|
|
|
|
|
| |
|
|
|
|
|
|
The default
delay time is always set to "0" (set by the FleX Publisher). |
|
|
|
|
|
|
| |
|
|
|
|
|
|
|
|
|
|
|
|
|
|
|
|
|
|
|
|
|
|
|
|
|
| |
|
|
|
|
|
> |
Parameter: sw5
(Page Recorder) |
|
|
|
|
|
|
|
|
|
|
|
|
| |
|
|
|
|
|
> |
Example:
<param name="sw5" value="%init:1%w2:reset"> |
|
|
|
|
|
|
|
|
| |
|
|
|
|
|
> |
Values:
"%" + Listen Label + ":" + Follow Label [multiple times] |
|
|
|
|
|
|
|
| |
|
|
|
|
|
|
Listen Label
and Follow Label are alphanumeric strings. |
|
|
|
|
|
|
|
|
| |
|
|
|
|
|
|
The initial
default label is "init". |
|
|
|
|
|
|
|
|
|
|
|
|
|
| |
|
|
|
|
|
|
|
|
|
|
|
|
|
|
|
|
|
|
|
|
|
|
|
|
|
| |
|
|
|
|
|
> |
Notes: As
soon as a label is set and the label equals the Listen Label, |
|
|
|
|
|
|
| |
|
|
|
|
|
|
the button
will be highlighted. As soon as the button will be executed, |
|
|
|
|
|
|
| |
|
|
|
|
|
|
the Follow
Label will be set as the new label to be recognized by a |
|
|
|
|
|
|
| |
|
|
|
|
|
|
following
button. |
|
|
|
|
|
|
|
|
|
|
|
|
|
|
|
|
| |
|
|
|
|
|
|
If a delay
time is set, the button will be constantly highlighted for the |
|
|
|
|
|
|
|
| |
|
|
|
|
|
|
duration of
the delay. As soon as the delay is elapsed or no delay has |
|
|
|
|
|
|
| |
|
|
|
|
|
|
been set, the
button will blink in an approximate frequency of 1 second. |
|
|
|
|
|
|
| |
|
|
|
|
|
|
Since a label
set can be included multiple times, the same button |
|
|
|
|
|
|
|
| |
|
|
|
|
|
|
can react to
different labels in order to direct to identical labels (loop) |
|
|
|
|
|
|
| |
|
|
|
|
|
|
or to
different labels (alternative). |
|
|
|
|
|
|
|
|
|
|
|
|
|
| |
|
|
|
|
|
|
Button Guide
is available for group and Page Recorder buttons |
|
|
|
|
|
|
|
| |
|
|
|
|
|
|
(see
"Record and Play" section in the "Preferences" page). |
|
|
|
|
|
|
|
|
| |
|
|
|
|
|
|
Button
highlighting can be activated by right mouse click for group |
|
|
|
|
|
|
|
| |
|
|
|
|
|
|
buttons only.
If the button does not contain a label set, the "init" label |
|
|
|
|
|
|
| |
|
|
|
|
|
|
will be set.
Delay time values will be ignored in this case. |
|
|
|
|
|
|
|
|
| |
|
|
|
|
|
|
|
|
|
|
|
|
|
|
|
|
|
|
|
|
|
|
|
|
|
| |
|
|
|
|
|
|
The initial
label is written into the internal "buttonfollow" preference |
|
|
|
|
|
|
|
| |
|
|
|
|
|
|
file. When
using palettes (see below), upon every load of a palette |
|
|
|
|
|
|
|
| |
|
|
|
|
|
|
belonging to
a base palette, the palette index (one alpha-numeric key) |
|
|
|
|
|
|
| |
|
|
|
|
|
|
is
automatically written to "buttonfollow". This allows
context-sensitive |
|
|
|
|
|
|
| |
|
|
|
|
|
|
appliance of
group parameters also for palettes without reloading |
|
|
|
|
|
|
|
| |
|
|
|
|
|
|
the base
palette HTML file. |
|
|
|
|
|
|
|
|
|
|
|
|
|
|
| |
|
|
|
|
|
|
|
|
|
|
|
|
|
|
|
|
|
|
|
|
|
|
|
|
|
| |
|
|
|
|
|
> |
Parameter:
sw6 (Group Reset and Group Stop only) |
|
|
|
|
|
|
|
|
|
| |
|
|
|
|
|
> |
Example:
<param name="sw6" value="reset"> |
|
|
|
|
|
|
|
|
|
|
| |
|
|
|
|
|
> |
Values:
Alphanumeric string or "@" |
|
|
|
|
|
|
|
|
|
|
|
|
| |
|
|
|
|
|
> |
Notes: As
soon as the Group Reset or Group Stop button is pressed, |
|
|
|
|
|
|
| |
|
|
|
|
|
|
the indicated
label is set and replaces the current Listen Label. |
|
|
|
|
|
|
|
| |
|
|
|
|
|
|
This precedes
any setting provided in sw5 (see above) and is used |
|
|
|
|
|
|
| |
|
|
|
|
|
|
in cases
where the user should be guided to start a sequence again. |
|
|
|
|
|
|
| |
|
|
|
|
|
|
If
"@" is used instead of a string, the current session path button |
|
|
|
|
|
|
|
| |
|
|
|
|
|
|
guide
sequence label is being used in accordance with the wrapping |
|
|
|
|
|
|
| |
|
|
|
|
|
|
file as
described in the "Use Wrapping File to Launch Sound Pages |
|
|
|
|
|
|
| |
|
|
|
|
|
|
with Different
Settings" section below (4.). |
|
|
|
|
|
|
|
|
|
|
|
| |
|
|
|
|
|
|
|
|
|
|
|
|
|
|
|
|
|
|
|
|
|
|
|
|
|
| |
|
|
|
|
|
> |
Indication:
Group buttons can be identified by a <!-- GroupX --> or |
|
|
|
|
|
|
|
| |
|
|
|
|
|
|
similar tag. |
|
|
|
|
|
|
|
|
|
|
|
|
|
|
|
|
| |
|
|
|
|
|
|
Preferences
buttons are residing in "<name>Menu.htm" files and can be |
|
|
|
|
|
|
| |
|
|
|
|
|
|
detected by
their respective identifier that is also used at the page, for |
|
|
|
|
|
|
| |
|
|
|
|
|
|
example,
<!-- Reset -->. |
|
|
|
|
|
|
|
|
|
|
|
|
|
|
| |
|
|
|
|
|
|
Button
highlighting is implemented as 1second blinking that can vary |
|
|
|
|
|
|
| |
|
|
|
|
|
|
according to
the actual performance load. |
|
|
|
|
|
|
|
|
|
|
|
| |
|
|
|
|
|
> |
Use cases:
Guiding a user through a Sound Trip in a well defined |
|
|
|
|
|
|
|
| |
|
|
|
|
|
|
manner.
Guiding a user through operations with the appliance of |
|
|
|
|
|
|
|
| |
|
|
|
|
|
|
Preferences
functions (for example, for tutorials). |
|
|
|
|
|
|
|
|
|
|
| |
|
|
|
|
|
|
The Delay
Time option can be used in order to indicate when a user |
|
|
|
|
|
|
| |
|
|
|
|
|
|
should go
ahead to perform the current intended operation. This allows |
|
|
|
|
|
|
| |
|
|
|
|
|
|
a timely
structure of the recommended Sound Trip (speed of changes). |
|
|
|
|
|
|
| |
|
|
|
|
|
|
|
|
|
|
|
|
|
|
|
|
|
|
|
|
|
|
|
|
|
| Change Sound Group |
|
|
|
|
> |
Define new
set of Animated Sounds to be executed by the relevant |
|
|
|
|
|
| |
|
|
|
|
|
Group Control |
|
|
|
|
|
|
|
|
|
|
|
|
|
|
|
|
| |
|
|
|
|
|
|
|
|
|
|
|
|
|
|
|
|
|
|
|
|
|
|
|
|
|
| |
|
|
|
|
|
> |
Parameter: sw2 |
|
|
|
|
|
|
|
|
|
|
|
|
|
|
|
|
| |
|
|
|
|
|
> |
Example:
<param name="sw2" value="Sound Trip5:S19731: |
|
|
|
|
|
|
|
|
| |
|
|
|
|
|
|
Sound
Trip6:A3998:Sound Trip7:S18374:Sound Trip8:G19694:"> |
|
|
|
|
|
|
|
| |
|
|
|
|
|
> |
Values:
Placeholder (sw2) + ":" + Animated Sound Label + ":" |
|
|
|
|
|
|
|
|
| |
|
|
|
|
|
|
of an
Animated Sound object, usually multiple times. |
|
|
|
|
|
|
|
|
|
| |
|
|
|
|
|
|
Animated
Sound Label = "S0000" for Play, Stop, and Forward |
|
|
|
|
|
|
|
| |
|
|
|
|
|
|
Animated
Sound Label = Sound Index (sw1) + Sound Number (src) |
|
|
|
|
|
|
|
| |
|
|
|
|
|
|
for Play,
Stop, and Reset (see description below). |
|
|
|
|
|
|
|
|
|
|
| |
|
|
|
|
|
|
|
|
|
|
|
|
|
|
|
|
|
|
|
|
|
|
|
|
|
| |
|
|
|
|
|
> |
Notes: You
can delete or add any pair of Group and Animated Sound |
|
|
|
|
|
|
| |
|
|
|
|
|
|
Labels. The
action defined by the group function (play, stop, reset, or |
|
|
|
|
|
|
| |
|
|
|
|
|
|
stop
initiated by forward) will be executed for the changed or new set |
|
|
|
|
|
|
| |
|
|
|
|
|
|
of Animated
Sounds. |
|
|
|
|
|
|
|
|
|
|
|
|
|
|
|
| |
|
|
|
|
|
|
You can also
keep the same Placeholder and call a different Animated |
|
|
|
|
|
|
| |
|
|
|
|
|
|
Sound (this
might result in online loading problems). |
|
|
|
|
|
|
|
|
|
| |
|
|
|
|
|
|
|
|
|
|
|
|
|
|
|
|
|
|
|
|
|
|
|
|
|
| |
|
|
|
|
|
|
Play: The
sound will continue playing the Animated Sound that is currently |
|
|
|
|
|
| |
|
|
|
|
|
|
open at the
Placeholder. If you use a real sound reference instead of |
|
|
|
|
|
|
| |
|
|
|
|
|
|
"S0000",
the indicated sound will be opened first and then be played. |
|
|
|
|
|
|
| |
|
|
|
|
|
|
When Group
Play control is pressed again, the same list will be stopped |
|
|
|
|
|
|
| |
|
|
|
|
|
|
according to
the functionality described below. This can be suppressed |
|
|
|
|
|
|
| |
|
|
|
|
|
|
introducing
the "(nstp)" option prior to the elements. "(nply)" will
do the |
|
|
|
|
|
|
| |
|
|
|
|
|
|
opposite: It
will not play but stop what is useful to stop subsequences (see |
|
|
|
|
|
| |
|
|
|
|
|
|
below). In
this case the relevant placeholders must be listed. |
|
|
|
|
|
|
|
|
| |
|
|
|
|
|
|
|
|
|
|
|
|
|
|
|
|
|
|
|
|
|
|
|
|
|
| |
|
|
|
|
|
|
In addition
"(stop)", "(mute)", "(play)",
"(keep)", and "(dirc)" can override the |
|
|
|
|
|
| |
|
|
|
|
|
|
standard
behavior of the elements that are listed when "play" is
pressed. |
|
|
|
|
|
| |
|
|
|
|
|
|
|
|
|
|
|
|
|
|
|
|
|
|
|
|
|
|
|
|
|
| |
|
|
|
|
|
|
(stop) |
Stop a sound
instead of playing it. |
|
|
|
|
|
|
|
|
|
|
| |
|
|
|
|
|
|
(mute) |
Reset a sound
instead of playing it. |
|
|
|
|
|
|
|
|
|
|
| |
|
|
|
|
|
|
(play) |
Force play
again, after other options have been set. |
|
|
|
|
|
|
|
| |
|
|
|
|
|
|
(keep) |
Play the
sound only if no sound is currently playing |
|
|
|
|
|
|
|
| |
|
|
|
|
|
|
|
|
at the
placeholder position, otherwise keep the current |
|
|
|
|
|
|
|
| |
|
|
|
|
|
|
|
|
sound playing. |
|
|
|
|
|
|
|
|
|
|
|
|
|
|
| |
|
|
|
|
|
|
(dirc) |
Play the
sound only if the Play group control was directly |
|
|
|
|
|
|
| |
|
|
|
|
|
|
|
|
executed. If
the element is called by another Play group |
|
|
|
|
|
|
| |
|
|
|
|
|
|
|
|
control, it
will be suppressed. |
|
|
|
|
|
|
|
|
|
|
|
| |
|
|
|
|
|
|
|
|
|
|
|
|
|
|
|
|
|
|
|
|
|
|
|
|
|
| |
|
|
|
|
TIP |
1 |
|
|
|
|
|
|
|
|
|
|
|
|
|
|
|
|
|
|
|
| |
|
|
|
|
|
(dirc) can be
used to launch single elements directly, whereas a group |
|
|
|
|
|
|
|
| |
|
|
|
|
|
of such
elements can be launched from a Play group control on a higher |
|
|
|
|
|
|
|
| |
|
|
|
|
|
level. Then.
the lower Play group controls can still be launched for |
|
|
|
|
|
|
|
|
| |
|
|
|
|
|
later
interaction whithout having them launching the grouped elements again. |
|
|
|
|
|
|
| |
|
|
|
|
|
The advantage
of launching elements as a group from a higher level |
|
|
|
|
|
|
|
| |
|
|
|
|
|
is a higher degree of
synchronity. |
|
|
|
|
|
|
|
|
|
|
|
|
|
| |
|
|
|
|
|
|
|
|
|
|
|
|
|
|
|
|
|
|
|
|
|
|
|
|
|
| |
|
|
|
|
|
|
The options
are valid for the current and all following elements |
|
|
|
|
|
|
|
| |
|
|
|
|
|
|
in the list,
till a new option would appear. They are activated only |
|
|
|
|
|
|
|
| |
|
|
|
|
|
|
with the Play
status of the Play group control. When the Play status |
|
|
|
|
|
|
|
| |
|
|
|
|
|
|
changes to
Stop (second time pressing the Play group control), |
|
|
|
|
|
|
|
| |
|
|
|
|
|
|
these options
will be ignored. |
|
|
|
|
|
|
|
|
|
|
|
|
|
| |
|
|
|
|
|
|
The options
can usually also be used in sw4 sequences (see below). |
|
|
|
|
|
|
| |
|
|
|
|
|
|
|
|
|
|
|
|
|
|
|
|
|
|
|
|
|
|
|
|
|
| |
|
|
|
|
|
|
Stop: The
sound will stop after its preset decay period. All scheduled |
|
|
|
|
|
|
| |
|
|
|
|
|
|
animated
links will be disabled. If you use a real sound reference instead |
|
|
|
|
|
| |
|
|
|
|
|
|
of
"S0000", the indicated sound will be loaded and immediately muted |
|
|
|
|
|
|
| |
|
|
|
|
|
|
(comparing to
Reset). |
|
|
|
|
|
|
|
|
|
|
|
|
|
|
| |
|
|
|
|
|
|
|
|
|
|
|
|
|
|
|
|
|
|
|
|
|
|
|
|
|
| |
|
|
|
|
|
|
Forward: The
sw2 values are valid for the stop function which is executed |
|
|
|
|
|
| |
|
|
|
|
|
|
as described
in Stop. sw6 will allow to define a different destination group |
|
|
|
|
|
| |
|
|
|
|
|
|
(see below). |
|
|
|
|
|
|
|
|
|
|
|
|
|
|
|
|
| |
|
|
|
|
|
|
|
|
|
|
|
|
|
|
|
|
|
|
|
|
|
|
|
|
|
| |
|
|
|
|
|
> |
Indication:
Group functions introduced by <!-- Group ... --> label. |
|
|
|
|
|
|
|
| |
|
|
|
|
|
> |
Use cases:
Execution of individual, overlapping, and complex cross-page |
|
|
|
|
|
| |
|
|
|
|
|
|
networking
oriented group settings, especially useful in accordance with |
|
|
|
|
|
| |
|
|
|
|
|
|
the Button
Guide function (see above) for easy navigation. |
|
|
|
|
|
|
|
|
| |
|
|
|
|
|
|
|
|
|
|
|
|
|
|
|
|
|
|
|
|
|
|
|
|
|
| Define Recorder Type |
|
|
|
|
> |
Define
Recorder Type in PageRecord procedure |
|
|
|
|
|
|
|
|
|
| |
|
|
|
|
|
|
|
|
|
|
|
|
|
|
|
|
|
|
|
|
|
|
|
|
|
| |
|
|
|
|
|
> |
Parameter: sw3 |
|
|
|
|
|
|
|
|
|
|
|
|
|
|
|
|
| |
|
|
|
|
|
> |
Example:
<param name="sw3" value="Reef Recorder"> |
|
|
|
|
|
|
|
|
| |
|
|
|
|
|
> |
Values:
"Reef Recorder" | none |
|
|
|
|
|
|
|
|
|
|
|
|
|
| |
|
|
|
|
|
> |
Notes: By
default, the PageRecord procedure assumes the |
|
|
|
|
|
|
|
|
| |
|
|
|
|
|
|
"Classic
Recorder" functionality which is provided for the |
|
|
|
|
|
|
|
|
| |
|
|
|
|
|
|
Portal, the
Workbench, and optionally for other Sound Page |
|
|
|
|
|
|
|
|
| |
|
|
|
|
|
|
projects. |
|
|
|
|
|
|
|
|
|
|
|
|
|
|
|
|
|
| |
|
|
|
|
|
|
If a project
provides additional functionality through the |
|
|
|
|
|
|
|
|
|
| |
|
|
|
|
|
|
"Reef
Recorder" functionality (including special capabilities |
|
|
|
|
|
|
|
|
| |
|
|
|
|
|
|
of GroupPlay
functions as described in the Animated Sound |
|
|
|
|
|
|
|
|
| |
|
|
|
|
|
|
help), the
PageRecord procedure needs to include "Reef |
|
|
|
|
|
|
|
|
| |
|
|
|
|
|
|
Recorder"
in parameter sw3. |
|
|
|
|
|
|
|
|
|
|
|
|
|
| |
|
|
|
|
|
|
"Reef
Recorder" functionality is applied in "The Sound Surf Beach", |
|
|
|
|
|
|
| |
|
|
|
|
|
|
"The
Sound S@nd Bank", "Palette" configurations, and optionally |
|
|
|
|
|
|
|
| |
|
|
|
|
|
|
in the
"Freesound Injections", and "Freesound Explorations"
projects. |
|
|
|
|
|
|
| |
|
|
|
|
|
> |
Indication:
Group functions introduced by <!-- Group ... --> label. |
|
|
|
|
|
|
|
| |
|
|
|
|
|
> |
Use cases:
Extended recording and play capabilities (hierarchical |
|
|
|
|
|
|
|
| |
|
|
|
|
|
|
recording). |
|
|
|
|
|
|
|
|
|
|
|
|
|
|
|
|
| |
|
|
|
|
|
|
|
|
|
|
|
|
|
|
|
|
|
|
|
|
|
|
|
|
|
| |
|
|
|
|
|
|
For more
information, open "Appendix A" of the "Animated Sound" |
|
>> |
|
|
|
|
|
| |
|
|
|
|
|
|
help. |
|
|
|
|
|
|
|
|
|
|
|
|
|
|
|
|
|
| |
|
|
|
|
|
|
|
|
|
|
|
|
|
|
|
|
|
|
|
|
|
|
|
|
|
| Change Group Label |
|
|
|
|
> |
Define new
Group Label for Multiple Use of Group Control |
|
|
|
|
|
|
|
| |
|
|
|
|
|
|
|
|
|
|
|
|
|
|
|
|
|
|
|
|
|
|
|
|
|
| |
|
|
|
|
|
> |
Parameter: sw3 |
|
|
|
|
|
|
|
|
|
|
|
|
|
|
|
|
| |
|
|
|
|
|
> |
Example:
<param name="sw3" value="Figures 008_1"> |
|
|
|
|
|
|
|
|
|
| |
|
|
|
|
|
> |
Value: Any
string [ ";" + any string ..] |
|
|
|
|
|
|
|
|
|
|
|
|
| |
|
|
|
|
|
|
Multiple
strings divided by ";" require use of sw7 (see below) |
|
|
|
|
|
|
|
|
| |
|
|
|
|
|
|
and are not
valid for Group Play controls. |
|
|
|
|
|
|
|
|
|
|
|
| |
|
|
|
|
|
> |
Notes: Group
functions can link to any of the same or a similar |
|
|
|
|
|
|
|
| |
|
|
|
|
|
|
set of
Animated Sounds. |
|
|
|
|
|
|
|
|
|
|
|
|
|
|
| |
|
|
|
|
|
|
The Group
Label controls the activation status of the Group Play |
|
|
|
|
|
|
|
| |
|
|
|
|
|
|
control (red
color) and the uniqueness for Page Recorder's record and |
|
|
|
|
|
|
| |
|
|
|
|
|
|
play
functions for all Group controls. If the play indication (red color) of |
|
|
|
|
|
|
| |
|
|
|
|
|
|
a Group Play
control should be disabled, a second Group control |
|
|
|
|
|
|
|
| |
|
|
|
|
|
|
(Stop,
Forward, or Reset) need to share the same Group Label, or the |
|
|
|
|
|
|
| |
|
|
|
|
|
|
Group Play
button must be pressed again (play/stop toggle). |
|
|
|
|
|
|
|
|
| |
|
|
|
|
|
|
If a number
of different Group Play buttons need to be stopped, |
|
|
|
|
|
|
|
| |
|
|
|
|
|
|
multiple
Group Labels can be entered in sw3. In this case a unique Group |
|
|
|
|
|
| |
|
|
|
|
|
|
Label must be
entered in addition in sw7 (see below). |
|
|
|
|
|
|
|
|
|
| |
|
|
|
|
|
> |
Indication:
Group functions introduced by <!-- Group ... --> label. |
|
|
|
|
|
|
|
| |
|
|
|
|
|
> |
Use cases:
Execution of individual, overlapping, and complex cross-page |
|
|
|
|
|
| |
|
|
|
|
|
|
networking
oriented group settings, especially useful in accordance with |
|
|
|
|
|
| |
|
|
|
|
|
|
the Button
Guide function (see above) for easy navigation. |
|
|
|
|
|
|
|
|
| |
|
|
|
|
|
|
|
|
|
|
|
|
|
|
|
|
|
|
|
|
|
|
|
|
|
| Stop Group indirectly |
|
|
|
|
> |
Stop the
Group Play Control Playlist indirectly |
|
|
|
|
|
|
|
|
|
|
| through Stop |
|
|
|
|
|
|
|
|
|
|
|
|
|
|
|
|
|
|
|
|
|
|
|
|
|
| |
|
|
|
|
|
> |
Parameter: sw4 |
|
|
|
|
|
|
|
|
|
|
|
|
|
|
|
|
| |
|
|
|
|
|
> |
Example:
<param name="sw4" value="indirect"> |
|
|
|
|
|
|
|
|
|
|
| |
|
|
|
|
|
> |
Value:
"indirect" |
|
|
|
|
|
|
|
|
|
|
|
|
|
|
|
|
| |
|
|
|
|
|
> |
Notes: By
default, the Group Stop control sets the Group Play |
|
|
|
|
|
|
|
|
| |
|
|
|
|
|
|
control mode
of the Group Label(s) set in sw3 to "stopped" and |
|
|
|
|
|
|
|
| |
|
|
|
|
|
|
stops the
relevant elements in its own stop list set in sw2. |
|
|
|
|
|
|
|
|
| |
|
|
|
|
|
|
With the
"indirect" option, the playlists set in sw2 of the Group Play |
|
|
|
|
|
|
|
| |
|
|
|
|
|
|
controls are
stopped in addition to the Play control mode. |
|
|
|
|
|
|
|
|
| |
|
|
|
|
|
> |
Indication:
Group functions introduced by <!-- Group ... --> label. |
|
|
|
|
|
|
|
| |
|
|
|
|
|
> |
Use cases:
Distributed and context depending management of |
|
|
|
|
|
|
|
| |
|
|
|
|
|
|
playlists
avoiding reference overhead when changing groups of |
|
|
|
|
|
|
|
| |
|
|
|
|
|
|
Animated
Sounds. |
|
|
|
|
|
|
|
|
|
|
|
|
|
|
|
| |
|
|
|
|
|
|
|
|
|
|
|
|
|
|
|
|
|
|
|
|
|
|
|
|
|
| Play Group directly |
|
|
|
|
> |
Specify Group
for Direct Play through Group Forward Control |
|
|
|
|
|
|
|
| through Forward |
|
|
|
|
|
|
|
|
|
|
|
|
|
|
|
|
|
|
|
|
|
|
|
|
|
| |
|
|
|
|
|
> |
Parameter: sw4 |
|
|
|
|
|
|
|
|
|
|
|
|
|
|
|
|
| |
|
|
|
|
|
> |
Example:
<param name="sw4" value="Sound Trip5:S19731: |
|
|
|
|
|
|
|
|
| |
|
|
|
|
|
|
Sound
Trip6:A3998:Sound Trip7:S18374:Sound Trip8:G19694:"> |
|
|
|
|
|
|
|
| |
|
|
|
|
|
> |
Values:
Placeholder (sw2) + ":" + Animated Sound Label + ":" |
|
|
|
|
|
|
|
|
| |
|
|
|
|
|
|
of an
Animated Sound object, usually multiple times. |
|
|
|
|
|
|
|
|
|
| |
|
|
|
|
|
|
Animated
Sound Label = "S0000" for launching currently open sound |
|
|
|
|
|
|
| |
|
|
|
|
|
|
Animated
Sound Label = Sound Index (sw1) + Sound Number (src) |
|
|
|
|
|
|
|
| |
|
|
|
|
|
|
for launching
specified sound |
|
|
|
|
|
|
|
|
|
|
|
|
|
| |
|
|
|
|
|
> |
Notes:
Combining the function for stopping a group of sounds in sw2 |
|
|
|
|
|
|
| |
|
|
|
|
|
|
with direct
launch of a new group here in sw4 provides a convenient |
|
|
|
|
|
|
| |
|
|
|
|
|
|
way to link
groups or parts together in a continuous way of playing |
|
|
|
|
|
|
|
| |
|
|
|
|
|
|
without the
need to include Group Play and Group Stop controls. |
|
|
|
|
|
|
|
| |
|
|
|
|
|
|
sw4 allows to
launch a group without the need to refer to another |
|
|
|
|
|
|
|
| |
|
|
|
|
|
|
Group Play
control that would launch the group. However, independent |
|
|
|
|
|
|
| |
|
|
|
|
|
|
sequences
(see sw6 of Group Play controls) are not available through |
|
|
|
|
|
|
| |
|
|
|
|
|
|
the Group
Forward control. |
|
|
|
|
|
|
|
|
|
|
|
|
|
|
| |
|
|
|
|
|
> |
Indication:
Group functions introduced by <!-- Group ... --> label. |
|
|
|
|
|
|
|
| |
|
|
|
|
|
> |
Use cases:
Execution of individual, overlapping, and complex cross-page |
|
|
|
|
|
| |
|
|
|
|
|
|
networking
oriented group settings, especially useful in accordance with |
|
|
|
|
|
| |
|
|
|
|
|
|
the Button
Guide function (see above) for easy navigation. |
|
|
|
|
|
|
|
|
| |
|
|
|
|
|
|
|
|
|
|
|
|
|
|
|
|
|
|
|
|
|
|
|
|
|
| Reset Sounds for |
|
|
|
|
> |
Stop or Reset
a Group of Sounds from a Group Play control |
|
|
|
|
|
|
|
| Sub Sequences |
|
|
|
|
|
|
|
|
|
|
|
|
|
|
|
|
|
|
|
|
|
|
|
|
|
| |
|
|
|
|
|
> |
Parameter: sw4 |
|
|
|
|
|
|
|
|
|
|
|
|
|
|
|
|
| |
|
|
|
|
|
> |
Example:
<param name="sw4" value="Sound Trip5:S19731: |
|
|
|
|
|
|
|
|
| |
|
|
|
|
|
|
Sound
Trip6:A3998:(stop)Sound Trip7:S18374:Sound Trip8:G19694:"> |
|
|
|
|
|
|
| |
|
|
|
|
|
> |
Values: [
option ] + Placeholder (sw2) + ":" + Animated Sound |
|
|
|
|
|
|
|
|
| |
|
|
|
|
|
|
Label +
":" of an Animated Sound object, usually multiple times. |
|
|
|
|
|
|
|
| |
|
|
|
|
|
|
Option =
"(stop)" or "(mute)" |
|
|
|
|
|
|
|
|
|
|
|
|
|
| |
|
|
|
|
|
|
Animated
Sound Label = Sound Index (sw1) + Sound Number (src) |
|
|
|
|
|
|
|
| |
|
|
|
|
|
> |
Notes: When
using Sub Sequences in sw6 this parameter can make |
|
|
|
|
|
|
| |
|
|
|
|
|
|
sure that the
desired sounds are in position when a Sub Sequence |
|
|
|
|
|
|
|
| |
|
|
|
|
|
|
tries to
access them (most of the Recorder commands require |
|
|
|
|
|
|
|
| |
|
|
|
|
|
|
the actual
sound being displayed, otherwise they would be ignored). |
|
|
|
|
|
|
| |
|
|
|
|
|
|
This way,
Group Reset controls can be avoided. This parameter, |
|
|
|
|
|
|
|
| |
|
|
|
|
|
|
however,
should not call identical group members in sw2. |
|
|
|
|
|
|
|
|
| |
|
|
|
|
|
|
In addition,
any individual set of animated sounds can be stopped or |
|
|
|
|
|
|
| |
|
|
|
|
|
|
reset using
either the (stop) or the (mute) option. The option remains |
|
|
|
|
|
|
| |
|
|
|
|
|
|
active for
all remaining elements, till another option appears in a |
|
|
|
|
|
|
|
| |
|
|
|
|
|
|
later element. |
|
|
|
|
|
|
|
|
|
|
|
|
|
|
|
|
| |
|
|
|
|
|
|
This option
is valid only for the ON status of the Group Play control, |
|
|
|
|
|
|
|
| |
|
|
|
|
|
|
and is being
ignored when the OFF status is given, i.e., if the played |
|
|
|
|
|
|
| |
|
|
|
|
|
|
status (pink,
blue, or red) changes to the stopped status (black). |
|
|
|
|
|
|
|
| |
|
|
|
|
|
> |
Indication:
Group functions introduced by <!-- Group ... --> label. |
|
|
|
|
|
|
|
| |
|
|
|
|
|
> |
Use cases:
Reset a Group of Sounds for assuring Sub Sequence play, |
|
|
|
|
|
|
| |
|
|
|
|
|
|
Individual
stop or reset of Animated Sounds. |
|
|
|
|
|
|
|
|
|
|
| |
|
|
|
|
|
|
|
|
|
|
|
|
|
|
|
|
|
|
|
|
|
|
|
|
|
| Load additional Page |
|
|
|
|
> |
Load
additional Page from individual Project Folders (Reset) |
|
|
|
|
|
|
|
| to any Frame |
|
|
|
|
|
|
|
|
|
|
|
|
|
|
|
|
|
|
|
|
|
|
|
|
|
| |
|
|
|
|
|
> |
Parameter: sw4 |
|
|
|
|
|
|
|
|
|
|
|
|
|
|
|
|
| |
|
|
|
|
|
> |
Example:
<param name="sw4" value="Xpressions01.htm;topframe2" |
|
|
|
|
|
|
| |
|
|
|
|
|
> |
Values:
Destination file + ";" + destination frame (HTML) |
|
|
|
|
|
|
|
|
|
| |
|
|
|
|
|
|
Prefs-ID:
project.txt |
|
|
|
|
|
|
|
|
|
|
|
|
|
|
|
| |
|
|
|
|
|
> |
Notes: When
using different projects, generic sound pages can invoke |
|
|
|
|
|
|
| |
|
|
|
|
|
|
project
specific files from another destination and be included in the same |
|
|
|
|
|
| |
|
|
|
|
|
|
page using
standard HTML frames. |
|
|
|
|
|
|
|
|
|
|
|
|
| |
|
|
|
|
|
|
The project
tag that allows to control this process is issued by the |
|
|
|
|
|
|
|
| |
|
|
|
|
|
|
InitSong.dcr
function, sw9 (see below). This tag is used as subfolder |
|
|
|
|
|
|
| |
|
|
|
|
|
|
path and will
be combined with the destination file above. |
|
|
|
|
|
|
|
|
| |
|
|
|
|
|
> |
Indication:
Group functions introduced by <!-- Group ... --> label. |
|
|
|
|
|
|
|
| |
|
|
|
|
|
> |
Use case: It
is recommended to issue this parameter only once from a project |
|
|
|
|
|
| |
|
|
|
|
|
|
portal page.
Then, the GroupReset.dcr page load function will automatically |
|
|
|
|
|
| |
|
|
|
|
|
|
rely on this
relative path for the duration the project is being used. Opening |
|
|
|
|
|
| |
|
|
|
|
|
|
another
portal will cause the GroupReset.dcr page load function to look for |
|
|
|
|
|
| |
|
|
|
|
|
|
the load file
in another folder. |
|
|
|
|
|
|
|
|
|
|
|
|
|
| |
|
|
|
|
|
|
|
|
|
|
|
|
|
|
|
|
|
|
|
|
|
|
|
|
|
| Launch Independent |
|
|
|
|
> |
Perform
Recorded Sequences with the Group Play Control (Sub |
|
|
|
|
|
|
| Sequence from Play |
|
|
|
|
|
Sequences) |
|
|
|
|
|
|
|
|
|
|
|
|
|
|
|
|
|
| |
|
|
|
|
|
|
|
|
|
|
|
|
|
|
|
|
|
|
|
|
|
|
|
|
|
| |
|
|
|
|
|
> |
Parameter: sw6 |
|
|
|
|
|
|
|
|
|
|
|
|
|
|
|
|
| |
|
|
|
|
|
> |
Example:
<param name="sw6" value="[50](2000-2300): |
|
|
|
|
|
|
|
|
|
| |
|
|
|
|
|
|
LinkSesame1330s$S5150e$;1000:LinkSesame1330s$S5149e$; |
|
|
|
|
|
|
|
| |
|
|
|
|
|
|
3000:LinkSesame1330s$S5151e$;1000:GroupPlayStop;"> |
|
|
|
|
|
|
|
|
| |
|
|
|
|
|
> |
Values: [
"[" + %Value + "]" + |
|
|
|
|
|
|
|
|
|
|
|
|
|
| |
|
|
|
|
|
|
Any time value + ":" + any
Recorder command + ";" ..] |
|
|
|
|
|
|
|
|
|
| |
|
|
|
|
|
|
%Value:
1-100, This optional function skips the current |
|
|
|
|
|
|
|
|
|
| |
|
|
|
|
|
|
element in
the sequence and moves to the next according to |
|
|
|
|
|
|
|
|
| |
|
|
|
|
|
|
the
%-probability. |
|
|
|
|
|
|
|
|
|
|
|
|
|
|
|
| |
|
|
|
|
|
|
Random
numbers: Instead of any Integer string within any |
|
|
|
|
|
|
|
|
| |
|
|
|
|
|
|
expression
use "(" + lower value + "-" + higher value +
")" |
|
|
|
|
|
|
|
|
| |
|
|
|
|
|
|
Time value:
In milliseconds. Unlike in the Page Recorder |
|
|
|
|
|
|
|
|
| |
|
|
|
|
|
|
time values
are usually relatively evaluated, expressing the |
|
|
|
|
|
|
|
|
| |
|
|
|
|
|
|
number of
milliseconds that elapses till the next command is |
|
|
|
|
|
|
|
|
| |
|
|
|
|
|
|
being executed
(see also sw8 below). |
|
|
|
|
|
|
|
|
|
|
|
|
| |
|
|
|
|
|
|
"GroupPlayStop":
Stops sequence execution |
|
|
|
|
|
|
|
|
|
|
| |
|
|
|
|
|
|
"GroupPlayFree":
Stops sequence but continues animated playing |
|
|
|
|
|
|
| |
|
|
|
|
|
|
"GeneralStop":
Stops all sequences and the Page Recorder |
|
|
|
|
|
|
|
| |
|
|
|
|
|
|
"GroupPlayLoop":
Continuously repeats the sequence |
|
|
|
|
|
|
|
|
|
| |
|
|
|
|
|
|
"ForcePlay_"
+ Group Control ID: calls another sequence to play |
|
|
|
|
|
|
|
| |
|
|
|
|
|
|
"ForceStop_"
+ Group Control ID: calls another sequence to stop |
|
|
|
|
|
|
|
| |
|
|
|
|
|
|
Group Control
ID: Root name + "_" + Integer |
|
|
|
|
|
|
|
|
|
|
|
| |
|
|
|
|
|
|
Parameter
sw8: Allows permutation of elements (see below) |
|
|
|
|
|
|
|
|
| |
|
|
|
|
|
|
Recorder
commands: See "Page Recorder Options" section below |
|
|
|
|
|
|
| |
|
|
|
|
|
|
|
|
|
|
|
|
|
|
|
|
|
|
|
|
|
|
|
|
|
| |
|
|
|
|
|
> |
Notes:
Scheduled sequences as known from the Page Recorder (see |
|
|
|
|
|
|
| |
|
|
|
|
|
|
below) can be
launched individually and in parallel instead or together |
|
|
|
|
|
|
| |
|
|
|
|
|
|
with the
standard call of group elements as known from parameter sw2. |
|
|
|
|
|
|
| |
|
|
|
|
|
|
All commands
are available including those that control Group Controls, |
|
|
|
|
|
|
| |
|
|
|
|
|
|
which allows
to create hierarchical sequences as well. Group Play |
|
|
|
|
|
|
|
| |
|
|
|
|
|
|
sequences can
be automatically stopped using GroupPlayStop at the end |
|
|
|
|
|
| |
|
|
|
|
|
|
of the
sequence, or being looped using GroupPlayLoop instead. In addition |
|
|
|
|
|
| |
|
|
|
|
|
|
two modes of
permutation are available as described below (sw8). |
|
|
|
|
|
|
| |
|
|
|
|
|
|
Integer
values can be differentiated by a simple random formula that |
|
|
|
|
|
|
| |
|
|
|
|
|
|
allows any
random value within a defined range (see Values above). |
|
|
|
|
|
|
| |
|
|
|
|
|
|
For the
duration of any Play Control Sequence being active, any |
|
|
|
|
|
|
|
| |
|
|
|
|
|
|
scheduled
action of the Animated Sounds is being suppressed. It |
|
|
|
|
|
|
|
| |
|
|
|
|
|
|
is
automatically retained as soon as no Play Control Sequence is |
|
|
|
|
|
|
|
| |
|
|
|
|
|
|
any more
active. In order to record a working session including those |
|
|
|
|
|
|
| |
|
|
|
|
|
|
sequences
with the Page Recorder (see below), the "Overdub" mode |
|
|
|
|
|
|
| |
|
|
|
|
|
|
of the Page
Recorder must be used. |
|
|
|
|
|
|
|
|
|
|
|
|
| |
|
|
|
|
|
|
|
|
|
|
|
|
|
|
|
|
|
|
|
|
|
|
|
|
|
| |
|
|
|
|
|
> |
Indication:
Group functions introduced by <!-- Group ... --> label. |
|
|
|
|
|
|
|
| |
|
|
|
|
|
|
Play status
of the Group Play control button is indicated in pink color when |
|
|
|
|
|
| |
|
|
|
|
|
|
Sub Sequences
are used (default active color is red). |
|
|
|
|
|
|
|
|
|
| |
|
|
|
|
|
> |
Use cases:
Execution of individual, overlapping, and complex cross-page |
|
|
|
|
|
| |
|
|
|
|
|
|
networking
oriented group settings, especially useful in accordance with |
|
|
|
|
|
| |
|
|
|
|
|
|
the Button
Guide function (see above) for easy navigation. |
|
|
|
|
|
|
|
|
| |
|
|
|
|
|
|
With
"ForcePlay" and "ForceStop" plus group placeholder, other
Group Play |
|
|
|
|
|
| |
|
|
|
|
|
|
sequences can
be launched from within a standard sequence. This allows |
|
|
|
|
|
| |
|
|
|
|
|
|
to create a
kind of non-hierachical network behaviour (internally realized by |
|
|
|
|
|
| |
|
|
|
|
|
|
"kick"
and "kill" commands). Mixed elements of this kind need to be edited |
|
|
|
|
|
| |
|
|
|
|
|
|
individually
and can not be transferred from the Recorder string. |
|
|
|
|
|
|
|
| |
|
|
|
|
|
|
|
|
|
|
|
|
|
|
|
|
|
|
|
|
|
|
|
|
|
| Use Page Recorder |
|
|
|
|
TIP |
2 |
|
|
|
|
|
|
|
|
|
|
|
|
|
|
|
|
|
|
|
| to gain required data |
|
|
|
|
|
In order to
ease the use of this feature, sequences can be directly recorded |
|
|
|
|
|
|
| |
|
|
|
|
|
as needed
with the Page Recorder. Then the recorded content can be |
|
|
|
|
|
|
|
| |
|
|
|
|
|
transferred
into the individual play sequence by using the PlayTransfer |
|
|
|
|
|
|
|
| |
|
|
|
|
|
object as
described in the Recorder section above. The recorded content |
|
|
|
|
|
|
| |
|
|
|
|
|
is available
through the "transfer.txt" preference file that can be accessed |
|
|
|
|
|
|
| |
|
|
|
|
|
through the
Shockwave preferences folder that reads something like: |
|
|
|
|
|
|
|
| |
|
|
|
|
|
|
|
|
|
|
|
|
|
|
|
|
|
|
|
|
|
|
|
|
|
| |
|
|
|
|
|
C:\Documents
and Settings\<your name>\Application Data\Macromedia |
|
|
|
|
|
|
| |
|
|
|
|
|
\Shockwave
Player\Prefs\Q93Z43LF |
|
|
|
|
|
|
|
|
|
|
|
|
|
| |
|
|
|
|
|
|
|
|
|
|
|
|
|
|
|
|
|
|
|
|
|
|
|
|
|
| |
|
|
|
|
|
Originally,
Page Recorder sequences are written in absolute time mode |
|
|
|
|
|
|
|
| |
|
|
|
|
|
directly
available through the "mouse.txt" file within the same folder. When |
|
|
|
|
|
|
| |
|
|
|
|
|
transferring
this type of sequence from the Page Recorder, parameter sw8 |
|
|
|
|
|
|
| |
|
|
|
|
|
in the Group
Play object must be set to "absolute" in order to cause |
|
|
|
|
|
|
|
| |
|
|
|
|
|
absolute time
value evaluation. |
|
|
|
|
|
|
|
|
|
|
|
|
|
|
| |
|
|
|
|
|
|
|
|
|
|
|
|
|
|
|
|
|
|
|
|
|
|
|
|
|
| Change Destination |
|
|
|
|
> |
Specify
Destination Group for Group Forward Control |
|
|
|
|
|
|
|
|
| Group for Forward |
|
|
|
|
|
|
|
|
|
|
|
|
|
|
|
|
|
|
|
|
|
|
|
|
|
| |
|
|
|
|
|
> |
Parameter: sw6 |
|
|
|
|
|
|
|
|
|
|
|
|
|
|
|
|
| |
|
|
|
|
|
> |
Example:
<param name="sw6" value="Figures 008_1"> |
|
|
|
|
|
|
|
|
|
| |
|
|
|
|
|
> |
Value: Any
string [ ";" + any string ..] |
|
|
|
|
|
|
|
|
|
|
|
|
| |
|
|
|
|
|
> |
Notes: Per
default, the following group (automated group index + 1 |
|
|
|
|
|
|
|
| |
|
|
|
|
|
|
based on
group name as indicated in a unique sw3 statement and |
|
|
|
|
|
|
|
| |
|
|
|
|
|
|
provided
through publishing) is being played when executing the |
|
|
|
|
|
|
|
| |
|
|
|
|
|
|
Group Forward
control button. If you want another group to be played |
|
|
|
|
|
|
| |
|
|
|
|
|
|
or if you
changed the Group Label of the successor group, you can |
|
|
|
|
|
|
| |
|
|
|
|
|
|
indicate this
label using the sw6 parameter. Then, also multiple entries |
|
|
|
|
|
|
| |
|
|
|
|
|
|
are possible
to trigger multiple groups. |
|
|
|
|
|
|
|
|
|
|
|
| |
|
|
|
|
|
> |
Indication:
Group functions introduced by <!-- Group ... --> label. |
|
|
|
|
|
|
|
| |
|
|
|
|
|
> |
Use cases:
Execution of individual, overlapping, and complex cross-page |
|
|
|
|
|
| |
|
|
|
|
|
|
networking
oriented group settings, especially useful in accordance with |
|
|
|
|
|
| |
|
|
|
|
|
|
the Button
Guide function (see above) for easy navigation. |
|
|
|
|
|
|
|
|
| |
|
|
|
|
|
|
|
|
|
|
|
|
|
|
|
|
|
|
|
|
|
|
|
|
|
| Add Group Label |
|
|
|
|
> |
Define an
alternate Group Label for Multiple Use of Group Controls |
|
|
|
|
|
|
| for Recording |
|
|
|
|
|
Stop, Reset,
and Forward |
|
|
|
|
|
|
|
|
|
|
|
|
|
|
| |
|
|
|
|
|
|
|
|
|
|
|
|
|
|
|
|
|
|
|
|
|
|
|
|
|
| |
|
|
|
|
|
> |
Parameter: sw7 |
|
|
|
|
|
|
|
|
|
|
|
|
|
|
|
|
| |
|
|
|
|
|
> |
Example:
<param name="sw7" value="Figures 008_1"> |
|
|
|
|
|
|
|
|
|
| |
|
|
|
|
|
> |
Value: Any
string |
|
|
|
|
|
|
|
|
|
|
|
|
|
|
|
| |
|
|
|
|
|
> |
Notes: If you
want to set multiple group destinations but still want |
|
|
|
|
|
|
|
| |
|
|
|
|
|
|
to stop the
same group the Group Forward button is referring to, and |
|
|
|
|
|
|
| |
|
|
|
|
|
|
to disable
the Group Play indication that belongs to this group, you |
|
|
|
|
|
|
|
| |
|
|
|
|
|
|
need to
retain the Group Label as defined in sw3. The same is valid |
|
|
|
|
|
|
| |
|
|
|
|
|
|
for a second
Group Stop button that might stop only a part of the |
|
|
|
|
|
|
|
| |
|
|
|
|
|
|
same group,
or for a second Group Play button that would be |
|
|
|
|
|
|
|
|
| |
|
|
|
|
|
|
launched by
the same forwarded label, etc. |
|
|
|
|
|
|
|
|
|
|
|
| |
|
|
|
|
|
|
In all those
different use cases where a multiplication of identical button |
|
|
|
|
|
|
| |
|
|
|
|
|
|
controls
applies to the same group sharing its Group Label (sw3), the |
|
|
|
|
|
|
| |
|
|
|
|
|
|
Page Recorder
needs still to recognize each of the multiple buttons by |
|
|
|
|
|
|
| |
|
|
|
|
|
|
a different
Recording Label. This is provided by the sw7 parameter and |
|
|
|
|
|
| |
|
|
|
|
|
|
must be used
for any of those cases. |
|
|
|
|
|
|
|
|
|
|
|
|
| |
|
|
|
|
|
> |
Indication:
Group functions introduced by <!-- Group ... --> label. |
|
|
|
|
|
|
|
| |
|
|
|
|
|
> |
Use cases:
Execution of individual, overlapping, and complex cross-page |
|
|
|
|
|
| |
|
|
|
|
|
|
networking
oriented group settings, especially useful in accordance with |
|
|
|
|
|
| |
|
|
|
|
|
|
the Button
Guide function (see above) for easy navigation. |
|
|
|
|
|
|
|
|
| |
|
|
|
|
|
|
|
|
|
|
|
|
|
|
|
|
|
|
|
|
|
|
|
|
|
| Stop other Group |
|
|
|
|
> |
Create a
Chain of Group Play controls - Stop others while start Group |
|
|
|
|
|
| Play Controls |
|
|
|
|
|
Play control |
|
|
|
|
|
|
|
|
|
|
|
|
|
|
|
|
|
| |
|
|
|
|
|
|
|
|
|
|
|
|
|
|
|
|
|
|
|
|
|
|
|
|
|
| |
|
|
|
|
|
> |
Parameter: sw7 |
|
|
|
|
|
|
|
|
|
|
|
|
|
|
|
|
| |
|
|
|
|
|
> |
Example:
<param name="sw7" value="Figures 008_1"> |
|
|
|
|
|
|
|
|
|
| |
|
|
|
|
|
> |
Value: [
option ] + any string [ ";" + [ option ] + any string ..] |
"(kick);" |
|
|
|
|
|
|
|
| |
|
|
|
|
|
|
Option = "(disp)" or "(kick)" or
"(togl)" or "(kill)" |
|
|
|
|
|
|
|
|
|
|
| |
|
|
|
|
|
|
|
|
|
|
|
|
|
|
|
|
|
|
|
|
|
|
|
|
|
| |
|
|
|
|
|
> |
Notes: Unlike
the other controls, sw3 remains always unique for Group Play |
|
|
|
|
|
| |
|
|
|
|
|
|
control,
therefore sw7 is not used for the unique recorder ID function (see |
|
|
|
|
|
|
| |
|
|
|
|
|
|
above). |
|
|
|
|
|
|
|
|
|
|
|
|
|
|
|
|
|
| |
|
|
|
|
|
|
sw7 in Group
Play provides the possibility to provide a number of other |
|
|
|
|
|
|
| |
|
|
|
|
|
|
Group Play
labels that will stop the corresponding Group Play controls. |
|
|
|
|
|
|
| |
|
|
|
|
|
|
This is
especially useful when a larger number of Group Play controls |
|
|
|
|
|
|
| |
|
|
|
|
|
|
with sub
sequences in sw6 should be concatenated without the involvement |
|
|
|
|
|
| |
|
|
|
|
|
|
of all the
other group controls. |
|
|
|
|
|
|
|
|
|
|
|
|
|
| |
|
|
|
|
|
|
A similar
concatenation function is available for Forward (sw2 for stop and sw4 |
|
|
|
|
|
| |
|
|
|
|
|
|
for playing a
number of Animated Sounds), however, this Group Play feature |
|
|
|
|
|
| |
|
|
|
|
|
|
is related to
labels and not to a list of Animated Sounds. Therefore only |
|
|
|
|
|
|
| |
|
|
|
|
|
|
complete
groups will be launched and stopped. |
|
|
|
|
|
|
|
|
|
|
| |
|
|
|
|
|
|
In order to
start other groups simultaneously with the native group, use the |
|
|
|
|
|
| |
|
|
|
|
|
|
"GroupPlay_[ID]"
Page Recorder command within a Sub Sequence (see sw6, |
|
|
|
|
| |
|
|
|
|
|
|
"Perform
Recorded Sequences…" above). |
|
|
|
|
|
|
|
|
|
|
|
| |
|
|
|
|
|
|
|
|
|
|
|
|
|
|
|
|
|
|
|
|
|
|
|
|
|
| |
|
|
|
|
|
|
When using
the FleX button (see below), the Placeholder root will be changed |
|
|
|
|
|
| |
|
|
|
|
|
|
when a new
Base Palette is being launched. |
|
|
|
|
|
|
|
|
|
|
| |
|
|
|
|
|
|
|
|
|
|
|
|
|
|
|
|
|
|
|
|
|
|
|
|
|
| |
|
|
|
|
|
|
Options: |
|
|
|
|
|
|
|
|
|
|
|
|
|
|
|
|
|
| |
|
|
|
|
|
|
|
|
|
|
|
|
|
|
|
|
|
|
|
|
|
|
|
|
|
| |
|
|
|
|
|
|
(disp) - |
Changes
"play" display to "stop" display without stopping
elements |
|
|
|
|
| |
|
|
|
|
|
|
|
|
(this is
needed when elements stopped anyway) |
|
|
|
|
|
|
|
|
| |
|
|
|
|
|
|
(kick) - |
Sets groups
on "play" when play is pressed and on "stop" when |
|
|
|
|
|
| |
|
|
|
|
|
|
|
|
stop is
pressed (remote launch) |
|
|
|
|
|
|
|
|
|
|
|
| |
|
|
|
|
|
|
(kick); - |
Same as
above, but analyzes sw2 elements to apply the kick list |
|
|
|
|
|
| |
|
|
|
|
|
|
|
|
automatically
(for this feature, the placeholders must be reduced to |
|
|
|
|
| |
|
|
|
|
|
|
|
|
two
alpha-numeric letters) |
|
|
|
|
|
|
|
|
|
|
|
|
| |
|
|
|
|
|
|
(togl) - |
Sets groups
on "play" when stop is pressed and on "stop" when |
|
|
|
|
|
| |
|
|
|
|
|
|
|
|
play is
pressed (remote launch) |
|
|
|
|
|
|
|
|
|
|
|
| |
|
|
|
|
|
|
(kill) - |
Sets groups
on "stop" when play is pressed (remote launch) |
|
|
|
|
|
|
| |
|
|
|
|
|
|
|
|
No action if
stop is pressed. Useful for succession of various groups |
|
|
|
|
| |
|
|
|
|
|
|
|
|
where older
controls can be stopped (no need for use of sw4 to |
|
|
|
|
|
| |
|
|
|
|
|
|
|
|
directly stop
the elements) |
|
|
|
|
|
|
|
|
|
|
|
|
| |
|
|
|
|
|
|
|
|
|
|
|
|
|
|
|
|
|
|
|
|
|
|
|
|
|
| |
|
|
|
|
|
> |
Indication:
Group functions introduced by <!-- Group ... --> label. |
|
|
|
|
|
|
|
| |
|
|
|
|
|
> |
Use cases:
Execution of individual, overlapping, and complex cross-page |
|
|
|
|
|
| |
|
|
|
|
|
|
networking
oriented group settings, especially useful in accordance with |
|
|
|
|
|
| |
|
|
|
|
|
|
the Button
Guide function (see above) for easy navigation. |
|
|
|
|
|
|
|
|
| |
|
|
|
|
|
|
|
|
|
|
|
|
|
|
|
|
|
|
|
|
|
|
|
|
|
| Permutation of Play |
|
|
|
|
> |
Permute
Elements of Recorded Sequences with the Group Play Control |
|
|
|
|
|
| Sequence Elements |
|
|
|
|
|
|
|
|
|
|
|
|
|
|
|
|
|
|
|
|
|
|
|
|
|
| |
|
|
|
|
|
> |
Parameter: sw8 |
|
|
|
|
|
|
|
|
|
|
|
|
|
|
|
|
| |
|
|
|
|
|
> |
Example:
<param name="sw8" value="permute"> |
|
|
|
|
|
|
|
|
|
|
| |
|
|
|
|
|
> |
Value:
"permute", "permute2", "sequence",
"absolute" |
|
|
|
|
|
|
|
|
|
| |
|
|
|
|
|
> |
Notes:
Further to the Play Control Sequence possibilities as described |
|
|
|
|
|
|
| |
|
|
|
|
|
|
above,
sequence elements can be selected randomly instead of being |
|
|
|
|
|
|
| |
|
|
|
|
|
|
processed in
a sequence. In this case the sequence will not terminate until |
|
|
|
|
|
| |
|
|
|
|
|
|
the Play
Control status is set to stop. |
|
|
|
|
|
|
|
|
|
|
|
|
| |
|
|
|
|
|
|
If
"permute" is set, all time and command elements will be permuted |
|
|
|
|
|
|
| |
|
|
|
|
|
|
independently.
"permute2" permutes coupled time and command |
|
|
|
|
|
|
|
| |
|
|
|
|
|
|
elements as
one. "sequence" must not be set since it is considered |
|
|
|
|
|
|
| |
|
|
|
|
|
|
as default.
"absolute" evaluates the time values as in the Page Recorder |
|
|
|
|
|
| |
|
|
|
|
|
|
in an absolute
(accumulated) manner. |
|
|
|
|
|
|
|
|
|
|
|
|
| |
|
|
|
|
|
> |
Indication:
Group functions introduced by <!-- Group ... --> label. |
|
|
|
|
|
|
|
| |
|
|
|
|
|
> |
Use cases:
Execution of individual, overlapping, and complex cross-page |
|
|
|
|
|
| |
|
|
|
|
|
|
networking
oriented group settings, especially useful in accordance with |
|
|
|
|
|
| |
|
|
|
|
|
|
the Button
Guide function (see above) for easy navigation. |
|
|
|
|
|
|
|
|
| |
|
|
|
|
|
|
|
|
|
|
|
|
|
|
|
|
|
|
|
|
|
|
|
|
|
| Play Soundfiles instead |
|
|
|
|
> |
Play
soundfiles alternatively to Animated Sounds with the Group Play Control |
|
|
|
| of Animated Sounds |
|
|
|
|
|
|
|
|
|
|
|
|
|
|
|
|
|
|
|
|
|
|
|
|
|
| |
|
|
|
|
|
> |
Parameter: sw8 |
|
|
|
|
|
|
|
|
|
|
|
|
|
|
|
|
| |
|
|
|
|
|
> |
Example:
<param name="sw8"
value="volume:100;fadein:2000;fadeout:2000;"> |
|
|
|
|
| |
|
|
|
|
|
> |
Values:
"volume:" + <value1> + ";" [ <parameter> + <value2> + ";" ]n |
|
|
|
|
|
|
| |
|
|
|
|
|
|
<parameters>
= "fadein:" | "fadeout:" | "fadeout2:" (all
optional) |
|
|
|
|
|
|
|
| |
|
|
|
|
|
|
<value1>
= 0..255 (0 = mute, 255 = max. volume) |
|
|
|
|
|
|
|
|
|
|
| |
|
|
|
|
|
|
<value2>
= n (milliseconds) |
|
|
|
|
|
|
|
|
|
|
|
|
|
|
| |
|
|
|
|
|
|
Default:
fadein: 1000, fadeout: 1000, fadeout2 = 7500 |
|
|
|
|
|
|
|
|
|
| |
|
|
|
|
|
|
Default Sound
Folder: /FleX/freesound/sounds/ |
|
|
|
|
|
|
|
|
|
|
| |
|
|
|
|
|
|
Soundfile
name: Placeholder (sw3) + ".mp3" |
|
|
|
|
|
|
|
|
|
|
|
| |
|
|
|
|
|
> |
Notes: When
the mandatory volume value is entered in the sw8 |
|
|
|
|
|
|
|
| |
|
|
|
|
|
|
parameter and
the "FleX" button (usually found in a Palette environment) |
|
|
|
|
|
|
| |
|
|
|
|
|
|
is clicked
(left mouse, red logo indication), the system searches for |
|
|
|
|
|
|
|
| |
|
|
|
|
|
|
a sound in
the pre-defined default Sound Folder that has the name |
|
|
|
|
|
|
|
| |
|
|
|
|
|
|
of the
Placeholder as indicated in sw3 plus ".mp3" sound extension. |
|
|
|
|
|
|
| |
|
|
|
|
|
|
As soon as
the Group Play Control is being clicked, this sound will |
|
|
|
|
|
|
|
| |
|
|
|
|
|
|
be played
instead of the Animated Sounds. The Animated Sounds |
|
|
|
|
|
|
|
| |
|
|
|
|
|
|
however (see
sw2 definition) will be launched as well in muted mode. |
|
|
|
|
|
|
| |
|
|
|
|
|
|
Animated
sound sequences issued in sw6 will still execute. |
|
|
|
|
|
|
|
|
| |
|
|
|
|
|
|
When the
Control button is clicked again, the sound file will pause |
|
|
|
|
|
|
|
| |
|
|
|
|
|
|
while
performing the fadeout value. The fadeout2 value will apply instead, |
|
|
|
|
|
| |
|
|
|
|
|
|
if the FleX
button has been pressed again to leave the Soundfile playing |
|
|
|
|
|
|
| |
|
|
|
|
|
|
mode. The
fadeout2 value is usually larger than the fadeout value due |
|
|
|
|
|
|
| |
|
|
|
|
|
|
to expected
call of a new Animated Sounds group which launches usually |
|
|
|
|
|
| |
|
|
|
|
|
|
with a larger
delay. |
|
|
|
|
|
|
|
|
|
|
|
|
|
|
|
| |
|
|
|
|
|
> |
Indication:
Group functions introduced by <!-- Group ... --> label. |
|
|
|
|
|
|
|
| |
|
|
|
|
|
> |
Use cases:
When calling a complete set of Animated Sounds the performance |
|
|
|
|
| |
|
|
|
|
|
|
can be
significantly reduced. In this case a soundfile which has been |
|
|
|
|
|
|
| |
|
|
|
|
|
|
recorded from
the set and is placed into the Sound Folder can be played |
|
|
|
|
|
| |
|
|
|
|
|
|
to allow
instant flow of the required sounds. Both Soundfile play and |
|
|
|
|
|
|
| |
|
|
|
|
|
|
the play of
Animated Sounds can be switched any time in order to allow |
|
|
|
|
|
|
| |
|
|
|
|
|
|
the required
combination of instant response and flexibility. |
|
|
|
|
|
|
|
|
| |
|
|
|
|
|
|
|
|
|
|
|
|
|
|
|
|
|
|
|
|
|
|
|
|
|
| Suppress Initialization |
|
|
|
|
> |
Suppress
placeholder initialization with the Group Reset Control |
|
|
|
|
|
|
| of Placeholders |
|
|
|
|
|
|
|
|
|
|
|
|
|
|
|
|
|
|
|
|
|
|
|
|
|
| |
|
|
|
|
|
> |
Parameter: sw8 |
|
|
|
|
|
|
|
|
|
|
|
|
|
|
|
|
| |
|
|
|
|
|
> |
Example:
<param name="sw8" value="noinitPlaceholders"> |
|
|
|
|
|
|
|
|
| |
|
|
|
|
|
> |
Value:
"noinitPlaceholders" |
|
|
|
|
|
|
|
|
|
|
|
|
|
| |
|
|
|
|
|
> |
Notes: The
predefined members in parameter sw2 (see above) |
|
|
|
|
|
|
|
| |
|
|
|
|
|
|
will not be
initialized upon the start of the page. The initialization |
|
|
|
|
|
|
|
| |
|
|
|
|
|
|
however will
take place as soon as the reset button is being |
|
|
|
|
|
|
|
|
| |
|
|
|
|
|
|
pressed. |
|
|
|
|
|
|
|
|
|
|
|
|
|
|
|
|
|
| |
|
|
|
|
|
> |
Indication:
Group functions introduced by <!-- Group ... --> label. |
|
|
|
|
|
|
|
| |
|
|
|
|
|
> |
Use cases:
When switching HTML pages that control a similar |
|
|
|
|
|
|
|
| |
|
|
|
|
|
|
Sound Page
(such as switching a matrix of multiple play controls), |
|
|
|
|
|
|
|
| |
|
|
|
|
|
|
the initial
reset of all placeholders will be suppressed to allow for |
|
|
|
|
|
|
|
| |
|
|
|
|
|
|
continuous
work with the currently active animated sounds. |
|
|
|
|
|
|
|
|
| |
|
|
|
|
|
|
|
|
|
|
|
|
|
|
|
|
|
|
|
|
|
|
|
|
|
| Text Display |
|
|
|
|
> |
Display text
when pressing a Guided Button and when Mouseover |
|
|
|
|
|
|
| |
|
|
|
|
|
|
|
|
|
|
|
|
|
|
|
|
|
|
|
|
|
|
|
|
|
| |
|
|
|
|
|
> |
Parameter: sw9 |
|
|
|
|
|
|
|
|
|
|
|
|
|
|
|
|
| |
|
|
|
|
|
> |
Example:
<param name="sw9" value="This is my free comment"> |
|
|
|
|
|
|
|
| |
|
|
|
|
|
> |
Value:
Alphanumeric text OR "sw" + one digit (1-9) |
|
|
|
|
|
|
|
|
|
|
| |
|
|
|
|
|
> |
Notes: In
accordance with the Page Display object (see Preferences) free |
|
|
|
|
|
| |
|
|
|
|
|
|
text can be
displayed each time a Group control button is pressed. |
|
|
|
|
|
|
|
| |
|
|
|
|
|
|
If a
"sw" + one digit (1-9) string is entered the content of those |
|
|
|
|
|
|
|
|
| |
|
|
|
|
|
|
parameters is
being shown. |
|
|
|
|
|
|
|
|
|
|
|
|
|
| |
|
|
|
|
|
|
In addition,
Group functions that are highlighted will show their text through |
|
|
|
|
|
| |
|
|
|
|
|
|
mouseover. If
Page Recorder text is displayed, the text will switch to |
|
|
|
|
|
|
| |
|
|
|
|
|
|
the Group
function text. When moving the mouse away, the Page Recorder |
|
|
|
|
|
| |
|
|
|
|
|
|
text resumes. |
|
|
|
|
|
|
|
|
|
|
|
|
|
|
|
|
| |
|
|
|
|
|
> |
Indication:
Group functions introduced by <!-- Group ... --> label. |
|
|
|
|
|
|
|
| |
|
|
|
|
|
|
Page Recorder
buttons as introduced in the "Preferences" page. |
|
|
|
|
|
|
|
| |
|
|
|
|
|
> |
Use cases:
Leading through a row of Play Groups with play instructions. |
|
|
|
|
|
|
| |
|
|
|
|
|
|
Using Group
control buttons as independent application unit in order |
|
|
|
|
|
|
| |
|
|
|
|
|
|
to display
any text without performing other Group actions. |
|
|
|
|
|
|
|
|
| |
|
|
|
|
|
|
Including
Page Recorder button instruction for complete tutorials. |
|
|
|
|
|
|
|
| |
|
|
|
|
|
|
|
|
|
|
|
|
|
|
|
|
|
|
|
|
|
|
|
|
|
| |
|
|
|
|
> |
Setup of Text
Display object |
|
|
|
|
|
|
|
|
|
|
|
|
|
| |
|
|
|
|
|
|
|
|
|
|
|
|
|
|
|
|
|
|
|
|
|
|
|
|
|
| |
|
|
|
|
|
> |
Parameter: sw9
(default text) |
|
|
|
|
|
|
|
|
|
|
|
|
|
| |
|
|
|
|
|
> |
Example:
<param name="sw9" value="This is my free comment"> |
|
|
|
|
|
|
|
| |
|
|
|
|
|
> |
Value:
Alphanumeric text |
|
|
|
|
|
|
|
|
|
|
|
|
|
|
| |
|
|
|
|
|
> |
Notes: In
accordance with all Group control features (see above) |
|
|
|
|
|
|
|
| |
|
|
|
|
|
|
text can be
displayed each time a Group control button is pressed. |
|
|
|
|
|
|
|
| |
|
|
|
|
|
|
The text
included in parameter sw9 will show a text every time the page |
|
|
|
|
|
|
| |
|
|
|
|
|
|
containing the
Display Object is being refreshed. |
|
|
|
|
|
|
|
|
|
|
| |
|
|
|
|
|
|
If sw9 is not
defined, "Press >>" will be shown by default. |
|
|
|
|
|
|
|
|
| |
|
|
|
|
|
|
In order to
hide text, enter space elements like "
". |
|
|
|
|
|
|
|
|
|
|
| |
|
|
|
|
|
|
|
|
|
|
|
|
|
|
|
|
|
|
|
|
|
|
|
|
|
| |
|
|
|
|
|
> |
Parameter:
bgColor (background color) |
|
|
|
|
|
|
|
|
|
|
|
| |
|
|
|
|
|
> |
Example:
<param name="bgColor" value="#8D0000"> |
|
|
|
|
|
|
|
|
|
| |
|
|
|
|
|
> |
Values:
"#000000" (black), "#8D0000" (dark red),
"#FFFF99" (yellow), |
|
|
|
|
|
|
| |
|
|
|
|
|
|
#FF9900
(orange); #F5F5F5 (gray) |
|
|
|
|
|
|
|
|
|
|
|
|
| |
|
|
|
|
|
> |
Notes: The
color value should match the background color value as provided |
|
|
|
|
| |
|
|
|
|
|
|
in the
<body> statement. |
|
|
|
|
|
|
|
|
|
|
|
|
|
|
| |
|
|
|
|
|
|
|
|
|
|
|
|
|
|
|
|
|
|
|
|
|
|
|
|
|
| |
|
|
|
|
|
> |
Indication:
Page functions introduced by <!-- Text Display --> label. |
|
|
|
|
|
|
|
| |
|
|
|
|
|
> |
Use cases: See
above. |
|
|
|
|
|
|
|
|
|
|
|
|
|
|
| |
|
|
|
|
|
|
|
|
|
|
|
|
|
|
|
|
|
|
|
|
|
|
|
|
|
| Button Guide sensitive |
|
|
|
|
> |
Activate
Specific List String when pressing a Guided Button |
|
|
|
|
|
|
|
| List Selection |
|
|
|
|
|
|
|
|
|
|
|
|
|
|
|
|
|
|
|
|
|
|
|
|
|
| |
|
|
|
|
|
> |
Parameters:
(Group Controls: all parameters except sw1 and sw5; |
|
|
|
|
|
|
|
| |
|
|
|
|
|
|
Page Recorder
buttons: sw9 only) |
|
|
|
|
|
|
|
|
|
|
|
|
| |
|
|
|
|
|
> |
Example:
<param name="sw9" value="<%default>Standard
note.<%init> |
|
|
|
|
|
| |
|
|
|
|
|
|
Start next
button.<%3>Now start again from the beginning.<%"> |
|
|
|
|
|
|
|
| |
|
|
|
|
|
> |
Values: [
"<%default>" + list chunk + ] [ "<%" + button
guide sequence label + |
|
|
|
|
|
| |
|
|
|
|
|
|
">"
+ list chunk ] (repeat ) |
|
|
|
|
|
|
|
|
|
|
|
|
|
|
| |
|
|
|
|
|
> |
Notes: A part
of a complete parameter list or free text (sw9) is being selected |
|
|
|
|
|
| |
|
|
|
|
|
|
each time a
Group control or a Page Recorder (see "Preferences" page) |
|
|
|
|
|
| |
|
|
|
|
|
|
button is
pressed. |
|
|
|
|
|
|
|
|
|
|
|
|
|
|
|
| |
|
|
|
|
|
|
Text after
"<%default>" - will be activated if button guide is not
active or cannot |
|
|
|
|
|
| |
|
|
|
|
|
|
be found at
the specific button when pressed (highlighting). |
|
|
|
|
|
|
|
|
| |
|
|
|
|
|
|
Text after
"<%" + button guide sequence label + ">" - will be
activated if button |
|
|
|
|
|
| |
|
|
|
|
|
|
guide is
active at the specific button when pressed according to the |
|
|
|
|
|
|
| |
|
|
|
|
|
|
actual label
that caused the highlighting of that button as defined in sw5. |
|
|
|
|
|
|
| |
|
|
|
|
|
|
No action
will be taken if neither a <%default> string is defined nor another |
|
|
|
|
|
| |
|
|
|
|
|
|
button guide
sequence label could be identified during the call. |
|
|
|
|
|
|
|
| |
|
|
|
|
|
> |
Indication:
Group functions introduced by <!-- Group ... --> label. |
|
|
|
|
|
|
|
| |
|
|
|
|
|
|
Page Recorder
buttons as introduced in the "Preferences" page (sw9). |
|
|
|
|
|
|
| |
|
|
|
|
|
> |
Use cases:
Leading through a row of Play Groups with play instructions. |
|
|
|
|
|
|
| |
|
|
|
|
|
|
Using Group
control buttons in multiple ways activating and stopping various |
|
|
|
|
|
| |
|
|
|
|
|
|
Animated
Sounds and/or other Group controls depending on a specific |
|
|
|
|
|
|
| |
|
|
|
|
|
|
path that is
laid out as a certain button guide. |
|
|
|
|
|
|
|
|
|
|
| |
|
|
|
|
|
|
|
|
|
|
|
|
|
|
|
|
|
|
|
|
|
|
|
|
|
| |
|
|
|
|
Note: |
Alternatively
the "[" "]" brackets symbols can be used in HTML
environments |
|
|
|
|
|
| |
|
|
|
|
|
|
where
"<%" combinations etc., are not valid (for example, in Ning.com
communities). |
|
|
|
| |
|
|
|
|
|
|
|
|
|
|
|
|
|
|
|
|
|
|
|
|
|
|
|
|
|
| Summary Group |
|
|
|
|
The following
table summarizes the Group Control function parameters: |
|
|
|
|
|
|
|
|
| Controls |
|
|
|
|
|
|
|
|
|
|
|
|
|
|
|
|
|
|
|
|
|
|
|
|
|
| |
|
|
|
|
Parameter |
Play |
|
Stop |
|
Reset |
|
Forward |
|
|
|
|
|
|
|
| |
|
|
|
|
|
|
|
|
|
|
|
|
|
|
|
|
|
|
|
|
|
|
|
|
|
| |
|
|
|
|
sw1 |
|
|
Function path* |
Function path* |
Function path* |
Function path* |
|
|
|
|
|
|
| |
|
|
|
|
sw2 |
|
|
Play list |
|
Stop list |
|
Reset list |
|
Stop list |
|
|
|
|
|
|
|
| |
|
|
|
|
sw3 |
|
|
Control ID |
|
Control ID(s) |
Control ID(s) |
Control ID(s) |
|
|
|
|
|
|
| |
|
|
|
|
sw4 |
|
|
Reset list |
|
Indirect |
|
Project link |
Play list |
|
|
|
|
|
|
|
| |
|
|
|
|
sw5 |
|
|
Button Guide* |
Button Guide* |
Button Guide* |
Button Guide* |
|
|
|
|
|
|
| |
|
|
|
|
sw6 |
|
|
Sub Sequence |
Guide reset |
Guide reset |
Destination
ID(s) |
|
|
|
|
|
| |
|
|
|
|
sw7 |
|
|
Control ID(s) |
Control ID |
|
Control ID |
|
Control ID |
|
|
|
|
|
|
|
| |
|
|
|
|
sw8 |
|
|
Permutation |
- |
|
|
No init |
|
- |
|
|
|
|
|
|
|
|
| |
|
|
|
|
sw9 |
|
|
Text Display |
Text Display |
Text Display |
Text Display |
|
|
|
|
|
|
| |
|
|
|
|
|
|
|
|
|
|
|
|
|
|
|
|
|
|
|
|
|
|
|
|
|
| |
|
|
|
|
* Not valid
for button guide sensitive list selection |
|
|
|
|
|
|
|
|
|
|
|
|
| |
|
|
|
|
|
|
|
|
|
|
|
|
|
|
|
|
|
|
|
|
|
|
|
|
|
| PAGE RECORDER |
|
|
|
3. |
Page Recorder
Options |
|
|
|
|
|
|
|
|
|
|
|
|
|
|
|
| |
|
|
|
|
|
|
|
|
|
|
|
|
|
|
|
|
|
|
|
|
|
|
|
|
|
| |
|
|
|
|
Recorded
sequences ("Sound Trips") can be exchanged via email or being
exposed |
|
|
|
|
|
| |
|
|
|
|
for further
editing. |
|
|
|
|
|
|
|
|
|
|
|
|
|
|
|
|
|
| |
|
|
|
|
|
|
|
|
|
|
|
|
|
|
|
|
|
|
|
|
|
|
|
|
|
| |
|
|
|
|
Preset
recorded sequences and page sets are being manually edited using the relevant |
|
|
|
|
|
| |
|
|
|
|
parameters
described below. In addition, an automatic load of a complete page set |
|
|
|
|
|
| |
|
|
|
|
can easily be
arranged. |
|
|
|
|
|
|
|
|
|
|
|
|
|
|
|
|
| |
|
|
|
|
|
|
|
|
|
|
|
|
|
|
|
|
|
|
|
|
|
|
|
|
|
| |
|
|
|
|
When editing
sequences you must make sure to apply the corresponding page sets |
|
|
|
|
|
| |
|
|
|
|
that include
the Animated Sounds that are called by the sequence. |
|
|
|
|
|
|
|
|
|
| |
|
|
|
|
|
|
|
|
|
|
|
|
|
|
|
|
|
|
|
|
|
|
|
|
|
| Exchange Sequences |
|
|
|
|
> |
Exchange a
Recorded Sequence |
|
|
|
|
|
|
|
|
|
|
|
|
| |
|
|
|
|
|
|
|
|
|
|
|
|
|
|
|
|
|
|
|
|
|
|
|
|
|
| |
|
|
|
|
|
The following
table summarizes the Sequence Exchange function parameters: |
|
|
|
|
|
| |
|
|
|
|
|
|
|
|
|
|
|
|
|
|
|
|
|
|
|
|
|
|
|
|
|
| |
|
|
|
|
|
Send |
|
Receive |
|
Transfer |
|
Extract |
|
Extract ID |
|
|
|
|
|
| |
|
|
|
|
|
|
|
|
|
|
|
|
|
|
|
|
|
|
|
|
|
|
|
|
|
| |
|
|
|
|
sw1 |
Function path |
Function path |
Function path |
Function path |
Function path |
|
|
|
|
|
| |
|
|
|
|
sw2 |
Root name |
Root name |
Root name |
Root name |
- |
|
|
|
|
|
|
|
| |
|
|
|
|
sw3 |
Sound Page |
- |
|
|
- |
|
|
- |
|
|
- |
|
|
|
|
|
|
|
| |
|
|
|
|
sw5 |
Button Guide |
Button Guide |
Button Guide |
Button Guide |
Button Guide |
|
|
|
|
|
| |
|
|
|
|
sw9 |
Text Display |
Text Display |
Text Display |
Text Display |
Text Display |
|
|
|
|
|
| |
|
|
|
|
|
|
|
|
|
|
|
|
|
|
|
|
|
|
|
|
|
|
|
|
|
| |
|
|
|
|
|
Functional
overview: |
|
|
|
|
|
|
|
|
|
|
|
|
|
|
|
|
| |
|
|
|
|
|
|
|
|
|
|
|
|
|
|
|
|
|
|
|
|
|
|
|
|
|
| |
|
|
|
|
|
> |
Send: |
|
Send recorded
sound trip sequence by email. |
|
|
|
|
|
|
|
| |
|
|
|
|
|
> |
Receive: |
|
Copy sound
trip into clipboard and apply to Sound Page. |
|
|
|
|
|
| |
|
|
|
|
|
> |
Transfer: |
|
Export sound
trip for inclusion as sub sequence. |
|
|
|
|
|
|
|
| |
|
|
|
|
|
> |
Extract: |
|
Split sound
trip into layers according to Extract ID. |
|
|
|
|
|
|
|
| |
|
|
|
|
|
> |
Extract ID: |
|
Mode for
sound trip split and local recording performed by |
|
|
|
|
|
| |
|
|
|
|
|
|
|
|
|
Extract. |
|
|
|
|
|
|
|
|
|
|
|
|
|
|
| |
|
|
|
|
|
|
|
|
|
|
|
|
|
|
|
|
|
|
|
|
|
|
|
|
|
| |
|
|
|
|
|
For further
description of the above functions refer to the "Preferences"
page. |
>> |
|
|
|
|
|
| |
|
|
|
|
|
|
|
|
|
|
|
|
|
|
|
|
|
|
|
|
|
|
|
|
|
| Preset Sequences |
|
|
|
|
> |
Edit or
leverage a Recorded Sequence |
|
|
|
|
|
|
|
|
|
|
|
| |
|
|
|
|
|
|
|
|
|
|
|
|
|
|
|
|
|
|
|
|
|
|
|
|
|
| |
|
|
|
|
|
> |
Parameter: sw3 |
|
|
|
|
|
|
|
|
|
|
|
|
|
|
|
|
| |
|
|
|
|
|
> |
Example:
<param name="sw3" value="empty:3792911;0:41Sound
Trip1S5146; |
|
|
|
|
| |
|
|
|
|
|
|
1089:LinkSound
Trip1330s$S5148e$;2342:LinkSound Trip1330s$S5148e$; |
|
|
|
|
|
| |
|
|
|
|
|
|
3003:43Sound
Trip1S514821right;3558:LinkSound Trip1330s$S5146e$; |
|
|
|
|
|
|
| |
|
|
|
|
|
|
4762:LinkSound
Trip1330s$S5146e$;5455:PlayStop;"> |
|
|
|
|
|
|
|
|
|
| |
|
|
|
|
|
> |
Values: As
provided by the "mouse.txt" file in the Shockwave preferences
folder |
|
|
|
|
| |
|
|
|
|
|
|
C:\Documents
and Settings\"your ID"\Application Data\Macromedia\ |
|
|
|
|
|
|
| |
|
|
|
|
|
|
Shockwave
Player\Prefs\Q93Z43LF\ |
|
|
|
|
|
|
|
|
|
|
|
|
| |
|
|
|
|
|
|
"empty:"
+ System Init Time placeholder + |
|
|
|
|
|
|
|
|
|
|
|
| |
|
|
|
|
|
|
[ Time value
+ ":" + Action + ";" ..] continuously repeated + |
|
|
|
|
|
|
|
|
| |
|
|
|
|
|
|
Time value +
":" + "PlayStop;" or "PlayLoop;" |
|
|
|
|
|
|
|
|
|
|
| |
|
|
|
|
|
> |
Notes: With
"PlayLoop;" (only manual) the recorder will be forced to start
the |
|
|
|
|
|
| |
|
|
|
|
|
|
complete
sequence again and again. All Group Play controls should be in off |
|
|
|
|
|
| |
|
|
|
|
|
|
status since
they are toggles. |
|
|
|
|
|
|
|
|
|
|
|
|
|
| |
|
|
|
|
|
|
Alternatively,
recorded sequences can be transferred to local Group Play |
|
|
|
|
|
| |
|
|
|
|
|
|
controls for
being independently and synchronously
be played. In this case, |
|
|
|
|
|
| |
|
|
|
|
|
|
the
PageTransfer object - available through the Preferences page - must be |
|
|
|
|
|
| |
|
|
|
|
|
|
used in order
to convert the absolute time values into relative time values. |
|
|
|
|
|
| |
|
|
|
|
|
|
The resulting
sequence is then available through the "transfer.txt" file |
|
|
|
|
|
|
| |
|
|
|
|
|
|
that can be
found in the folder as indicated above. For more information visit |
|
|
|
|
|
| |
|
|
|
|
|
|
the
"Button Guide and Group Control Options" section above. |
|
|
|
|
|
|
|
|
| |
|
|
|
|
|
|
For more
information about the single commands (actions) see "Page |
|
|
|
|
|
|
| |
|
|
|
|
|
|
Recorder
Commands" below. |
|
|
|
|
|
|
|
|
|
|
|
|
|
| |
|
|
|
|
|
> |
Indication:
"<name>Menu.htm" file, "<!-- Play -->" , "<!-- Restore -->" tags |
|
|
|
|
|
|
| |
|
|
|
|
|
> |
Use cases:
Time savings without the need to go through the complete |
|
|
|
|
|
|
| |
|
|
|
|
|
|
publishing
process for: |
|
|
|
|
|
|
|
|
|
|
|
|
|
|
| |
|
|
|
|
|
|
> |
Exchange of
recorded sequences between Sound Pages |
|
|
|
|
|
|
|
| |
|
|
|
|
|
|
> |
Refining time
values |
|
|
|
|
|
|
|
|
|
|
|
|
|
|
| |
|
|
|
|
|
|
> |
Changing
destination sound |
|
|
|
|
|
|
|
|
|
|
|
|
| |
|
|
|
|
|
|
> |
Deleting, or
inserting an action |
|
|
|
|
|
|
|
|
|
|
|
|
| |
|
|
|
|
|
|
Feeding local
Group Play Controls with individual sequences (extended |
|
|
|
|
|
| |
|
|
|
|
|
|
possibilities
as described in the Group Play documentation) |
|
|
|
|
|
|
|
|
| |
|
|
|
|
|
|
Producing an
endless play loop. |
|
|
|
|
|
|
|
|
|
|
|
|
|
| |
|
|
|
|
|
|
|
|
|
|
|
|
|
|
|
|
|
|
|
|
|
|
|
|
|
| Edit Page Set |
|
|
|
|
> |
Edit or
leverage a Recorded Page Set |
|
|
|
|
|
|
|
|
|
|
|
| |
|
|
|
|
|
|
|
|
|
|
|
|
|
|
|
|
|
|
|
|
|
|
|
|
|
| |
|
|
|
|
|
> |
Parameter: sw3 |
|
|
|
|
|
|
|
|
|
|
|
|
|
|
|
|
| |
|
|
|
|
|
> |
Example:
<param name="sw3" value="C:\MySoundTrips\Sound
TripFrame.htm; |
|
|
|
|
| |
|
|
|
|
|
|
C:\MySoundTrips\Tests\Sound
Trip.htm;"> |
|
|
|
|
|
|
|
|
|
|
|
| |
|
|
|
|
|
> |
Values: full
paths separated by ";" |
|
|
|
|
|
|
|
|
|
|
|
|
| |
|
|
|
|
|
> |
Notes: Make
sure that the HTML file paths are accessible that you are entering. |
|
|
|
|
| |
|
|
|
|
|
|
You can also
apply URLs from which you know that they provide access to |
|
|
|
|
|
| |
|
|
|
|
|
|
sound
pages. |
|
|
|
|
|
|
|
|
|
|
|
|
|
|
|
|
| |
|
|
|
|
|
> |
Indication:
"<name>Menu.htm" file, "<!-- Reset -->"
tag |
|
|
|
|
|
|
|
|
|
| |
|
|
|
|
|
> |
Use cases:
Synchronize with appliance of new sequences as described above. |
|
|
|
|
| |
|
|
|
|
|
|
Prepare
automatic loading of multiple pages as described below. |
|
|
|
|
|
|
|
| |
|
|
|
|
|
|
|
|
|
|
|
|
|
|
|
|
|
|
|
|
|
|
|
|
|
| Automatic Page Load |
|
|
|
|
> |
Automatic
Start of Multiple Sound Pages |
|
|
|
|
|
|
|
|
|
|
|
| |
|
|
|
|
|
|
|
|
|
|
|
|
|
|
|
|
|
|
|
|
|
|
|
|
|
| |
|
|
|
|
|
> |
Parameter: sw4 |
|
|
|
|
|
|
|
|
|
|
|
|
|
|
|
|
| |
|
|
|
|
|
> |
Example:
<param name="sw4" value="#8D0000"> |
|
|
|
|
|
|
|
|
|
| |
|
|
|
|
|
> |
Values:
"#000000" (black), "#8D0000" (dark red),
"#FFFF99" (yellow), |
|
|
|
|
|
|
| |
|
|
|
|
|
|
#F5F5F5
(gray) = enabled; none, "empty" = disabled |
|
|
|
|
|
|
|
|
|
| |
|
|
|
|
|
> |
Notes: Make
sure that the relevant HTML file paths are applied in the sw3 |
|
|
|
|
|
| |
|
|
|
|
|
|
parameter.
The color value must match the background color value as provided |
|
|
|
|
| |
|
|
|
|
|
|
in the
<body> statement. |
|
|
|
|
|
|
|
|
|
|
|
|
|
|
| |
|
|
|
|
|
> |
Indication:
"<name>Menu.htm" file, "<!-- Reset -->"
tag |
|
|
|
|
|
|
|
|
|
| |
|
|
|
|
|
> |
Use cases:
Convenient launch of multiple pages that are needed for a session. |
|
|
|
|
| |
|
|
|
|
|
|
|
|
|
|
|
|
|
|
|
|
|
|
|
|
|
|
|
|
|
| Page Recorder |
|
|
|
|
> |
Page Recorder
Command Dictionary |
|
|
|
|
|
|
|
|
|
|
|
|
| Commands |
|
|
|
|
|
|
|
|
|
|
|
|
|
|
|
|
|
|
|
|
|
|
|
|
|
| Time |
|
|
|
|
|
Time |
|
|
|
|
|
|
|
|
|
|
|
|
|
|
|
|
|
|
| |
|
|
|
|
|
> |
Example:
"2000:" |
|
|
|
|
|
|
|
|
|
|
|
|
|
|
|
| |
|
|
|
|
|
> |
Value:
Milliseconds + ":" |
|
|
|
|
|
|
|
|
|
|
|
|
|
|
| |
|
|
|
|
|
> |
Notes: Time
that elapses till the following command will be executed. |
|
|
|
|
|
|
| |
|
|
|
|
|
|
|
|
|
|
|
|
|
|
|
|
|
|
|
|
|
|
|
|
|
| Hypersound Link |
|
|
|
|
|
Execute Hypersound Link |
|
|
|
|
|
|
|
|
|
|
|
|
|
|
|
| |
|
|
|
|
|
> |
Example:
"LinkSesame1310s$S5150e$;" |
|
|
|
|
|
|
|
|
|
|
|
| |
|
|
|
|
|
> |
Value:
"Link" + Placeholder (sw2) + Link number + Link index + |
|
|
|
|
|
|
|
| |
|
|
|
|
|
|
"s$"
+ Animated Sound ID + "e$" + ";" |
|
|
|
|
|
|
|
|
|
|
|
|
| |
|
|
|
|
|
> |
Notes: The
placeholder is found in parameter sw2 of the Animated Sound |
|
|
|
|
|
| |
|
|
|
|
|
|
within the
corresponding HTML object. The link number starts usually |
|
|
|
|
|
|
| |
|
|
|
|
|
|
with 31 (self
reference), 32 (successor), 33 (random selection) and will be |
|
|
|
|
|
|
| |
|
|
|
|
|
|
overridden by
this command, i.e. any Animated Sound can replace the |
|
|
|
|
|
|
| |
|
|
|
|
|
|
existing one.
The default value for a link index is usually "0". |
|
|
|
|
|
|
|
|
| |
|
|
|
|
|
|
If multiple
procedures are used within one member (see "Shockwave" |
|
|
|
|
|
|
| |
|
|
|
|
|
|
chapter
below) different indices are used to identify each of them. |
|
|
|
|
|
|
|
| |
|
|
|
|
|
|
In the above
example, "Sesame1" is the placeholder, "31" is the link |
|
|
|
|
|
|
| |
|
|
|
|
|
|
number,
"0" is the link index, and "S1550" is the Animated Sound
ID. |
|
|
|
|
|
|
| |
|
|
|
|
|
|
|
|
|
|
|
|
|
|
|
|
|
|
|
|
|
|
|
|
|
| |
|
|
|
|
|
TIP |
3 |
|
|
|
|
|
|
|
|
|
|
|
|
|
|
|
|
|
|
| |
|
|
|
|
|
|
The self
reference (first link) is always linked to link number "31" and |
|
|
|
|
|
|
| |
|
|
|
|
|
|
has the link
index "0". Due to this convention, Animated Sounds that are |
|
|
|
|
|
|
| |
|
|
|
|
|
|
currently not
open can be reloaded with any other sound of the Sound Park |
|
|
|
|
|
| |
|
|
|
|
|
|
using a
playing sequence. |
|
|
|
|
|
|
|
|
|
|
|
|
|
|
| |
|
|
|
|
|
|
|
|
|
|
|
|
|
|
|
|
|
|
|
|
|
|
|
|
|
| |
|
|
|
|
|
|
If a command
referes to a link number/link index combination that is not |
|
|
|
|
|
|
| |
|
|
|
|
|
|
defined in an
Animated Sound, the command cannot be executed and |
|
|
|
|
|
|
| |
|
|
|
|
|
|
the sequence
will not be able to terminate. |
|
|
|
|
|
|
|
|
|
|
|
| |
|
|
|
|
|
|
|
|
|
|
|
|
|
|
|
|
|
|
|
|
|
|
|
|
|
| |
|
|
|
|
|
|
Limitation:
When using Animated Sounds online, make sure that only |
|
|
|
|
|
|
| |
|
|
|
|
|
|
those other
Animated Sounds will be called by this command that are |
|
|
|
|
|
|
| |
|
|
|
|
|
|
included in
the Animated Sounds link reference list (see Shockwave |
|
|
|
|
|
|
| |
|
|
|
|
|
|
section
below). Otherwise the Animated Sound
will fail to execute and freeze. |
|
|
|
|
|
| |
|
|
|
|
|
|
|
|
|
|
|
|
|
|
|
|
|
|
|
|
|
|
|
|
|
| Local Link |
|
|
|
|
|
Execute Local Link |
|
|
|
|
|
|
|
|
|
|
|
|
|
|
|
|
| |
|
|
|
|
|
> |
Example:
"LinkSesame1310;" |
|
|
|
|
|
|
|
|
|
|
|
|
|
| |
|
|
|
|
|
> |
Value:
"Link" + Placeholder (sw2) + Link number + Link index |
|
|
|
|
|
|
|
|
| |
|
|
|
|
|
> |
Notes: Local
links are all buttons that are displayed on the graphic area |
|
|
|
|
|
|
| |
|
|
|
|
|
|
of an
Animated Sound that do not link to any other Animated Sound. |
|
|
|
|
|
|
| |
|
|
|
|
|
|
Therefore, a
destination sound is not included in the command. |
|
|
|
|
|
|
|
| |
|
|
|
|
|
|
|
|
|
|
|
|
|
|
|
|
|
|
|
|
|
|
|
|
|
| Scheduled Link |
|
|
|
|
|
Disable/Enable Scheduled
Link (right mouse click) |
|
|
|
|
|
|
|
|
|
|
| |
|
|
|
|
|
> |
Example:
"LinkSesame1310right;" |
|
|
|
|
|
|
|
|
|
|
|
|
| |
|
|
|
|
|
> |
Value:
"Link" + Placeholder (sw2) + Link number + Link index + |
|
|
|
|
|
|
|
| |
|
|
|
|
|
|
"right"
+ ";" |
|
|
|
|
|
|
|
|
|
|
|
|
|
|
|
|
|
| |
|
|
|
|
|
> |
Notes: An
animated scheduled link will be disabled if enabled, or being |
|
|
|
|
|
|
| |
|
|
|
|
|
|
enabled if an
existing schedule has been disabled. |
|
|
|
|
|
|
|
|
|
| |
|
|
|
|
|
|
During play
mode, all animated scheduled links are disabled. |
|
|
|
|
|
|
|
| |
|
|
|
|
|
|
|
|
|
|
|
|
|
|
|
|
|
|
|
|
|
|
|
|
|
| Control Buttons |
|
|
|
|
|
Control Buttons (Play,
Loop, Mute) |
|
|
|
|
|
|
|
|
|
|
|
|
|
| |
|
|
|
|
|
> |
Example:
"Sesame7S30845;" |
|
|
|
|
|
|
|
|
|
|
|
|
|
| |
|
|
|
|
|
> |
Value:
Placeholder (sw2) + Animated Sound ID + Button number + ";" |
|
|
|
|
|
|
| |
|
|
|
|
|
|
Button
numbers: 5 - Play on/off, 6 - Loop on/off, 8 - Mute on/off |
|
|
|
|
|
|
|
|
| |
|
|
|
|
|
> |
Notes: The
placeholder is found in parameter sw2 of the Animated Sound |
|
|
|
|
|
| |
|
|
|
|
|
|
within the
corresponding HTML object. The Animated Sound must be open. |
|
|
|
|
|
| |
|
|
|
|
|
|
|
|
|
|
|
|
|
|
|
|
|
|
|
|
|
|
|
|
|
| Sound Graphic |
|
|
|
|
|
Sound Graphic actions
(left mouse for play from indicated location or loop start) |
|
|
|
|
|
| |
|
|
|
|
|
> |
Example:
"48Sesame7S3084;" |
|
|
|
|
|
|
|
|
|
|
|
|
|
| |
|
|
|
|
|
> |
Value:
Control value + Placeholder (sw2) + Animated Sound ID + ";" |
|
|
|
|
|
|
| |
|
|
|
|
|
|
Control value:
0 - 84 |
|
|
|
|
|
|
|
|
|
|
|
|
|
|
|
| |
|
|
|
|
|
> |
Notes: The
placeholder is found in parameter sw2 of the Animated Sound |
|
|
|
|
|
| |
|
|
|
|
|
|
within the
corresponding HTML object. The Animated Sound must be open. |
|
|
|
|
|
| |
|
|
|
|
|
|
|
|
|
|
|
|
|
|
|
|
|
|
|
|
|
|
|
|
|
| |
|
|
|
|
|
Sound Graphic actions
(right mouse for stop or loop end value) |
|
|
|
|
|
|
|
|
| |
|
|
|
|
|
> |
Example:
"48Sesame7S3084right;" |
|
|
|
|
|
|
|
|
|
|
|
|
| |
|
|
|
|
|
> |
Value:
Control value + Placeholder (sw2) + Animated Sound ID + "right" +
";" |
|
|
|
|
|
| |
|
|
|
|
|
|
Control value:
0 - 84 |
|
|
|
|
|
|
|
|
|
|
|
|
|
|
|
| |
|
|
|
|
|
> |
Notes: The
placeholder is found in parameter sw2 of the Animated Sound |
|
|
|
|
|
| |
|
|
|
|
|
|
within the
corresponding HTML object. The Animated Sound must be open. |
|
|
|
|
|
| |
|
|
|
|
|
|
|
|
|
|
|
|
|
|
|
|
|
|
|
|
|
|
|
|
|
| Volume and Panorama |
|
|
|
|
|
Volume and Panorama
(left mouse for direct control) |
|
|
|
|
|
|
|
|
|
|
| |
|
|
|
|
|
> |
Example:
"48Sesame7S308421;" |
|
|
|
|
|
|
|
|
|
|
|
|
| |
|
|
|
|
|
> |
Value:
Control value + Placeholder (sw2) + Animated Sound ID + |
|
|
|
|
|
|
|
| |
|
|
|
|
|
|
Control strip
+ ";" |
|
|
|
|
|
|
|
|
|
|
|
|
|
|
|
| |
|
|
|
|
|
|
Control value:
0 - 84 |
|
|
|
|
|
|
|
|
|
|
|
|
|
|
|
| |
|
|
|
|
|
|
Control strip:
21 - Volume, 23 - Panorama |
|
|
|
|
|
|
|
|
|
|
|
| |
|
|
|
|
|
> |
Notes: The
placeholder is found in parameter sw2 of the Animated Sound |
|
|
|
|
|
| |
|
|
|
|
|
|
within the
corresponding HTML object. The Animated Sound must be open. |
|
|
|
|
|
| |
|
|
|
|
|
|
|
|
|
|
|
|
|
|
|
|
|
|
|
|
|
|
|
|
|
| |
|
|
|
|
|
Volume and Panorama
(right mouse for superior control) |
|
|
|
|
|
|
|
|
|
| |
|
|
|
|
|
> |
Example:
"48Sesame7S308421right;" |
|
|
|
|
|
|
|
|
|
|
|
|
| |
|
|
|
|
|
> |
Value:
Control value + Placeholder (sw2) + Animated Sound ID + |
|
|
|
|
|
|
|
| |
|
|
|
|
|
|
Control strip
+ "right" + ";" |
|
|
|
|
|
|
|
|
|
|
|
|
|
|
| |
|
|
|
|
|
|
Control value:
0 - 84 |
|
|
|
|
|
|
|
|
|
|
|
|
|
|
|
| |
|
|
|
|
|
|
Control strip:
21 - Volume, 23 - Panorama |
|
|
|
|
|
|
|
|
|
|
|
| |
|
|
|
|
|
> |
Notes: The
placeholder is found in parameter sw2 of the Animated Sound |
|
|
|
|
|
| |
|
|
|
|
|
|
within the
corresponding HTML object. The Animated Sound must be open. |
|
|
|
|
|
| |
|
|
|
|
|
|
|
|
|
|
|
|
|
|
|
|
|
|
|
|
|
|
|
|
|
| Scheduled Group |
|
|
|
|
|
Scheduled Group Commands |
|
|
|
|
|
|
|
|
|
|
|
|
|
|
| Commands |
|
|
|
|
|
> |
Example:
"[F1,stop];" |
|
|
|
|
|
|
|
|
|
|
|
|
|
|
|
| |
|
|
|
|
|
> |
Value:
Placeholder [+ "kom"] + "," + Group Command |
|
|
|
|
|
|
|
|
|
| |
|
|
|
|
|
|
|
|
|
|
|
|
|
|
|
|
|
|
|
|
|
|
|
|
|
| |
|
|
|
|
|
|
Scheduled
Group Command names: |
|
|
|
|
|
|
|
|
|
|
|
|
| |
|
|
|
|
|
|
|
|
|
|
|
|
|
|
|
|
|
|
|
|
|
|
|
|
|
| |
|
|
|
|
|
|
"stop" |
|
Sound will be
stopped but NOT reset disabling animated mode. |
|
|
|
|
| |
|
|
|
|
|
|
[with
"kom"] |
(keep) feature
in sw2 will execute play as well. |
|
|
|
|
|
|
|
| |
|
|
|
|
|
|
"play" |
|
Sound will
restart itself and play with the original parameters. |
|
|
|
|
|
| |
|
|
|
|
|
|
[with
"kom"] |
(keep) feature
in sw2 will suppress new play. |
|
|
|
|
|
|
|
| |
|
|
|
|
|
|
"dirc" |
|
(dirc)
feature in sw2 will execute only if control was directly played. |
|
|
|
|
| |
|
|
|
|
|
|
"strt" |
|
Sound will be
reset to original scr HTML parameter and played. |
|
|
|
|
| |
|
|
|
|
|
|
"SXXXX" |
|
Sound will be
reset and played according to predefined settings. |
|
|
|
|
| |
|
|
|
|
|
|
"stopSXXXX" |
Sound will be
reset and stopped disabling animated mode. |
|
|
|
|
|
| |
|
|
|
|
|
|
"muteSXXXX" |
Sound will be
reset and muted (default initialization). |
|
|
|
|
|
|
| |
|
|
|
|
|
|
"playSXXXX" |
Sound will be
reset and played. |
|
|
|
|
|
|
|
|
|
|
| |
|
|
|
|
|
|
|
|
|
|
|
|
|
|
|
|
|
|
|
|
|
|
|
|
|
| |
|
|
|
|
|
> |
Notes: The
Scheduled Group Command "stop" is issued by the Page Recorder |
|
|
|
|
| |
|
|
|
|
|
|
in order to
terminate unspecified elements that have been launched by
"S0000" |
|
|
|
|
| |
|
|
|
|
|
|
commands. |
|
|
|
|
|
|
|
|
|
|
|
|
|
|
|
|
| |
|
|
|
|
|
|
|
|
|
|
|
|
|
|
|
|
|
|
|
|
|
|
|
|
|
| Group Controls |
|
|
|
|
|
Activating Group Controls |
|
|
|
|
|
|
|
|
|
|
|
|
|
|
|
| |
|
|
|
|
|
> |
Example:
"ForceStop_Sesame_10;" |
|
|
|
|
|
|
|
|
|
|
|
|
| |
|
|
|
|
|
> |
Value: Group
Control name + "_" + Group Control ID |
|
|
|
|
|
|
|
|
|
| |
|
|
|
|
|
|
Group Control
name: "ForcePlay", "ForceStop", "GroupReset", |
|
|
|
|
|
|
|
| |
|
|
|
|
|
|
"GroupForward" |
|
|
|
|
|
|
|
|
|
|
|
|
|
|
|
| |
|
|
|
|
|
|
Group Control
ID: Root name + "_" + Integer |
|
|
|
|
|
|
|
|
|
|
|
| |
|
|
|
|
|
> |
Notes: The
activation simulates simply a left mouse click. The use must |
|
|
|
|
|
|
| |
|
|
|
|
|
|
consider the
current context of operation. |
|
|
|
|
|
|
|
|
|
|
|
| |
|
|
|
|
|
|
|
|
|
|
|
|
|
|
|
|
|
|
|
|
|
|
|
|
|
| End Controls |
|
|
|
|
|
Termination conditions |
|
|
|
|
|
|
|
|
|
|
|
|
|
|
|
| |
|
|
|
|
|
> |
Example:
"PlayStop;" |
|
|
|
|
|
|
|
|
|
|
|
|
|
|
|
| |
|
|
|
|
|
> |
Values: |
|
|
|
|
|
|
|
|
|
|
|
|
|
|
|
|
|
| |
|
|
|
|
|
|
"PlayStop",
"PlayLoop", "GroupPlayStop", "GroupPlayLoop",
"GeneralStop", |
|
|
|
|
|
| |
|
|
|
|
|
|
"GroupPlayFree" |
|
|
|
|
|
|
|
|
|
|
|
|
|
|
|
| |
|
|
|
|
|
> |
Notes:
PlayStop terminates the complete play when used in the Page |
|
|
|
|
|
|
| |
|
|
|
|
|
|
Recorder or
the play of a local sequence launched by the Group Play |
|
|
|
|
|
|
| |
|
|
|
|
|
|
Control
option (sw6 and sw8). PlayLoop causes the sequence to be |
|
|
|
|
|
|
| |
|
|
|
|
|
|
played from
the beginning (endless mode). GeneralStop is only |
|
|
|
|
|
|
|
| |
|
|
|
|
|
|
available
within a local sequence and causes all playing to be stopped |
|
|
|
|
|
|
| |
|
|
|
|
|
|
including the
playing controlled by the Page Recorder. |
|
|
|
|
|
|
|
|
|
| |
|
|
|
|
|
|
GroupPlayFree
ends a subsequence but frees its element for further |
|
|
|
|
|
|
| |
|
|
|
|
|
|
animated play
(button changes from pink to red). |
|
|
|
|
|
|
|
|
|
|
| |
|
|
|
|
|
|
|
|
|
|
|
|
|
|
|
|
|
|
|
|
|
|
|
|
|
| HTML CHANGES |
|
|
|
4. |
Standard HTML
Changes, Title Inheritance and Other Customizations |
|
|
|
|
|
|
| |
|
|
|
|
|
|
|
|
|
|
|
|
|
|
|
|
|
|
|
|
|
|
|
|
|
| |
|
|
|
|
Title,
Greetings, and other text elements as well as colors, images, links, etc. can
be |
|
|
|
|
|
| |
|
|
|
|
edited freely
as required according to HTML standards. |
|
|
|
|
|
|
|
|
|
|
| |
|
|
|
|
|
|
|
|
|
|
|
|
|
|
|
|
|
|
|
|
|
|
|
|
|
| |
|
|
|
|
You can also
change a title that will be copied into a new publication using the Page |
|
|
|
|
|
| |
|
|
|
|
Indicator
page selection and publishing feature as described in the end of the |
|
|
|
|
|
|
|
| |
|
|
|
|
"Page
Recorder" section. |
|
|
|
|
|
|
|
|
|
|
|
|
|
|
|
|
| |
|
|
|
|
|
|
|
|
|
|
|
|
|
|
|
|
|
|
|
|
|
|
|
|
|
| |
|
|
|
|
Using other
InitSong.dcr, InitPage.dcr, and Wrapping File functions, Preferences and |
|
|
|
|
|
| |
|
|
|
|
other
pre-settings can be applied individually for each Sound Page project as
described |
|
|
|
|
|
| |
|
|
|
|
below. |
|
|
|
|
|
|
|
|
|
|
|
|
|
|
|
|
|
|
|
| |
|
|
|
|
|
|
|
|
|
|
|
|
|
|
|
|
|
|
|
|
|
|
|
|
|
| Change Published |
|
|
|
|
> |
Change a Page
Title to be inherited |
|
|
|
|
|
|
|
|
|
|
|
|
| Page Title |
|
|
|
|
|
|
|
|
|
|
|
|
|
|
|
|
|
|
|
|
|
|
|
|
|
| |
|
|
|
|
|
> |
Parameter: sw2 |
|
|
|
|
|
|
|
|
|
|
|
|
|
|
|
|
| |
|
|
|
|
|
> |
Example:
<param name="sw2" value="WB Xpressions 3"> |
|
|
|
|
|
|
|
|
| |
|
|
|
|
|
> |
Values: any
string |
|
|
|
|
|
|
|
|
|
|
|
|
|
|
|
| |
|
|
|
|
|
> |
Notes: Each
time a page is selected by checking the Page Indicator check |
|
|
|
|
|
| |
|
|
|
|
|
|
box, the
specified title will show up in the published destination page and |
|
|
|
|
|
| |
|
|
|
|
|
|
provide the
URL link to the page that is indicated. |
|
|
|
|
|
|
|
|
|
|
| |
|
|
|
|
|
> |
Indication:
<!-- Song Init --> tag, <!-- Page Init --> tag |
|
|
|
|
|
|
|
|
|
| |
|
|
|
|
|
|
Included,
i.e. already published page references can be identified specifically |
|
|
|
|
| |
|
|
|
|
|
|
by the <td
width=11px> statement that surrounds those page reference objects |
|
|
|
|
| |
|
|
|
|
|
|
(inserted Page
Indicator check boxes) |
|
|
|
|
|
|
|
|
|
|
|
|
| |
|
|
|
|
|
> |
Use cases:
Deviation of display name from file name eases orientation |
|
|
|
|
|
|
| |
|
|
|
|
|
|
for page
navigation. |
|
|
|
|
|
|
|
|
|
|
|
|
|
|
|
| |
|
|
|
|
|
|
|
|
|
|
|
|
|
|
|
|
|
|
|
|
|
|
|
|
|
| Change Published |
|
|
|
|
> |
Change a File
Path using standard Save As Operation |
|
|
|
|
|
|
|
|
| File Path |
|
|
|
|
|
|
|
|
|
|
|
|
|
|
|
|
|
|
|
|
|
|
|
|
|
| |
|
|
|
|
|
> |
Parameter: sw3 |
|
|
|
|
|
|
|
|
|
|
|
|
|
|
|
|
| |
|
|
|
|
|
> |
Example:
<param name="sw3" value="C:\MySoundTrips\Sound
Trip.htm"> |
|
|
|
|
|
| |
|
|
|
|
|
> |
Values: any
path + any file name + ".htm" |
|
|
|
|
|
|
|
|
|
|
|
| |
|
|
|
|
|
> |
Notes: This
value must always reflect the current name and path of the |
|
|
|
|
|
|
| |
|
|
|
|
|
|
Sound Page in
order to allow the Page Recorder to correctly restore |
|
|
|
|
|
|
| |
|
|
|
|
|
|
the page
configuration of a multiple page recording. |
|
|
|
|
|
|
|
|
|
| |
|
|
|
|
|
> |
Indication:
<!-- Song Init --> tag, <!-- Page Init --> tag |
|
|
|
|
|
|
|
|
|
| |
|
|
|
|
|
|
Included,
i.e. already published page references can be identified specifically |
|
|
|
|
| |
|
|
|
|
|
|
by the <td
width=11px> statement that surrounds those page reference objects |
|
|
|
|
| |
|
|
|
|
|
|
(inserted Page
Indicator check boxes) |
|
|
|
|
|
|
|
|
|
|
|
|
| |
|
|
|
|
|
> |
Use cases:
Saving Sound Pages with a different name and/or under a different |
|
|
|
|
| |
|
|
|
|
|
|
location
without the need to republish them again. |
|
|
|
|
|
|
|
|
|
|
| |
|
|
|
|
|
|
|
|
|
|
|
|
|
|
|
|
|
|
|
|
|
|
|
|
|
| Frame Indicator |
|
|
|
|
> |
Indicate
Frame Settings of Sound Page Project |
|
|
|
|
|
|
|
|
|
|
| |
|
|
|
|
|
|
|
|
|
|
|
|
|
|
|
|
|
|
|
|
|
|
|
|
|
| |
|
|
|
|
|
> |
Parameter: sw4 |
|
|
|
|
|
|
|
|
|
|
|
|
|
|
|
|
| |
|
|
|
|
|
> |
Example:
<param name="sw4" value="Frame"> |
|
|
|
|
|
|
|
|
|
|
| |
|
|
|
|
|
> |
Values:
"None", "Frame", "FrameMenu" |
|
|
|
|
|
|
|
|
|
|
|
| |
|
|
|
|
|
> |
Notes: |
|
|
|
|
|
|
|
|
|
|
|
|
|
|
|
|
|
| |
|
|
|
|
|
|
"None"
- Page is stand-alone, no frameset is being applied. |
|
|
|
|
|
|
|
|
| |
|
|
|
|
|
|
"Frame"
- Standard frameset is being applied consisting of <name>.htm, |
|
|
|
|
|
|
| |
|
|
|
|
|
|
<name>Frame.htm,
<name>Menu.htm components, and <name>Frame.htm |
|
|
|
|
|
| |
|
|
|
|
|
|
is being
called. |
|
|
|
|
|
|
|
|
|
|
|
|
|
|
|
|
| |
|
|
|
|
|
|
"FrameMenu"
- <name>.htm is being loaded in the current frame, and |
|
|
|
|
|
|
| |
|
|
|
|
|
|
<name>Menu.htm
is loaded into "leftframe". <name>Frame.htm is NOT invoked. |
|
|
|
|
| |
|
|
|
|
|
> |
Indication:
<!-- Song Init --> tag, <!-- Page Init --> tag |
|
|
|
|
|
|
|
|
|
| |
|
|
|
|
|
|
Included,
i.e. already published page references can be identified specifically |
|
|
|
|
| |
|
|
|
|
|
|
by the <td
width=11px> statement that surrounds those page reference objects |
|
|
|
|
| |
|
|
|
|
|
|
(inserted Page
Indicator check boxes) |
|
|
|
|
|
|
|
|
|
|
|
|
| |
|
|
|
|
|
> |
Use cases:
"Frame" is used to load complete Sound Page set into the complete |
|
|
|
|
| |
|
|
|
|
|
|
browser
window while "FrameMenu" menu allows to retain other frames and
only |
|
|
|
|
| |
|
|
|
|
|
|
to apply main
file and menu file where needed. |
|
|
|
|
|
|
|
|
|
|
| |
|
|
|
|
|
|
|
|
|
|
|
|
|
|
|
|
|
|
|
|
|
|
|
|
|
| Initiate Synch-ID |
|
|
|
|
> |
Initiate
Synch-ID for Hypersound-Synchronization (without Group Control) |
|
|
|
|
| |
|
|
|
|
|
|
|
|
|
|
|
|
|
|
|
|
|
|
|
|
|
|
|
|
|
| |
|
|
|
|
|
> |
Parameter: sw5 |
|
|
|
|
|
|
|
|
|
|
|
|
|
|
|
|
| |
|
|
|
|
|
> |
Example:
<param name="sw5" value="init"> |
|
|
|
|
|
|
|
|
|
|
|
| |
|
|
|
|
|
> |
Value:
Alphanumeric text |
|
|
|
|
|
|
|
|
|
|
|
|
|
|
| |
|
|
|
|
|
> |
Notes:
Animated Sounds are able to communicate with each other without |
|
|
|
|
|
| |
|
|
|
|
|
|
relying on
Group Play Controls. The Synch-ID allows to synchronize Animated |
|
|
|
|
|
| |
|
|
|
|
|
|
Sounds and
can be initiated using this parameter (see chapter "Shockwave"). |
|
|
|
|
|
| |
|
|
|
|
|
> |
Indication:
<!-- Song Init --> tag, <!-- Page Init --> tag |
|
|
|
|
|
|
|
|
|
| |
|
|
|
|
|
|
Included,
i.e. already published page references can be identified specifically |
|
|
|
|
| |
|
|
|
|
|
|
by the <td
width=11px> statement that surrounds those page reference objects |
|
|
|
|
| |
|
|
|
|
|
|
(inserted Page
Indicator check boxes) |
|
|
|
|
|
|
|
|
|
|
|
|
| |
|
|
|
|
|
> |
Use cases: See
"Notes". |
|
|
|
|
|
|
|
|
|
|
|
|
|
|
| |
|
|
|
|
|
|
|
|
|
|
|
|
|
|
|
|
|
|
|
|
|
|
|
|
|
| Initiate Sound Size |
|
|
|
|
> |
Initiate
Display Size of Animated Sound |
|
|
|
|
|
|
|
|
|
|
|
| |
|
|
|
|
|
|
|
|
|
|
|
|
|
|
|
|
|
|
|
|
|
|
|
|
|
| |
|
|
|
|
|
> |
Parameter: sw6 |
|
|
|
|
|
|
|
|
|
|
|
|
|
|
|
|
| |
|
|
|
|
|
> |
Example:
<param name="sw6" value="big"> |
|
|
|
|
|
|
|
|
|
|
| |
|
|
|
|
|
> |
Values:
"big", "medium", "small", "invisible" |
|
|
|
|
|
|
|
|
|
|
|
| |
|
|
|
|
|
> |
Notes: This
value is set to initiate the size of all Animated Sounds in the |
|
|
|
|
|
|
| |
|
|
|
|
|
|
Sound Page. |
|
|
|
|
|
|
|
|
|
|
|
|
|
|
|
|
| |
|
|
|
|
|
> |
Indication:
<!-- Song Init --> tag, <!-- Page Init --> tag |
|
|
|
|
|
|
|
|
|
| |
|
|
|
|
|
|
Included,
i.e. already published page references can be identified specifically |
|
|
|
|
| |
|
|
|
|
|
|
by the <td
width=11px> statement that surrounds those page reference objects |
|
|
|
|
| |
|
|
|
|
|
|
(inserted Page
Indicator check boxes) |
|
|
|
|
|
|
|
|
|
|
|
|
| |
|
|
|
|
|
|
|
|
|
|
|
|
|
|
|
|
|
|
|
|
|
|
|
|
|
| Add Info Link |
|
|
|
|
> |
Add Info Link
to Page Link for Publishing |
|
|
|
|
|
|
|
|
|
|
|
| |
|
|
|
|
|
|
|
|
|
|
|
|
|
|
|
|
|
|
|
|
|
|
|
|
|
| |
|
|
|
|
|
> |
Parameter: sw7 |
|
|
|
|
|
|
|
|
|
|
|
|
|
|
|
|
| |
|
|
|
|
|
> |
Example:
<param name="sw7" value="info"> |
|
|
|
|
|
|
|
|
|
|
| |
|
|
|
|
|
> |
Values:
"none", "info" |
|
|
|
|
|
|
|
|
|
|
|
|
|
|
|
| |
|
|
|
|
|
> |
Notes: If
value is set to "info", the Info button next to the Page Indicator
(see |
|
|
|
|
|
| |
|
|
|
|
|
|
chapter
"Sound Park", section "Preparation") will be published
together with the |
|
|
|
|
| |
|
|
|
|
|
|
page link in
the resulting Sound Page. |
|
|
|
|
|
|
|
|
|
|
|
|
| |
|
|
|
|
|
> |
Indication:
<!-- Song Init --> tag, <!-- Page Init --> tag |
|
|
|
|
|
|
|
|
|
| |
|
|
|
|
|
|
Included,
i.e. already published page references can be identified specifically |
|
|
|
|
| |
|
|
|
|
|
|
by the <td
width=11px> statement that surrounds those page reference objects |
|
|
|
|
| |
|
|
|
|
|
|
(inserted Page
Indicator check boxes) |
|
|
|
|
|
|
|
|
|
|
|
|
| |
|
|
|
|
|
|
|
|
|
|
|
|
|
|
|
|
|
|
|
|
|
|
|
|
|
| Frame Content Fallback |
|
|
|
|
> |
Load Page
into "mainframe" if PagePathway.dcr sw6 is not set |
|
|
|
|
|
|
| |
|
|
|
|
|
|
|
|
|
|
|
|
|
|
|
|
|
|
|
|
|
|
|
|
|
| |
|
|
|
|
|
> |
Parameter: sw8 |
|
|
|
|
|
|
|
|
|
|
|
|
|
|
|
|
| |
|
|
|
|
|
> |
Example:
<param name="sw8" value="../Docu/Topics/TOC.htm"> |
|
|
|
|
|
|
|
| |
|
|
|
|
|
> |
Values: any
path + any file name + ".htm" |
|
|
|
|
|
|
|
|
|
|
|
| |
|
|
|
|
|
> |
Notes: The
file set in this parameter will be load into "mainframe", if
parameter |
|
|
|
|
|
| |
|
|
|
|
|
|
sw4 is set to
"FrameMenu" (see "Indicate Frame Settings…" above), and |
|
|
|
|
|
|
| |
|
|
|
|
|
|
sw6 in the
Wrapping File is not set so that "topic.txt" preference is not
being written |
|
|
|
|
| |
|
|
|
|
|
|
(see also
"Wrapping File" description below). Obviously, the Sound Page needs |
|
|
|
|
| |
|
|
|
|
|
|
to be loaded
in another frame which needs to be set in the <name>Frame.htm |
|
|
|
|
|
| |
|
|
|
|
|
|
file (for
example, "topframe"). |
|
|
|
|
|
|
|
|
|
|
|
|
|
| |
|
|
|
|
|
> |
Indication:
<!-- Song Init --> tag only |
|
|
|
|
|
|
|
|
|
|
|
|
| |
|
|
|
|
|
|
Included,
i.e. already published page references can be identified specifically |
|
|
|
|
| |
|
|
|
|
|
|
by the <td
width=11px> statement that surrounds those page reference objects |
|
|
|
|
| |
|
|
|
|
|
|
(inserted Page
Indicator check boxes) |
|
|
|
|
|
|
|
|
|
|
|
|
| |
|
|
|
|
|
> |
Use case:
Using the Wrapping File's parameter sw6 (see below) a file can be |
|
|
|
|
|
| |
|
|
|
|
|
|
linked to a
Sound Page (for example, text). In case the Sound Page is called |
|
|
|
|
|
| |
|
|
|
|
|
|
directly, the
file reference in sw8 will make sure that a page is being loaded in |
|
|
|
|
|
| |
|
|
|
|
|
|
any case. |
|
|
|
|
|
|
|
|
|
|
|
|
|
|
|
|
|
| |
|
|
|
|
|
|
|
|
|
|
|
|
|
|
|
|
|
|
|
|
|
|
|
|
|
| Issue Project Tag |
|
|
|
|
> |
Issue Project
Tag to be used for context sensitive Page Load |
|
|
|
|
|
|
|
| |
|
|
|
|
|
|
|
|
|
|
|
|
|
|
|
|
|
|
|
|
|
|
|
|
|
| |
|
|
|
|
|
> |
Parameter: sw9 |
|
|
|
|
|
|
|
|
|
|
|
|
|
|
|
|
| |
|
|
|
|
|
> |
Example:
<param name="sw9" value="INJ"> |
|
|
|
|
|
|
|
|
|
|
| |
|
|
|
|
|
> |
Values: [ any
path + ] any name |
|
|
|
|
|
|
|
|
|
|
|
|
|
| |
|
|
|
|
|
|
Prefs-ID:
project.txt |
|
|
|
|
|
|
|
|
|
|
|
|
|
|
|
| |
|
|
|
|
|
> |
Notes: The
string set in this parameter is saved as a Prefs text reference |
|
|
|
|
|
|
| |
|
|
|
|
|
|
into the
system and is being used by the GroupReset.dcr function to be |
|
|
|
|
|
|
| |
|
|
|
|
|
|
used as a
project folder in the same level of the folder the Sound Page is |
|
|
|
|
|
| |
|
|
|
|
|
|
located. In
order to set deeper levels or absolute paths, the string can be |
|
|
|
|
|
| |
|
|
|
|
|
|
extended with
a path string prior to the project tag. |
|
|
|
|
|
|
|
|
|
|
| |
|
|
|
|
|
> |
Indication:
<!-- Song Init --> tag only |
|
|
|
|
|
|
|
|
|
|
|
|
| |
|
|
|
|
|
|
Included,
i.e. already published page references can be identified specifically |
|
|
|
|
| |
|
|
|
|
|
|
by the <td
width=11px> statement that surrounds those page reference objects |
|
|
|
|
| |
|
|
|
|
|
|
(inserted Page
Indicator check boxes) |
|
|
|
|
|
|
|
|
|
|
|
|
| |
|
|
|
|
|
> |
Use case: It
is recommended to issue this parameter only once from a project |
|
|
|
|
|
| |
|
|
|
|
|
|
portal page.
Then, the GroupReset.dcr page load function will automatically |
|
|
|
|
|
| |
|
|
|
|
|
|
rely on this
relative path for the duration the project is being used. Opening |
|
|
|
|
|
| |
|
|
|
|
|
|
another
portal will cause the GroupReset.dcr page load function to look for |
|
|
|
|
|
| |
|
|
|
|
|
|
the load file
in another folder (see also GroupReset.dcr, sw4 parameter). |
|
|
|
|
|
|
| |
|
|
|
|
|
|
|
|
|
|
|
|
|
|
|
|
|
|
|
|
|
|
|
|
|
| Launch Page with |
|
|
|
|
> |
Use Wrapping
File to Launch Sound Pages with Different Settings |
|
|
|
|
|
|
| Variable Settings |
|
|
|
|
|
|
|
|
|
|
|
|
|
|
|
|
|
|
|
|
|
|
|
|
|
| |
|
|
|
|
|
> |
Parameter: src |
|
|
|
|
|
|
|
|
|
|
|
|
|
|
|
|
| |
|
|
|
|
|
> |
Fixed Format:
<param name="src"
value="../../Lib/PagePathway.dcr"> |
|
|
|
|
|
|
| |
|
|
|
|
|
> |
Values: (see
above) |
|
|
|
|
|
|
|
|
|
|
|
|
|
|
|
| |
|
|
|
|
|
> |
Notes: Call
for PagePathway object that executes presettings. |
|
|
|
|
|
|
|
| |
|
|
|
|
|
|
|
|
|
|
|
|
|
|
|
|
|
|
|
|
|
|
|
|
|
| |
|
|
|
|
|
> |
Parameter: sw1 |
|
|
|
|
|
|
|
|
|
|
|
|
|
|
|
|
| |
|
|
|
|
|
> |
Example:
<param name="sw1"
value="../ST-001-SesameFrame.htm"> |
|
|
|
|
|
|
| |
|
|
|
|
|
> |
Values: any
path + any file name + ".htm" |
|
|
|
|
|
|
|
|
|
|
|
| |
|
|
|
|
|
> |
Notes:
Destination Sound Trip that need to be launched with the new settings. |
|
|
|
|
|
| |
|
|
|
|
|
|
|
|
|
|
|
|
|
|
|
|
|
|
|
|
|
|
|
|
|
| |
|
|
|
|
|
> |
Parameter: sw2 |
|
|
|
|
|
|
|
|
|
|
|
|
|
|
|
|
| |
|
|
|
|
|
> |
Example:
<param name="sw2" value="@keyword"> |
|
|
|
|
|
|
|
|
|
| |
|
|
|
|
|
> |
Values:
"@" + alphanumeric text |
|
|
|
|
|
|
|
|
|
|
|
|
|
| |
|
|
|
|
|
> |
Notes:
Initial button guide sequence label to indicate start button. |
|
|
|
|
|
|
|
| |
|
|
|
|
|
|
|
|
|
|
|
|
|
|
|
|
|
|
|
|
|
|
|
|
|
| |
|
|
|
|
|
> |
Parameter: sw3 |
|
|
|
|
|
|
|
|
|
|
|
|
|
|
|
|
| |
|
|
|
|
|
> |
Example:
<param name="sw3" value="Sesame"> |
|
|
|
|
|
|
|
|
|
| |
|
|
|
|
|
> |
Values:
Alphanumeric text |
|
|
|
|
|
|
|
|
|
|
|
|
|
|
| |
|
|
|
|
|
> |
Notes: This
parameter includes the root word for the Sound Page the |
|
|
|
|
|
|
| |
|
|
|
|
|
|
wrapping file
is referring to. |
|
|
|
|
|
|
|
|
|
|
|
|
|
|
| |
|
|
|
|
|
|
|
|
|
|
|
|
|
|
|
|
|
|
|
|
|
|
|
|
|
| |
|
|
|
|
|
> |
Parameter: sw4 |
|
|
|
|
|
|
|
|
|
|
|
|
|
|
|
|
| |
|
|
|
|
|
> |
Example:
<param name="sw4" value="empty:647000469;0: |
|
|
|
|
|
|
|
|
| |
|
|
|
|
|
|
GroupForward_Sesame_000;10235:GroupForward_Sesame_001;11670: |
|
|
|
|
|
| |
|
|
|
|
|
|
LinkF1330s$S5147e$;13149:LinkF1330s$S5150e$;15005:PlayStop;"> |
|
|
|
|
|
|
| |
|
|
|
|
|
> |
Values: As
provided by the "mouse.txt" file in the Shockwave preferences
folder |
|
|
|
|
| |
|
|
|
|
|
|
C:\Documents
and Settings\"your ID"\Application Data\Macromedia\ |
|
|
|
|
|
|
| |
|
|
|
|
|
|
Shockwave
Player\Prefs\Q93Z43LF\ |
|
|
|
|
|
|
|
|
|
|
|
|
| |
|
|
|
|
|
|
"empty:"
+ System Init Time placeholder + |
|
|
|
|
|
|
|
|
|
|
|
| |
|
|
|
|
|
|
[ Time value
+ ":" + Action + ";" ..] continuously repeated + |
|
|
|
|
|
|
|
|
| |
|
|
|
|
|
|
Time value +
":" + "PlayStop;" or "PlayLoop;" |
|
|
|
|
|
|
|
|
|
|
| |
|
|
|
|
|
> |
Notes: A
recorded sequence that is copied from mouse.txt into parameter sw4 |
|
|
|
|
|
| |
|
|
|
|
|
|
can be
reproduced by the user from the destination file using the
"Reset"-"Play" |
|
|
|
|
| |
|
|
|
|
|
|
combination
of the page recorder. This allows with each wrapping file to |
|
|
|
|
|
|
| |
|
|
|
|
|
|
present a
different pre-produced playing sequence. |
|
|
|
|
|
|
|
|
|
| |
|
|
|
|
|
|
For this
feature to become active parameter sw3 must match the root name |
|
|
|
|
|
| |
|
|
|
|
|
|
of the
destination file (sequence is copied internally into "mouselast" +
root |
|
|
|
|
|
| |
|
|
|
|
|
|
name.) |
|
|
|
|
|
|
|
|
|
|
|
|
|
|
|
|
|
| |
|
|
|
|
|
|
|
|
|
|
|
|
|
|
|
|
|
|
|
|
|
|
|
|
|
| |
|
|
|
|
|
> |
Parameter: sw5 |
|
|
|
|
|
|
|
|
|
|
|
|
|
|
|
|
| |
|
|
|
|
|
> |
Example:
<param name="sw5" value="@keyword"> |
|
|
|
|
|
|
|
|
|
| |
|
|
|
|
|
> |
Values:
"@" + alphanumeric text |
|
|
|
|
|
|
|
|
|
|
|
|
|
| |
|
|
|
|
|
> |
Notes:
Initial button follow sequence label to indicate start button. |
|
|
|
|
|
|
|
| |
|
|
|
|
|
|
|
|
|
|
|
|
|
|
|
|
|
|
|
|
|
|
|
|
|
| |
|
|
|
|
|
> |
Parameter: sw6 |
|
|
|
|
|
|
|
|
|
|
|
|
|
|
|
|
| |
|
|
|
|
|
> |
Example:
<param name="sw6"
value="../Docu/Topics/TO-001-3.htm"> |
|
|
|
|
|
|
| |
|
|
|
|
|
> |
Values: any
path + any file name + ".htm" |
|
|
|
|
|
|
|
|
|
|
|
| |
|
|
|
|
|
> |
Notes:
Indicated file will be written to the "topic.txt" preference file.
This file |
|
|
|
|
|
| |
|
|
|
|
|
|
will be
loaded into the "mainframe" frame, if "FrameMenu" is
entered into |
|
|
|
|
|
|
| |
|
|
|
|
|
|
the sw4
parameter of the corresponding InitSong.dcr HTML reference |
|
|
|
|
|
|
| |
|
|
|
|
|
|
(see also
InitSong.dcr parameter descriptions sw4 and sw8 above). |
|
|
|
|
|
|
| |
|
|
|
|
|
|
|
|
|
|
|
|
|
|
|
|
|
|
|
|
|
|
|
|
|
| |
|
|
|
|
|
> |
Parameter: sw9 |
|
|
|
|
|
|
|
|
|
|
|
|
|
|
|
|
| |
|
|
|
|
|
> |
Example:
<param name="sw9" value="This is my free comment"> |
|
|
|
|
|
|
|
| |
|
|
|
|
|
> |
Value:
Alphanumeric text |
|
|
|
|
|
|
|
|
|
|
|
|
|
|
| |
|
|
|
|
|
> |
Notes: The
text will be displayed in the Text Display object (see above) when |
|
|
|
|
|
| |
|
|
|
|
|
|
the
destination page is being launched. |
|
|
|
|
|
|
|
|
|
|
|
| |
|
|
|
|
|
|
If sw9 is not
defined, "Press >>" will be shown by default. |
|
|
|
|
|
|
|
|
| |
|
|
|
|
|
|
In order to
hide text, enter space elements like "
". |
|
|
|
|
|
|
|
|
|
|
| |
|
|
|
|
|
|
|
|
|
|
|
|
|
|
|
|
|
|
|
|
|
|
|
|
|
| |
|
|
|
|
|
> |
Parameter:
bgColor (background color) |
|
|
|
|
|
|
|
|
|
|
|
| |
|
|
|
|
|
> |
Example:
<param name="bgColor" value="#8D0000"> |
|
|
|
|
|
|
|
|
|
| |
|
|
|
|
|
> |
Values:
"#000000" (black), "#8D0000" (dark red),
"#0000AA" (dark blue), |
|
|
|
|
|
|
| |
|
|
|
|
|
|
#005500 (dark
green) |
|
|
|
|
|
|
|
|
|
|
|
|
|
|
|
| |
|
|
|
|
|
> |
Notes: The
color value will change the background color of the |
|
|
|
|
|
|
|
| |
|
|
|
|
|
|
Animated
Sounds as supported by the Preference settings. |
|
|
|
|
|
|
|
|
| |
|
|
|
|
|
|
|
|
|
|
|
|
|
|
|
|
|
|
|
|
|
|
|
|
|
| |
|
|
|
|
|
> |
Indication:
Separate template file residing in the /FleX/SoundTrips/Pathways |
|
|
|
|
|
| |
|
|
|
|
|
|
folder. |
|
|
|
|
|
|
|
|
|
|
|
|
|
|
|
|
|
| |
|
|
|
|
|
> |
Use cases:
Launching a specific Sound Page with different presettings |
|
|
|
|
|
|
| |
|
|
|
|
|
|
without the
need to copy the original file and to care about multiple file |
|
|
|
|
|
|
| |
|
|
|
|
|
|
version
management. Especially useful when indicating different sound |
|
|
|
|
|
|
| |
|
|
|
|
|
|
paths through
one sound page (administrating various play versions per |
|
|
|
|
|
| |
|
|
|
|
|
|
one Sound
Page). |
|
|
|
|
|
|
|
|
|
|
|
|
|
|
|
| |
|
|
|
|
|
|
|
|
|
|
|
|
|
|
|
|
|
|
|
|
|
|
|
|
|
| Load Pages into |
|
|
|
|
> |
Launch
multiple Sound Pages into dedicated Frames |
|
|
|
|
|
|
|
|
| Frames |
|
|
|
|
|
|
|
|
|
|
|
|
|
|
|
|
|
|
|
|
|
|
|
|
|
| |
|
|
|
|
|
> |
Parameter: src |
|
|
|
|
|
|
|
|
|
|
|
|
|
|
|
|
| |
|
|
|
|
|
> |
Example:
<param name="src" value="../Lib/PageLaunch.dcr"> |
|
|
|
|
|
|
|
| |
|
|
|
|
|
> |
Values:
"../Lib/PageLaunch.dcr" | "../../Lib/2nd/PageLaunch.dcr" |
|
|
|
|
|
|
|
| |
|
|
|
|
|
> |
Notes: Call
for PageLaunch object that executes multiple page launch. |
|
|
|
|
|
|
| |
|
|
|
|
|
|
|
|
|
|
|
|
|
|
|
|
|
|
|
|
|
|
|
|
|
| |
|
|
|
|
|
> |
Parameter: sw3 |
|
|
|
|
|
|
|
|
|
|
|
|
|
|
|
|
| |
|
|
|
|
|
> |
Example: |
|
|
|
|
|
|
|
|
|
|
|
|
|
|
|
|
|
| |
|
|
|
|
|
|
<param
name="sw3"
value="../../freesound/INJ/LayersFrame.htm:_blank"> |
|
|
|
|
|
| |
|
|
|
|
|
> |
Values: any
path + any file name + ".htm" + ":" + frame name +
";" (repeat) |
|
|
|
|
|
|
| |
|
|
|
|
|
|
frame name:
any alphanumeric string | HTML conventions | "noframe" |
|
|
|
|
|
|
| |
|
|
|
|
|
|
"forcelaunch" |
|
|
|
|
|
|
|
|
|
|
|
|
|
|
|
|
| |
|
|
|
|
|
|
HTML
conventions: "_blank" | "_new" | "_parent" |
"_top" |
|
|
|
|
|
|
|
|
| |
|
|
|
|
|
> |
Notes: A list
of path/frame pairs will be executed simultaneously. If the page(s) |
|
|
|
|
|
| |
|
|
|
|
|
|
is (are)
already loaded, the page will not be loaded again. |
|
|
|
|
|
|
|
|
| |
|
|
|
|
|
|
If a frame
cannot be addressed, a new browser page will be opened. |
|
|
|
|
|
|
| |
|
|
|
|
|
|
If
"noframe" is used as a frame name, the frame destination will be
skipped. |
|
|
|
|
|
| |
|
|
|
|
|
|
If
"forcelaunch" is used, the page will be loaded in any case
(_blank). |
|
|
|
|
|
|
| |
|
|
|
|
|
|
|
|
|
|
|
|
|
|
|
|
|
|
|
|
|
|
|
|
|
| |
|
|
|
|
|
> |
Parameter: sw8
(optional) |
|
|
|
|
|
|
|
|
|
|
|
|
|
|
| |
|
|
|
|
|
> |
Example:
<param name="sw8"
value="freesound/INJ/Navigator01Frame.htm: |
|
|
|
|
|
| |
|
|
|
|
|
|
Breaking
through the Sound Barrier;"> |
|
|
|
|
|
|
|
|
|
|
|
|
| |
|
|
|
|
|
> |
Values: any
path + any file name + ".htm" + ":" + any project title |
|
|
|
|
|
|
|
| |
|
|
|
|
|
> |
Notes: This
parameter delivers launch path and project name to the |
|
|
|
|
|
|
| |
|
|
|
|
|
|
email message
that is issued by PageSend.dcr based on the absolute |
|
|
|
|
|
|
| |
|
|
|
|
|
|
path root,
for example, "http://www.cm-gallery.com/FleX/". |
|
|
|
|
|
|
|
|
| |
|
|
|
|
|
|
The receiver
of the email will be able to open the link with this page. |
|
|
|
|
|
|
| |
|
|
|
|
|
|
The page will
open all the other pages that are needed to perform the |
|
|
|
|
|
|
| |
|
|
|
|
|
|
session to
which the email invites. |
|
|
|
|
|
|
|
|
|
|
|
|
| |
|
|
|
|
|
|
|
|
|
|
|
|
|
|
|
|
|
|
|
|
|
|
|
|
|
| |
|
|
|
|
|
> |
Indication:
PageLaunch.dcr within Sound Pages that use to launch |
|
|
|
|
|
|
|
| |
|
|
|
|
|
|
multiple pages
(alternatively to PageReset.dcr). |
|
|
|
|
|
|
|
|
|
|
| |
|
|
|
|
|
> |
Use cases:
Launching multiple pages at once to allow easy session |
|
|
|
|
|
|
| |
|
|
|
|
|
|
setup. |
|
|
|
|
|
|
|
|
|
|
|
|
|
|
|
|
|
| |
|
|
|
|
|
|
Loading pages
into frames instead of loading full pages allows |
|
|
|
|
|
|
|
| |
|
|
|
|
|
|
higher
flexibility for projects where sound page chunks are used |
|
|
|
|
|
|
|
| |
|
|
|
|
|
|
across one
player ('Reef Recorder'). The player uses similar |
|
|
|
|
|
|
|
| |
|
|
|
|
|
|
placeholders
of the sound page chunks to combine a high number |
|
|
|
|
|
|
| |
|
|
|
|
|
|
of sounds
within one real-time session. |
|
|
|
|
|
|
|
|
|
|
|
| |
|
|
|
|
|
|
|
|
|
|
|
|
|
|
|
|
|
|
|
|
|
|
|
|
|
| Palettes of GroupPlay |
|
|
|
|
> |
Working with
Palettes |
|
|
|
|
|
|
|
|
|
|
|
|
|
|
|
| Objects |
|
|
|
|
|
|
|
|
|
|
|
|
|
|
|
|
|
|
|
|
|
|
|
|
|
| |
|
|
|
|
|
> |
Parameter:
src, sw1 |
|
|
|
|
|
|
|
|
|
|
|
|
|
|
|
| |
|
|
|
|
|
> |
Example:
<param name="src" value="../../Lib/FleXButton.dcr"> |
|
|
|
|
|
|
|
| |
|
|
|
|
|
> |
Values:
relative path to standard library of .dcr objects |
|
|
|
|
|
|
|
|
|
| |
|
|
|
|
|
> |
Notes: FleX
button manages an assmebly of GroupPlay controls. |
|
|
|
|
|
|
|
| |
|
|
|
|
|
|
|
|
|
|
|
|
|
|
|
|
|
|
|
|
|
|
|
|
|
| |
|
|
|
|
|
> |
Parameter: sw2 |
|
|
|
|
|
|
|
|
|
|
|
|
|
|
|
|
| |
|
|
|
|
|
> |
Example:
<param name="sw2" value="Project ID"> |
|
|
|
|
|
|
|
|
|
| |
|
|
|
|
|
> |
Values:
<any alphanumeric string> |
|
|
|
|
|
|
|
|
|
|
|
|
| |
|
|
|
|
|
> |
Notes: Needs
to comply to project IDs of other recorder controls |
|
|
|
|
|
|
|
| |
|
|
|
|
|
|
such as
PageRecordAll, PageSend, PageReceive, |
|
|
|
|
|
|
|
|
|
| |
|
|
|
|
|
|
PageStop.
PageReset, PageRecord (all sw2), PageFollow (sw3). |
|
|
|
|
|
|
|
| |
|
|
|
|
|
|
|
|
|
|
|
|
|
|
|
|
|
|
|
|
|
|
|
|
|
| |
|
|
|
|
|
> |
Parameter: sw3 |
|
|
|
|
|
|
|
|
|
|
|
|
|
|
|
|
| |
|
|
|
|
|
> |
Example:
<param name="sw3"
value="INJ_08_F1;INJ_08_F2;INJ_08_X1;"> |
|
|
|
|
|
| |
|
|
|
|
|
> |
Values:
<alphanumeric string as placeholder root> + <two alphanumerics> +
";" |
|
|
|
|
| |
|
|
|
|
|
> |
Notes: List
of placeholders of GroupPlay controls belonging to the palette. |
|
|
|
|
|
| |
|
|
|
|
|
|
The suffix of
the two alphanumeric letters points to a fixed set of Animated Sounds |
|
|
|
|
| |
|
|
|
|
|
|
placeholders,
usually F1-F4, L1-L4, E1-E4, and X1-X4. These fixed place- |
|
|
|
|
|
| |
|
|
|
|
|
|
holders allow
various assemblies of group controls (palettes) to operate |
|
|
|
|
|
|
| |
|
|
|
|
|
|
on the same
HTML page without the need to launch a new HTML page |
|
|
|
|
|
|
| |
|
|
|
|
|
|
which would
interrupt real-time play. |
|
|
|
|
|
|
|
|
|
|
|
|
| |
|
|
|
|
|
|
Placeholder
root and project ID can be even replaced on the fly using |
|
|
|
|
|
|
| |
|
|
|
|
|
|
optional
parameter sw6 (see below). |
|
|
|
|
|
|
|
|
|
|
|
|
| |
|
|
|
|
|
|
|
|
|
|
|
|
|
|
|
|
|
|
|
|
|
|
|
|
|
| |
|
|
|
|
|
> |
Parameter: sw4 |
|
|
|
|
|
|
|
|
|
|
|
|
|
|
|
|
| |
|
|
|
|
|
> |
Example:
<param name="sw4" value="1"> |
|
|
|
|
|
|
|
|
|
|
|
| |
|
|
|
|
|
> |
Values:
<one alphanumeric letter> |
|
|
|
|
|
|
|
|
|
|
|
|
| |
|
|
|
|
|
> |
Notes: The
alphanumeric letter is the ID of the palette that belongs to |
|
|
|
|
|
|
| |
|
|
|
|
|
|
a Base
Palette (one HTML palette). Palettes are launched via the |
|
|
|
|
|
|
|
| |
|
|
|
|
|
|
FleX button
plus alphanumeric keys. |
|
|
|
|
|
|
|
|
|
|
|
|
| |
|
|
|
|
|
|
Optional. |
|
|
|
|
|
|
|
|
|
|
|
|
|
|
|
|
|
| |
|
|
|
|
|
|
|
|
|
|
|
|
|
|
|
|
|
|
|
|
|
|
|
|
|
| |
|
|
|
|
|
> |
Parameter: sw5 |
|
|
|
|
|
|
|
|
|
|
|
|
|
|
|
|
| |
|
|
|
|
|
> |
Example:
<param name="sw5" value="flex/INJ"> |
|
|
|
|
|
|
|
|
|
|
| |
|
|
|
|
|
> |
Values:
<any alphanumeric string> |
|
|
|
|
|
|
|
|
|
|
|
|
| |
|
|
|
|
|
> |
Notes: Source
file path relative to /FleX. Can be used for additional information |
|
|
|
|
| |
|
|
|
|
|
|
within
palette registry managed by pref "flexpalette_index". This
registry |
|
|
|
|
|
|
| |
|
|
|
|
|
|
supports the
FIND feature of the FleX button. |
|
|
|
|
|
|
|
|
|
|
|
| |
|
|
|
|
|
|
Optional. |
|
|
|
|
|
|
|
|
|
|
|
|
|
|
|
|
|
| |
|
|
|
|
|
|
|
|
|
|
|
|
|
|
|
|
|
|
|
|
|
|
|
|
|
| |
|
|
|
|
|
> |
Parameter: sw6 |
|
|
|
|
|
|
|
|
|
|
|
|
|
|
|
|
| |
|
|
|
|
|
> |
Example:
<param name="sw6" value="1,Session 1:INJ_03_;2,Session
2:INJ_04_;"> |
|
|
|
|
| |
|
|
|
|
|
> |
Values: [
<one alphanumeric letter> + "," + <project ID> +
":" + <placeholder root> + ";" ] |
|
|
|
| |
|
|
|
|
|
> |
Notes: The
letter indicates the key that is mapped to the new Base Palette. |
|
|
|
|
|
| |
|
|
|
|
|
|
Project ID =
New Base Palette. Placeholder root = Corresponding root (see above). |
|
|
|
|
| |
|
|
|
|
|
|
When changing
the Base Palette, in the belonging GroupPlay objects, baseID and |
|
|
|
|
| |
|
|
|
|
|
|
all
corresponding IDs, as well as the placeholder roots in the sw7 stop list will
be |
|
|
|
|
| |
|
|
|
|
|
|
temporarily
replaced. The belonging objects are indicated by their native ID that |
|
|
|
|
| |
|
|
|
|
|
|
is registered
in the FleX button in parameter sw3 (see above). |
|
|
|
|
|
|
|
| |
|
|
|
|
|
|
Optional. |
|
|
|
|
|
|
|
|
|
|
|
|
|
|
|
|
|
| |
|
|
|
|
|
|
|
|
|
|
|
|
|
|
|
|
|
|
|
|
|
|
|
|
|
| |
|
|
|
|
|
> |
Parameter: sw9 |
|
|
|
|
|
|
|
|
|
|
|
|
|
|
|
|
| |
|
|
|
|
|
> |
Example:
<param name="sw9" value="<%default>Load
palette<%1> |
|
|
|
|
|
|
| |
|
|
|
|
|
|
Take
1<%2>Take 2<%"> |
|
|
|
|
|
|
|
|
|
|
|
|
|
|
| |
|
|
|
|
|
> |
Values: [
"<%default>" + list chunk + ] [ "<%" + button
guide sequence label + |
|
|
|
|
|
| |
|
|
|
|
|
|
">"
+ list chunk ] (repeat ) |
|
|
|
|
|
|
|
|
|
|
|
|
|
|
| |
|
|
|
|
|
> |
Notes: A part
of a complete parameter list or free text (sw9) is being selected |
|
|
|
|
|
| |
|
|
|
|
|
|
each time the
FleX button is being pressed. |
|
|
|
|
|
|
|
|
|
|
|
| |
|
|
|
|
|
|
Text after
"<%default>" - will be activated if button guide is not
active or cannot |
|
|
|
|
|
| |
|
|
|
|
|
|
be found at
the specific button when pressed (highlighting). |
|
|
|
|
|
|
|
|
| |
|
|
|
|
|
|
Text after
"<%" + button guide sequence label + ">" - will be
activated if button |
|
|
|
|
|
| |
|
|
|
|
|
|
guide is
active. Please note that the palette index is written to the button guide |
|
|
|
|
|
| |
|
|
|
|
|
|
label each
time, a new palette is loaded. For more information refer to |
|
|
|
|
|
|
| |
|
|
|
|
|
|
"Activate
Specific List String when pressing a Guided Button" and "Set |
|
|
|
|
|
|
| |
|
|
|
|
|
|
Sequence Label
for Button" above. |
|
|
|
|
|
|
|
|
|
|
|
|
| |
|
|
|
|
|
> |
Indication:
FleXButton.dcr object. |
|
|
|
|
|
|
|
|
|
|
|
|
|
| |
|
|
|
|
|
> |
Use case:
When loading an internal palette within a base palette, the name |
|
|
|
|
|
| |
|
|
|
|
|
|
of the
palette content or any initial advice can be shown. |
|
|
|
|
|
|
|
|
| |
|
|
|
|
|
|
|
|
|
|
|
|
|
|
|
|
|
|
|
|
|
|
|
|
|
| |
|
|
|
|
|
|
More
information: |
|
|
|
|
|
|
|
|
|
>> |
|
|
|
|
|
| |
|
|
|
|
|
|
|
|
|
|
|
|
|
|
|
|
|
|
|
|
|
|
|
|
|
| Hybrid Path |
|
|
|
|
> |
Apply Paths
for simultaneous Online and Offline Operation |
|
|
|
|
|
|
|
| Management |
|
|
|
|
|
|
|
|
|
|
|
|
|
|
|
|
|
|
|
|
|
|
|
|
|
| |
|
|
|
|
|
> |
Notes: Paths
executed within Shockwave code are handled differently |
|
|
|
|
|
|
| |
|
|
|
|
|
|
by an offline
environment and by the server. |
|
|
|
|
|
|
|
|
|
|
|
| |
|
|
|
|
|
|
Offline: The
HTML file that contains the Shockwave object determines |
|
|
|
|
|
|
| |
|
|
|
|
|
|
the location
from where a path is being executed. |
|
|
|
|
|
|
|
|
|
|
| |
|
|
|
|
|
|
Online: The
Shockwave object itself determines the location from |
|
|
|
|
|
|
|
| |
|
|
|
|
|
|
where a path
is being executed. |
|
|
|
|
|
|
|
|
|
|
|
|
|
| |
|
|
|
|
|
|
|
|
|
|
|
|
|
|
|
|
|
|
|
|
|
|
|
|
|
| |
|
|
|
|
|
> |
Policy:
PageReset.dcr and PageLaunch.dcr are Shockwave objects |
|
|
|
|
|
|
| |
|
|
|
|
|
|
that execute
HTML calls. They are simultaneously located in the |
|
|
|
|
|
|
|
| |
|
|
|
|
|
|
/Lib and in
the /Lib/2nd/ folders in order to allow 1-level and 2-level |
|
|
|
|
|
|
|
| |
|
|
|
|
|
|
paths for both
environments. |
|
|
|
|
|
|
|
|
|
|
|
|
|
| |
|
|
|
|
|
|
|
|
|
|
|
|
|
|
|
|
|
|
|
|
|
|
|
|
|
| |
|
|
|
|
|
|
1-level
example: ../Doc/WebSongs/AS_Help.htm will be called by |
|
|
|
|
|
|
|
| |
|
|
|
|
|
|
/Lib/PageLaunch.dcr. |
|
|
|
|
|
|
|
|
|
|
|
|
|
|
|
| |
|
|
|
|
|
|
2-level
example: ../../freesound/INJ/Events01.htm will be called by |
|
|
|
|
|
|
|
| |
|
|
|
|
|
|
/Lib/2nd/PageLaunch.dcr. |
|
|
|
|
|
|
|
|
|
|
|
|
|
|
| |
|
|
|
|
|
|
|
|
|
|
|
|
|
|
|
|
|
|
|
|
|
|
|
|
|
| |
|
|
|
|
|
|
The root of
the system is http://www.cm-gallery.com/FleX. |
|
|
|
|
|
|
|
|
| |
|
|
|
|
|
|
|
|
|
|
|
|
|
|
|
|
|
|
|
|
|
|
|
|
|
| |
|
|
|
|
|
|
|
|
|
|
|
|
|
|
|
|
|
|
|
|
|
|
|
|
|
| Shockwave |
|
|
|
Animated
Sound objects are built by Adobe Shockwave technology. Any owner of the |
|
|
|
|
|
|
| |
|
|
|
corresponding
Director application can easily modify those objects by certain parameters, |
|
|
|
|
|
| |
|
|
|
or create
similar objects while inserting new Freesound samples. |
|
|
|
|
|
|
|
|
|
|
| |
|
|
|
|
|
|
|
|
|
|
|
|
|
|
|
|
|
|
|
|
|
|
|
|
|
| |
|
|
|
Currently,
the exchange of Animated Sounds on a level of Shockwave compilations can |
|
|
|
|
|
|
| |
|
|
|
only be
driven offline, but will gratefully be supported (see also
"Contribution" page, accessed |
|
|
|
|
|
| |
|
|
|
by the
"Contribution" tab at the bottom, and the "Contact" tab
for further information). |
|
|
|
|
|
|
|
| |
|
|
|
|
|
|
|
|
|
|
|
|
|
|
|
|
|
|
|
|
|
|
|
|
|
| OVERVIEW |
|
|
|
1. |
Overview |
|
|
|
|
|
|
|
|
|
|
|
|
|
|
|
|
|
|
| |
|
|
|
|
|
|
|
|
|
|
|
|
|
|
|
|
|
|
|
|
|
|
|
|
|
| |
|
|
|
|
The following
figure shows the general structure of an Animated Sound within Director |
|
|
|
|
|
| |
|
|
|
|
MX, Version
10: |
|
|
|
|
|
|
|
|
|
|
|
|
|
|
|
|
|
|
| |
|
|
|
|
|
|
|
|
|
|
|
|
|
|
|
|
|
|
|
|
|
|
|
|
|
| |
|
|
|
|
|
|
|
|
|
|
|
|
|
|
|
|
|
|
|
|
|
|
|
|
|
| |
|
|
|
|
|
|
|
|
Sound Number Placeholder |
|
|
|
|
|
|
|
|
|
|
|
|
| |
|
|
|
|
|
|
|
Code Version |
Clipboard Placeholder |
|
|
|
|
|
|
|
|
|
|
|
| |
|
|
|
|
|
|
|
|
|
|
|
|
|
|
|
|
|
|
|
|
|
|
|
|
|
| Cast Window |
|
|
|
|
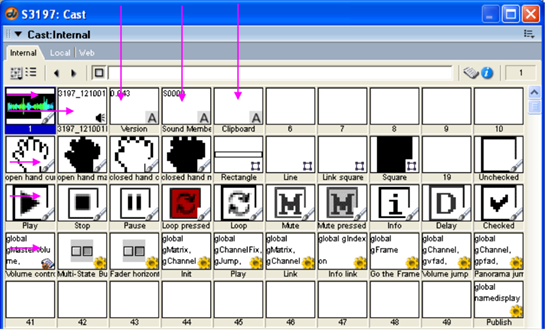
|
|
|
|
|
|
|
|
|
|
|
|
|
|
|
|
|
|
|
|
|
| |
|
|
|
|
|
|
|
|
|
|
|
|
|
|
|
|
|
|
|
|
|
|
|
|
|
| |
|
|
|
|
|
|
|
|
|
|
|
|
|
|
|
|
|
|
|
|
|
|
|
|
|
| |
|
|
|
|
|
|
|
|
|
|
|
|
|
|
|
|
|
|
|
|
|
|
|
|
|
| |
|
|
|
|
|
|
|
|
|
|
|
|
|
|
|
|
|
|
|
|
|
|
|
|
|
| Sound Graphics |
|
|
|
|
|
|
|
|
|
|
|
|
|
|
|
|
|
|
|
|
|
|
|
|
|
| Freesound
Sound Sample |
|
|
|
|
|
|
|
|
|
|
|
|
|
|
|
|
|
|
|
|
|
|
|
| |
|
|
|
|
|
|
|
|
|
|
|
|
|
|
|
|
|
|
|
|
|
|
|
|
|
| |
|
|
|
|
|
|
|
|
|
|
|
|
|
|
|
|
|
|
|
|
|
|
|
|
|
| Graphical Elements |
|
|
|
|
|
|
|
|
|
|
|
|
|
|
|
|
|
|
|
|
|
|
|
|
|
| |
|
|
|
|
|
|
|
|
|
|
|
|
|
|
|
|
|
|
|
|
|
|
|
|
|
| Control
Button Graphics |
|
|
|
|
|
|
|
|
|
|
|
|
|
|
|
|
|
|
|
|
|
|
|
| |
|
|
|
|
|
|
|
|
|
|
|
|
|
|
|
|
|
|
|
|
|
|
|
|
|
| |
|
|
|
|
|
|
|
|
|
|
|
|
|
|
|
|
|
|
|
|
|
|
|
|
|
| Code
Elements (Lingo scripts) |
|
|
|
|
|
|
|
|
|
|
|
|
|
|
|
|
|
|
|
|
|
| |
|
|
|
|
|
|
|
|
|
|
|
|
|
|
|
|
|
|
|
|
|
|
|
|
|
| |
|
|
|
|
|
|
|
|
|
|
|
|
|
|
|
|
|
|
|
|
|
|
|
|
|
| |
|
|
|
|
|
|
|
|
|
|
|
|
|
|
|
|
|
|
|
|
|
|
|
|
|
| |
|
|
|
|
|
|
|
|
|
|
|
|
|
|
|
|
|
|
|
|
|
|
|
|
|
| |
|
|
|
|
|
|
|
|
|
|
|
|
|
|
|
|
|
|
|
|
|
|
|
|
|
| |
|
|
|
|
Figure 19: Adobe
Director Cast window of an Animated Sound based on Freesound sample #3197
(16-Sep-06) |
|
|
|
|
|
| |
|
|
|
|
|
|
|
|
|
|
|
|
|
|
|
|
|
|
|
|
|
|
|
|
|
| |
|
|
|
|
The Code
Elements are controlled by various parameters that are used to define the |
|
|
|
|
|
| |
|
|
|
|
musical
behavior and graphical appearance of the Animated Sound. |
|
|
|
|
|
|
|
|
| |
|
|
|
|
|
|
|
|
|
|
|
|
|
|
|
|
|
|
|
|
|
|
|
|
|
| |
|
|
|
|
From the
parameters that can be used to define or modify musical behavior and |
|
|
|
|
|
|
| |
|
|
|
|
relationships
to other Animated Sounds, the following groups can be described: |
|
|
|
|
|
|
| |
|
|
|
|
|
|
|
|
|
|
|
|
|
|
|
|
|
|
|
|
|
|
|
|
|
| Customization Areas |
|
|
|
|
> |
Control Button
settings |
|
|
|
|
|
|
|
|
|
|
|
|
|
|
|
| |
|
|
|
|
> |
Init routine
settings |
|
|
|
|
|
|
|
|
|
|
|
|
|
|
|
|
| |
|
|
|
|
> |
Play routine
settings |
|
|
|
|
|
|
|
|
|
|
|
|
|
|
|
|
| |
|
|
|
|
> |
Link routine
settings |
|
|
|
|
|
|
|
|
|
|
|
|
|
|
|
|
| |
|
|
|
|
> |
Create New
Animated Sound with different Prefix |
|
|
|
|
|
|
|
|
|
|
|
| |
|
|
|
|
> |
Create New
Animated Sound from Freesound |
|
|
|
|
|
|
|
|
|
|
|
| |
|
|
|
|
|
|
|
|
|
|
|
|
|
|
|
|
|
|
|
|
|
|
|
|
|
| CONTROL BUTTONS |
|
|
|
2. |
Control Button
Settings |
|
|
|
|
|
|
|
|
|
|
|
|
|
|
|
|
| |
|
|
|
|
|
|
|
|
|
|
|
|
|
|
|
|
|
|
|
|
|
|
|
|
|
| |
|
|
|
|
The following
figure shows how the Initial state of a button can be changed. |
|
|
|
|
|
|
|
| |
|
|
|
|
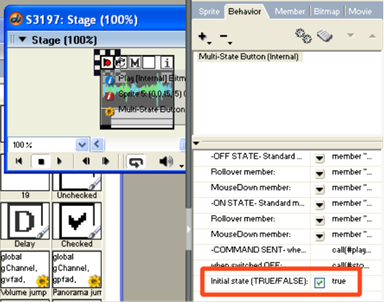
|
|
|
|
|
|
|
|
|
|
|
|
|
|
|
|
|
|
|
|
|
| |
|
|
|
|
|
|
|
|
|
|
|
|
|
|
|
|
|
|
|
|
|
|
|
|
|
| |
|
|
|
|
|
|
|
|
|
|
|
|
|
|
|
|
|
|
|
|
|
|
|
|
|
| |
|
|
|
|
|
|
|
|
|
|
|
|
|
|
|
|
|
|
|
|
|
|
|
|
|
| |
|
|
|
|
|
|
|
|
|
|
|
|
|
|
|
|
|
|
|
|
|
|
|
|
|
| |
|
|
|
|
|
|
|
|
|
|
|
|
|
|
|
|
|
|
|
|
|
|
|
|
|
| |
|
|
|
|
|
|
|
|
|
|
|
|
|
|
|
|
|
|
|
|
|
|
|
|
|
| |
|
|
|
|
|
|
|
|
|
|
|
|
|
|
|
|
|
|
|
|
|
|
|
|
|
| |
|
|
|
|
|
|
|
|
|
|
|
|
|
|
|
|
|
|
|
|
|
|
|
|
|
| |
|
|
|
|
|
|
|
|
|
|
|
|
|
|
|
|
|
|
|
|
|
|
|
|
|
| |
|
|
|
|
|
|
|
|
|
|
|
|
|
|
|
|
|
|
|
|
|
|
|
|
|
| |
|
|
|
|
|
|
|
|
|
|
|
|
|
|
|
|
|
|
|
|
|
|
|
|
|
| |
|
|
|
|
|
|
|
|
|
|
|
|
|
|
|
|
|
|
|
|
|
|
|
|
|
| |
|
|
|
|
|
|
|
|
|
|
|
|
|
|
|
|
|
|
|
|
|
|
|
|
|
| |
|
|
|
|
|
|
|
|
|
|
|
|
|
|
|
|
|
|
|
|
|
|
|
|
|
| |
|
|
|
|
|
|
|
|
|
|
|
|
|
|
|
|
|
|
|
|
|
|
|
|
|
| |
|
|
|
|
|
|
|
|
|
|
|
|
|
|
|
|
|
|
|
|
|
|
|
|
|
| |
|
|
|
|
|
|
|
|
|
|
|
|
|
|
|
|
|
|
|
|
|
|
|
|
|
| |
|
|
|
|
|
|
|
|
|
|
|
|
|
|
|
|
|
|
|
|
|
|
|
|
|
| |
|
|
|
|
Figure 20: Adobe
Director Behavior tab, Initial state setting |
|
|
|
|
|
|
|
|
|
|
|
|
| |
|
|
|
|
|
|
|
|
|
|
|
|
|
|
|
|
|
|
|
|
|
|
|
|
|
| Initial State |
|
|
|
|
Button |
|
State |
Initial
Function when Page opens |
|
|
|
|
|
|
|
|
|
| |
|
|
|
|
|
|
|
|
|
|
|
|
|
|
|
|
|
|
|
|
|
|
|
|
|
| |
|
|
|
|
1. Play |
|
TRUE |
Sound stays
silent but can start with Automated Sound |
|
|
|
|
|
|
| |
|
|
|
|
|
|
|
|
|
Link (red link
box), if Mute button state is FALSE. |
|
|
|
|
|
|
|
| |
|
|
|
|
|
|
|
FALSE |
Sound starts
playing. |
|
|
|
|
|
|
|
|
|
|
|
|
| |
|
|
|
|
2. Loop |
|
|
|
Loop is set
in "Init" procedure, see below. |
|
|
|
|
|
|
|
|
| |
|
|
|
|
3. Mute |
|
TRUE |
Sound stays
silent. Automated Links are blocked. |
|
|
|
|
|
|
|
| |
|
|
|
|
|
|
|
FALSE |
Sound may be
started by Automated Link or be played |
|
|
|
|
|
|
| |
|
|
|
|
|
|
|
|
|
if Play button
state is TRUE (see above). |
|
|
|
|
|
|
|
|
| |
|
|
|
|
4. Sound
Selector |
|
Button state
is selected only on Sound Page. |
|
|
|
|
|
|
|
| |
|
|
|
|
5. Sound Info |
|
|
Links to
Home Page of Sound at the Freesound site. |
|
|
|
|
|
|
| |
|
|
|
|
|
|
|
|
|
|
|
|
|
|
|
|
|
|
|
|
|
|
|
|
|
| INIT AND PLAY |
|
|
|
3. |
Init and Play
Procedure Settings |
|
|
|
|
|
|
|
|
|
|
|
|
|
|
| |
|
|
|
|
|
|
|
|
|
|
|
|
|
|
|
|
|
|
|
|
|
|
|
|
|
| |
|
|
|
|
The following
figure shows how to access the Parameter settings dialogs both for |
|
|
|
|
|
|
| |
|
|
|
|
the Init and
for the Play procedure: |
|
|
|
|
|
|
|
|
|
|
|
|
|
|
| |
|
|
|
|
|
|
|
|
|
|
|
|
|
|
|
| Access |
|
|
|
|
|
|
|
|
|
|
|
|
|
|
| |
|
|
|
|
|
|
|
|
|
|
|
|
|
|
| |
|
|
|
|
|
|
|
|
|
|
|
|
|
|
| |
|
|
|
|
|
|
|
|
|
|
|
|
|
|
| |
|
|
|
|
|
|
|
|
|
|
|
|
|
|
| |
|
|
|
|
|
|
|
|
|
|
|
|
|
|
| |
|
|
|
|
|
|
|
|
|
|
|
|
|
|
| |
|
|
|
|
Figure 21: Adobe
Director Behavior tab, Init and Play procedure parameter access |
|
|
|
|
|
|
|
|
|
| |
|
|
|
|
|
|
|
|
|
|
|
|
|
|
|
|
|
|
|
|
|
|
|
|
|
| |
|
|
|
|
The following
figure shows the Parameters of the Init routine that are valid when |
|
|
|
|
|
|
| |
|
|
|
|
the Animated
Sound is directly called and not by a Sound Link: |
|
|
|
|
|
|
|
|
|
| |
|
|
|
|
|
|
|
|
|
|
|
|
|
|
|
|
|
|
|
|
|
|
|
|
|
| Init Procedure |
|
|
|
|
|
|
|
|
|
|
|
|
|
|
|
|
|
|
| |
|
|
|
|
|
|
|
|
|
|
|
|
|
|
|
|
|
| |
|
|
|
|
Initial
Volume value |
|
|
|
|
|
|
|
|
|
|
| |
|
|
|
|
Second value |
|
|
|
|
|
|
|
|
|
|
| |
|
|
|
|
Initial
Panorama value |
|
|
|
|
|
|
|
|
|
| |
|
|
|
|
Second value |
|
|
|
|
|
|
|
|
|
|
| |
|
|
|
|
|
|
|
|
|
|
|
|
|
|
|
|
|
| |
|
|
|
|
Loop start
time value |
|
|
|
|
|
|
|
|
|
| |
|
|
|
|
Second value |
|
|
|
|
|
|
|
|
|
|
| |
|
|
|
|
Loop end time
value |
|
|
|
|
|
|
|
|
|
| |
|
|
|
|
Second value |
|
|
|
|
|
|
|
|
|
|
| |
|
|
|
|
|
|
|
|
|
|
|
|
|
|
|
|
|
| |
|
|
|
|
Loop count
value |
|
|
|
|
|
|
|
|
|
|
| |
|
|
|
|
Second value |
|
|
|
|
|
|
|
|
|
|
| |
|
|
|
|
|
|
|
|
|
|
|
|
|
|
|
|
|
| |
|
|
|
|
Direct call
value |
|
|
|
|
|
|
|
|
|
|
| |
|
|
|
|
|
|
|
|
|
|
|
|
|
|
|
|
|
| |
|
|
|
|
Figure 22: Adobe
Director Parameters editing dialog box for the Init procedure |
|
|
|
|
|
|
|
|
|
| |
|
|
|
|
|
|
|
|
|
|
|
|
|
|
|
|
|
|
|
|
|
|
|
|
|
| Initial Values |
|
|
|
|
> |
Initial
Volume and Panorama values are effective when Sound is played |
|
|
|
|
|
|
|
| |
|
|
|
|
|
directly.
These values are overridden when the sound is called by a Sound |
|
|
|
|
|
|
| |
|
|
|
|
|
Link (gray or
red box on the sound graphics). |
|
|
|
|
|
|
|
|
|
|
|
| |
|
|
|
|
|
|
|
|
|
|
|
|
|
|
|
|
|
|
|
|
|
|
|
|
|
| Second Value |
|
|
|
|
> |
Second values
defines together with first values a value range from which |
|
|
|
|
|
|
| |
|
|
|
|
|
a random
number will be created each time the sound is called. |
|
|
|
|
|
|
|
|
| |
|
|
|
|
|
|
|
|
|
|
|
|
|
|
|
|
|
|
|
|
|
|
|
|
|
| |
|
|
|
|
|
If the Second
value is set to -1, then no random number is created and the |
|
|
|
|
|
|
| |
|
|
|
|
|
first value is
valid. |
|
|
|
|
|
|
|
|
|
|
|
|
|
|
|
|
| |
|
|
|
|
|
|
|
|
|
|
|
|
|
|
|
|
|
|
|
|
|
|
|
|
|
| Panorama Value |
|
|
|
|
> |
Panorama
values are set to 0 for left, 37 for center, and 71 for right. Any |
|
|
|
|
|
|
|
| |
|
|
|
|
|
value in
between can be used as well. |
|
|
|
|
|
|
|
|
|
|
|
|
|
| |
|
|
|
|
|
|
|
|
|
|
|
|
|
|
|
|
|
|
|
|
|
|
|
|
|
| Loop Values |
|
|
|
|
> |
The Loop
start time value defines the loop start point on the sound sample. |
|
|
|
|
|
|
| |
|
|
|
|
|
|
|
|
|
|
|
|
|
|
|
|
|
|
|
|
|
|
|
|
|
| |
|
|
|
|
> |
The Loop end
time value defines the loop end point on the sound sample. |
|
|
|
|
|
|
| |
|
|
|
|
|
|
|
|
|
|
|
|
|
|
|
|
|
|
|
|
|
|
|
|
|
| |
|
|
|
|
> |
If the Loop
count value is set to 1, no Loop settings apply and the Loop |
|
|
|
|
|
|
|
| |
|
|
|
|
|
Control
button at the Animated Sound will be displayed in white color. |
|
|
|
|
|
|
|
| |
|
|
|
|
|
|
|
|
|
|
|
|
|
|
|
|
|
|
|
|
|
|
|
|
|
| |
|
|
|
|
|
If the Loop
count value is set to 0, an endless Loop will be played and |
|
|
|
|
|
|
|
| |
|
|
|
|
|
the Loop
Control button at the Animated Sound will be displayed in red color. |
|
|
|
|
|
|
| |
|
|
|
|
|
|
|
|
|
|
|
|
|
|
|
|
|
|
|
|
|
|
|
|
|
| |
|
|
|
|
|
If the Loop
count value is set to another number, for example to 5, the |
|
|
|
|
|
|
|
| |
|
|
|
|
|
loop will be
played for the number as indicated. |
|
|
|
|
|
|
|
|
|
|
|
| |
|
|
|
|
|
|
|
|
|
|
|
|
|
|
|
|
|
|
|
|
|
|
|
|
|
| |
|
|
|
|
> |
The loop can
be enabled and disabled using the Loop Control button |
|
|
|
|
|
|
|
| |
|
|
|
|
|
at the
Animated Sound. If set, an endless loop will be played. |
|
|
|
|
|
|
|
|
|
| |
|
|
|
|
|
|
|
|
|
|
|
|
|
|
|
|
|
|
|
|
|
|
|
|
|
| Direct Call |
|
|
|
|
> |
If the Direct
call value is set to 0, the Animated Sound Delay function will |
|
|
|
|
|
|
|
| |
|
|
|
|
|
be enabled. |
|
|
|
|
|
|
|
|
|
|
|
|
|
|
|
|
|
| |
|
|
|
|
|
|
|
|
|
|
|
|
|
|
|
|
|
|
|
|
|
|
|
|
|
| |
|
|
|
|
|
If the Direct
call value is set to 1, the Animated Sound Delay function will |
|
|
|
|
|
|
|
| |
|
|
|
|
|
be suppressed
and the following sound will immediately be played. |
|
|
|
|
|
|
|
| |
|
|
|
|
|
|
|
|
|
|
|
|
|
|
|
|
|
|
|
|
|
|
|
|
|
| |
|
|
|
|
|
The Delay
function parameter settings can be accessed via the Play |
|
|
|
|
|
|
|
| |
|
|
|
|
|
routine (see
below). |
|
|
|
|
|
|
|
|
|
|
|
|
|
|
|
|
| |
|
|
|
|
|
|
|
|
|
|
|
|
|
|
|
|
|
|
|
|
|
|
|
|
|
| |
|
|
|
|
The following
figure shows the Parameters of the Play routine that define the |
|
|
|
|
|
|
|
| |
|
|
|
|
Delay function
of an Animated Sound: |
|
|
|
|
|
|
|
|
|
|
|
|
|
|
| |
|
|
|
|
|
|
|
|
|
|
|
|
|
|
|
|
|
|
|
| Play Procedure |
|
|
|
|
|
|
|
|
|
|
|
|
|
|
|
|
|
|
| |
|
|
|
|
|
|
|
|
|
|
|
|
|
|
|
|
|
|
| |
|
|
|
|
Do not change |
|
|
|
|
|
|
|
|
|
|
|
| |
|
|
|
|
|
|
|
|
|
|
|
|
|
|
|
|
|
|
| |
|
|
|
|
Fade in value |
|
|
|
|
|
|
|
|
|
|
|
| |
|
|
|
|
Second value |
|
|
|
|
|
|
|
|
|
|
|
| |
|
|
|
|
Fade out value |
|
|
|
|
|
|
|
|
|
|
|
| |
|
|
|
|
Second value |
|
|
|
|
|
|
|
|
|
|
|
| |
|
|
|
|
|
|
|
|
|
|
|
|
|
|
|
|
|
|
| |
|
|
|
|
Figure 23: Adobe
Director Parameters editing dialog box for the Play procedure |
|
|
|
|
|
|
|
|
|
| |
|
|
|
|
|
|
|
|
|
|
|
|
|
|
|
|
|
|
|
|
|
|
|
|
|
| Fade Values |
|
|
|
|
> |
The Fade in
value is the time in Milliseconds the sound needs to reach |
|
|
|
|
|
|
|
| |
|
|
|
|
|
the Volume
value as defined in the Init or the Link routine. |
|
|
|
|
|
|
|
|
|
| |
|
|
|
|
|
|
|
|
|
|
|
|
|
|
|
|
|
|
|
|
|
|
|
|
|
| |
|
|
|
|
> |
The Fade out
value is the time in Milliseconds the sound needs to decrease |
|
|
|
|
|
|
| |
|
|
|
|
|
its Volume
value down to zero. This process is triggered by any stop |
|
|
|
|
|
|
|
| |
|
|
|
|
|
applied to
the sound but will be disrupted if a link to another sound is executed. |
|
|
|
|
|
| |
|
|
|
|
|
|
|
|
|
|
|
|
|
|
|
|
|
|
|
|
|
|
|
|
|
| |
|
|
|
|
> |
Second values
defines together with first values a value range from which |
|
|
|
|
|
|
| |
|
|
|
|
|
a random
number will be created each time the sound is called. |
|
|
|
|
|
|
|
|
| |
|
|
|
|
|
|
|
|
|
|
|
|
|
|
|
|
|
|
|
|
|
|
|
|
|
| |
|
|
|
|
|
If the Second
value is set to -1, then no random number is created and the |
|
|
|
|
|
|
| |
|
|
|
|
|
first value is
valid. |
|
|
|
|
|
|
|
|
|
|
|
|
|
|
|
|
| |
|
|
|
|
|
|
|
|
|
|
|
|
|
|
|
|
|
|
|
|
|
|
|
|
|
| Cursor Range |
|
|
|
|
> |
Do not change
the Cursor range value. |
|
|
|
|
|
|
|
|
|
|
|
|
| |
|
|
|
|
|
|
|
|
|
|
|
|
|
|
|
|
|
|
|
|
|
|
|
|
|
| LINK |
|
|
|
4. |
Link Procedure
Settings |
|
|
|
|
|
|
|
|
|
|
|
|
|
|
|
| |
|
|
|
|
|
|
|
|
|
|
|
|
|
|
|
|
|
|
|
|
|
|
|
|
|
| |
|
|
|
|
The following
figure shows how to access the Parameter settings dialog for the |
|
|
|
|
|
|
| |
|
|
|
|
multiple Link
procedures that can be applied to an Animated Sound: |
|
|
|
|
|
|
|
|
| |
|
|
|
|
|
|
|
|
|
|
|
|
|
|
|
|
| Access |
|
|
|
|
|
|
|
|
|
|
|
|
|
|
|
| |
|
|
|
|
|
|
|
|
|
|
|
|
|
|
|
| |
|
|
|
|
|
|
|
|
|
|
|
|
|
|
|
| |
|
|
|
|
|
|
|
|
|
|
|
|
|
|
|
| |
|
|
|
|
|
|
|
|
|
|
|
|
|
|
|
| |
|
|
|
|
|
|
|
|
|
|
|
|
|
|
|
| |
|
|
|
|
Figure 24: Adobe
Director Behavior tab, Link procedure parameter access |
|
|
|
|
|
|
|
|
|
|
| |
|
|
|
|
|
|
|
|
|
|
|
|
|
|
|
|
|
|
|
|
|
|
|
|
|
| |
|
|
|
|
The following
figure shows the Parameters of the Link routine that are valid when |
|
|
|
|
|
|
| |
|
|
|
|
the Animated
Sound is directly called and not by a Sound Link: |
|
|
|
|
|
|
|
|
|
| |
|
|
|
|
|
|
|
|
|
|
|
|
|
|
|
|
|
| Link Procedure |
|
|
|
|
|
|
|
|
|
|
|
|
|
|
|
|
| |
|
|
|
|
|
|
|
|
|
|
|
|
|
|
|
|
| |
|
|
|
|
Link mode |
|
|
|
|
|
|
|
|
|
|
| |
|
|
|
|
Listen ID |
|
|
|
|
|
|
|
|
|
|
| |
|
|
|
|
Listen
Parameter |
|
|
|
|
|
|
|
|
|
| |
|
|
|
|
Synch ID |
|
|
|
|
|
|
|
|
|
|
| |
|
|
|
|
|
|
|
|
|
|
|
|
|
|
|
|
| |
|
|
|
|
Auto Pilot
value |
|
|
|
|
|
|
|
|
|
| |
|
|
|
|
Second value |
|
|
|
|
|
|
|
|
|
| |
|
|
|
|
|
|
|
|
|
|
|
|
|
|
|
|
| |
|
|
|
|
Target Sound
ID |
|
|
|
|
|
|
|
|
|
| |
|
|
|
|
Target Index |
|
|
|
|
|
|
|
|
|
|
| |
|
|
|
|
Second value |
|
|
|
|
|
|
|
|
|
| |
|
|
|
|
|
|
|
|
|
|
|
|
|
|
|
|
| |
|
|
|
|
Target Volume |
|
|
|
|
|
|
|
|
|
| |
|
|
|
|
Second value |
|
|
|
|
|
|
|
|
|
| |
|
|
|
|
Target
Panorama |
|
|
|
|
|
|
|
|
|
| |
|
|
|
|
Second value |
|
|
|
|
|
|
|
|
|
| |
|
|
|
|
|
|
|
|
|
|
|
|
|
|
|
|
| |
|
|
|
|
Secondary
Target Sound ID |
|
|
|
|
|
|
|
| |
|
|
|
|
Secondary
Target Sound ID |
|
|
|
|
|
|
|
| |
|
|
|
|
Secondary
Target Sound ID |
|
|
|
|
|
|
|
| |
|
|
|
|
Secondary
Target Sound ID |
|
|
|
|
|
|
|
| |
|
|
|
|
Secondary
Target Sound ID |
|
|
|
|
|
|
|
| |
|
|
|
|
|
|
|
|
|
|
|
|
|
|
|
|
| |
|
|
|
|
Secondary
Target Sound ID |
|
|
|
|
|
|
|
| |
|
|
|
|
Secondary
Target Sound ID |
|
|
|
|
|
|
|
| |
|
|
|
|
Secondary
Target Sound ID |
|
|
|
|
|
|
|
| |
|
|
|
|
Secondary
Target Sound ID |
|
|
|
|
|
|
|
| |
|
|
|
|
Secondary
Target Sound ID |
|
|
|
|
|
|
|
| |
|
|
|
|
|
|
|
|
|
|
|
|
|
|
|
|
| |
|
|
|
|
Sound Page
link & Link index |
|
|
|
|
|
|
|
| |
|
|
|
|
|
|
|
|
|
|
|
|
|
|
|
|
| |
|
|
|
|
Figure 25: Adobe
Director Parameters editing dialog box for the Link procedure |
|
|
|
|
|
|
|
|
|
| |
|
|
|
|
|
|
|
|
|
|
|
|
|
|
|
|
|
|
|
|
|
|
|
|
|
| Link Mode |
|
|
|
|
> |
Link mode =
0: Animated Sound links to another Animated Sound. |
|
|
|
|
|
|
|
|
| |
|
|
|
|
|
All parameter
values are valid except the last one. |
|
|
|
|
|
|
|
|
|
|
| |
|
|
|
|
|
|
|
|
|
|
|
|
|
|
|
|
|
|
|
|
|
|
|
|
|
| |
|
|
|
|
|
Link mode =
1: Animated Sound links to an HTML page, for example to |
|
|
|
|
|
|
|
| |
|
|
|
|
|
another Sound
Page. This is set in the Sound Page link Parameter field |
|
|
|
|
|
|
|
| |
|
|
|
|
|
in the end of
the dialog. All other values will be suppressed. |
|
|
|
|
|
|
|
|
|
| |
|
|
|
|
|
|
|
|
|
|
|
|
|
|
|
|
|
|
|
|
|
|
|
|
|
| Listen ID |
|
|
|
|
> |
The Listen ID
field can contain an alphanumeric tag that causes an action |
|
|
|
|
|
|
| |
|
|
|
|
|
entered in
the following Listen Parameter field to be executed as soon as |
|
|
|
|
|
|
| |
|
|
|
|
|
this tag has
been issued by another or the same Animated Sound. |
|
|
|
|
|
|
|
|
| |
|
|
|
|
|
|
|
|
|
|
|
|
|
|
|
|
|
|
|
|
|
|
|
|
|
| |
|
|
|
|
|
Tags are
issued by the Synch ID field as described below. |
|
|
|
|
|
|
|
|
|
| |
|
|
|
|
|
|
|
|
|
|
|
|
|
|
|
|
|
|
|
|
|
|
|
|
|
| Listen Parameter |
|
|
|
|
> |
The following
values (actions) can be set to be triggered by an |
|
|
|
|
|
|
|
|
| |
|
|
|
|
|
alphanumeric
tag: |
|
|
|
|
|
|
|
|
|
|
|
|
|
|
|
|
| |
|
|
|
|
|
|
|
|
|
|
|
|
|
|
|
|
|
|
|
|
|
|
|
|
|
| |
|
|
|
|
|
highlight |
|
The gray link
box that resides on the sound graphics will |
|
|
|
|
|
|
| |
|
|
|
|
|
|
|
|
be displayed
in white to indicate that the user should use |
|
|
|
|
|
|
| |
|
|
|
|
|
|
|
|
this specific
link to proceed with the Sound Trip. |
|
|
|
|
|
|
|
|
| |
|
|
|
|
|
|
|
|
|
|
|
|
|
|
|
|
|
|
|
|
|
|
|
|
|
| |
|
|
|
|
|
playon |
|
The sound will
start to play. |
|
|
|
|
|
|
|
|
|
|
|
|
| |
|
|
|
|
|
|
|
|
|
|
|
|
|
|
|
|
|
|
|
|
|
|
|
|
|
| |
|
|
|
|
|
playoff |
|
The sound will
stop to play. |
|
|
|
|
|
|
|
|
|
|
|
|
| |
|
|
|
|
|
|
|
|
|
|
|
|
|
|
|
|
|
|
|
|
|
|
|
|
|
| |
|
|
|
|
|
loopon |
|
The loop of
the sound will be activated (endless). |
|
|
|
|
|
|
|
|
| |
|
|
|
|
|
|
|
|
|
|
|
|
|
|
|
|
|
|
|
|
|
|
|
|
|
| |
|
|
|
|
|
loopoff |
|
The loop of
the sound will be disabled. |
|
|
|
|
|
|
|
|
|
| |
|
|
|
|
|
|
|
|
|
|
|
|
|
|
|
|
|
|
|
|
|
|
|
|
|
| |
|
|
|
|
|
muteon |
|
The sound
will be muted, all Automated Links are set on |
|
|
|
|
|
|
| |
|
|
|
|
|
|
|
|
on hold. |
|
|
|
|
|
|
|
|
|
|
|
|
|
|
|
| |
|
|
|
|
|
|
|
|
|
|
|
|
|
|
|
|
|
|
|
|
|
|
|
|
|
| |
|
|
|
|
|
muteoff |
|
The sound
will be unmuted, the schedules for all Automated |
|
|
|
|
|
|
| |
|
|
|
|
|
|
|
|
Links will be
restarted except for those that had already |
|
|
|
|
|
|
| |
|
|
|
|
|
|
|
|
expired. |
|
|
|
|
|
|
|
|
|
|
|
|
|
|
|
| |
|
|
|
|
|
|
|
|
|
|
|
|
|
|
|
|
|
|
|
|
|
|
|
|
|
| |
|
|
|
|
|
autoswitch |
If the link
has an automated schedule and the schedule is |
|
|
|
|
|
|
| |
|
|
|
|
|
|
|
|
enabled, then
the schedule will be disabled (gray indication). |
|
|
|
|
|
|
| |
|
|
|
|
|
|
|
|
If the link
has an automated schedule and the schedule is |
|
|
|
|
|
|
| |
|
|
|
|
|
|
|
|
disabled,
then the schedule will be enabled (red indication). |
|
|
|
|
|
|
| |
|
|
|
|
|
|
|
|
|
|
|
|
|
|
|
|
|
|
|
|
|
|
|
|
|
| |
|
|
|
|
|
autostop |
|
The sound
will stop to play and all automated schedules |
|
|
|
|
|
|
| |
|
|
|
|
|
|
|
|
will be
disabled. |
|
|
|
|
|
|
|
|
|
|
|
|
|
| |
|
|
|
|
|
|
|
|
|
|
|
|
|
|
|
|
|
|
|
|
|
|
|
|
|
| |
|
|
|
|
|
link |
|
|
The sound
will immediately link to another Animated Sound |
|
|
|
|
|
|
| |
|
|
|
|
|
|
|
|
as indicated
in the lower Target Sound ID fields. |
|
|
|
|
|
|
|
|
| |
|
|
|
|
|
|
|
|
|
|
|
|
|
|
|
|
|
|
|
|
|
|
|
|
|
| |
|
|
|
|
|
soundstop |
All sounds
will immediately stop across the whole Sound |
|
|
|
|
|
|
| |
|
|
|
|
|
|
|
|
Page and no
Delay function will apply. |
|
|
|
|
|
|
|
|
|
|
| |
|
|
|
|
|
|
|
|
|
|
|
|
|
|
|
|
|
|
|
|
|
|
|
|
|
| |
|
|
|
|
|
showinfo |
|
If the
Animated Sound has a Show Info pane (sprite #51) |
|
|
|
|
|
|
| |
|
|
|
|
|
|
|
|
this Info
will be shown. The Show Info pane is accessible |
|
|
|
|
|
|
| |
|
|
|
|
|
|
|
|
from the
Sound Page clicking the right mouse button on |
|
|
|
|
|
|
|
| |
|
|
|
|
|
|
|
|
the info
button. |
|
|
|
|
|
|
|
|
|
|
|
|
|
|
| |
|
|
|
|
|
|
|
|
|
|
|
|
|
|
|
|
|
|
|
|
|
|
|
|
|
| |
|
|
|
|
|
matrixlink |
This action
calls a function within the Link procedure with |
|
|
|
|
|
|
| |
|
|
|
|
|
|
|
|
further link
commands as described below. In order to |
|
|
|
|
|
|
|
| |
|
|
|
|
|
|
|
|
allow
multiple matrixlink sets of link actions, the Link |
|
|
|
|
|
|
|
| |
|
|
|
|
|
|
|
|
procedure is
copied across the Adobe Director Cast |
|
|
|
|
|
|
|
| |
|
|
|
|
|
|
|
|
window as
shown below: |
|
|
|
|
|
|
|
|
|
|
|
|
| |
|
|
|
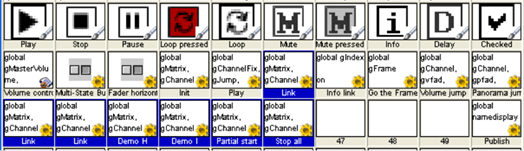
|
|
|
|
|
|
|
|
|
|
|
|
|
|
|
|
|
|
|
|
|
|
| |
|
|
|
|
|
|
|
|
|
|
|
|
|
|
|
|
|
|
|
|
|
|
|
|
|
| |
|
|
|
|
|
|
|
|
|
|
|
|
|
|
|
|
|
|
|
|
|
|
|
|
|
| |
|
|
|
|
|
|
|
|
|
|
|
|
|
|
|
|
|
|
|
|
|
|
|
|
|
| |
|
|
|
|
|
|
|
|
|
|
|
|
|
|
|
|
|
|
|
|
|
|
|
|
|
| |
|
|
|
|
|
|
|
|
|
|
|
|
|
|
|
|
|
|
|
|
|
|
|
|
|
| |
|
|
|
|
|
|
|
|
|
|
|
|
|
|
|
|
|
|
|
|
|
|
|
|
|
| |
|
|
|
|
|
|
|
|
|
|
|
|
|
|
|
|
|
|
|
|
|
|
|
|
|
| |
|
|
|
|
|
|
|
|
|
|
|
|
|
|
|
|
|
|
|
|
|
|
|
|
|
| |
|
|
|
|
|
|
|
|
|
|
|
|
|
|
|
|
|
|
|
|
|
|
|
|
|
| |
|
|
|
Figure 26: Adobe
Director Cast window (part) with multiple Link procedures for multiple
matrixlink applications |
|
|
|
|
|
|
| |
|
|
|
|
|
|
|
|
|
|
|
|
|
|
|
|
|
|
|
|
|
|
|
|
|
| Lingo Link Commands |
|
|
|
|
|
_player.setPref("F1","S0000") |
|
Sound will be
reset and played |
|
|
|
|
|
|
|
| |
|
|
|
|
|
|
|
|
|
|
|
|
according to
predefined settings. |
|
|
|
|
|
|
| |
|
|
|
|
|
_player.setPref("F1","playS0000") |
Sound will be
reset and played. |
|
|
|
|
|
|
|
| |
|
|
|
|
|
_player.setPref("F1","stopS0000") |
Sound will be
reset and stopped. |
|
|
|
|
|
|
| |
|
|
|
|
|
_player.setPref("F1","muteS0000") |
Sound will be
reset and muted. |
|
|
|
|
|
|
|
| |
|
|
|
|
|
_player.setPref("F1","play") |
|
Sound will
restart itself and play |
|
|
|
|
|
|
|
| |
|
|
|
|
|
|
|
|
|
|
|
|
with the
original parameters. |
|
|
|
|
|
|
|
| |
|
|
|
|
|
_player.setPref("F1","strt") |
|
|
Sound will be
reset to original |
|
|
|
|
|
|
|
| |
|
|
|
|
|
|
|
|
|
|
|
|
src HTML
parameter and be played. |
|
|
|
|
|
|
| |
|
|
|
|
|
_player.setPref("F1","stop") |
|
Sound will NOT
be reset but stopped. |
|
|
|
|
|
|
| |
|
|
|
|
|
|
|
|
|
|
|
|
All Automated
Links will be disabled. |
|
|
|
|
|
|
| |
|
|
|
|
|
_player.setPref("F1com","0") |
|
Suppress
matrixlink feature |
|
|
|
|
|
|
|
|
| |
|
|
|
|
|
|
|
|
|
|
|
|
approached
from a certain sound. |
|
|
|
|
|
|
| |
|
|
|
|
|
|
|
|
|
|
|
|
Used as
additional command to a |
|
|
|
|
|
|
| |
|
|
|
|
|
|
|
|
|
|
|
|
matrixlink of
the above forms. |
|
|
|
|
|
|
|
| |
|
|
|
|
|
|
|
|
|
|
|
|
It allows to
suppress the execution |
|
|
|
|
|
|
| |
|
|
|
|
|
|
|
|
|
|
|
|
when
matrixlink launching through |
|
|
|
|
|
|
| |
|
|
|
|
|
|
|
|
|
|
|
|
a certain link
call. |
|
|
|
|
|
|
|
|
|
| |
|
|
|
|
|
|
|
|
|
|
|
|
|
|
|
|
|
|
|
|
|
|
|
|
|
| |
|
|
|
|
|
The first
parameter (here "F1") describes the placeholder that is set in
the |
|
|
|
|
|
|
| |
|
|
|
|
|
HTML page in
the "sw2" parameter of a Sound object. |
|
|
|
|
|
|
|
|
|
|
| |
|
|
|
|
|
More
information on how to apply a matrixlink is provided in the code itself. |
|
|
|
|
|
|
| |
|
|
|
|
|
|
|
|
|
|
|
|
|
|
|
|
|
|
|
|
|
|
|
|
|
| Listen Parameter (cont.) |
|
|
|
|
|
setparam |
|
This action
utilizes the schedule set in the Auto Pilot |
|
|
|
|
|
|
| |
|
|
|
|
|
|
|
|
|
fields to
apply the sound parameter values that are |
|
|
|
|
|
|
| |
|
|
|
|
|
|
|
|
|
available in
the Link procedure instead of applying |
|
|
|
|
|
|
| |
|
|
|
|
|
|
|
|
|
them as
initial parameter values for a following sound. |
|
|
|
|
|
|
| |
|
|
|
|
|
|
|
|
|
For example,
if the Auto Pilot value is set to 2000 and |
|
|
|
|
|
|
| |
|
|
|
|
|
|
|
|
|
no Target
Sound ID is set, but a Volume value of |
|
|
|
|
|
|
|
| |
|
|
|
|
|
|
|
|
|
50, then this
value will be applied to the sound itself |
|
|
|
|
|
|
| |
|
|
|
|
|
|
|
|
|
as soon as
2000 Milliseconds are expired. |
|
|
|
|
|
|
|
|
| |
|
|
|
|
|
|
|
|
|
|
|
|
|
|
|
|
|
|
|
|
|
|
|
|
|
| |
|
|
|
|
|
|
|
|
|
The following
values are available: |
|
|
|
|
|
|
|
|
|
| |
|
|
|
|
|
|
|
|
|
|
|
|
|
|
|
|
|
|
|
|
|
|
|
|
|
| |
|
|
|
|
|
|
|
|
|
> |
Target Index
(will cause the Sound to be played |
|
|
|
|
|
|
| |
|
|
|
|
|
|
|
|
|
|
from the
indicated position) |
|
|
|
|
|
|
|
|
|
|
| |
|
|
|
|
|
|
|
|
|
> |
Target Volume |
|
|
|
|
|
|
|
|
|
|
|
|
| |
|
|
|
|
|
|
|
|
|
> |
Target
Panorama |
|
|
|
|
|
|
|
|
|
|
|
| |
|
|
|
|
|
|
|
|
|
|
|
|
|
|
|
|
|
|
|
|
|
|
|
|
|
| |
|
|
|
|
|
randomrange |
|
Usually
Animated Sounds are selected randomly |
|
|
|
|
|
|
| |
|
|
|
|
|
|
|
|
|
across all
Secondary Target Sound ID fields as |
|
|
|
|
|
|
|
| |
|
|
|
|
|
|
|
|
|
described
below. With randomrange, only the Target |
|
|
|
|
|
|
| |
|
|
|
|
|
|
|
|
|
Sound ID
field and the first Secondary Target Sound ID |
|
|
|
|
|
|
| |
|
|
|
|
|
|
|
|
|
field are
valid whereas both sound numbers are |
|
|
|
|
|
|
|
| |
|
|
|
|
|
|
|
|
|
defining an
index range from where a Sound ID will |
|
|
|
|
|
|
| |
|
|
|
|
|
|
|
|
|
be randomly
selected. |
|
|
|
|
|
|
|
|
|
|
|
| |
|
|
|
|
|
|
|
|
|
|
|
|
|
|
|
|
|
|
|
|
|
|
|
|
|
| Synch ID |
|
|
|
|
> |
The Synch ID
field is used to issue an alphanumeric tag that can trigger |
|
|
|
|
|
|
|
| |
|
|
|
|
|
various
actions as described above. |
|
|
|
|
|
|
|
|
|
|
|
|
|
| |
|
|
|
|
|
|
|
|
|
|
|
|
|
|
|
|
|
|
|
|
|
|
|
|
|
| |
|
|
|
|
|
If another
Animated Sound shares the same alphanumeric tag, the Animated |
|
|
|
|
|
|
| |
|
|
|
|
|
Sound will
automatically start playing. This way, a whole group of Animated |
|
|
|
|
|
|
| |
|
|
|
|
|
Sounds
sharing the same tag can be started simultaneously. |
|
|
|
|
|
|
|
|
|
| |
|
|
|
|
|
|
|
|
|
|
|
|
|
|
|
|
|
|
|
|
|
|
|
|
|
| Synchronization |
|
|
|
|
TIP |
1 |
|
|
|
|
|
|
|
|
|
|
|
|
|
|
|
|
|
|
|
| |
|
|
|
|
|
Other methods
to synchronize the play of Animated Sounds are: |
|
|
|
|
|
|
|
|
| |
|
|
|
|
|
|
|
|
|
|
|
|
|
|
|
|
|
|
|
|
|
|
|
|
|
| |
|
|
|
|
|
> |
Listen
Parameter: matrixlink (manual execution) |
|
|
|
|
|
|
|
|
|
|
| |
|
|
|
|
|
> |
Listen ID:
alphanumeric tag + Listen Parameter: matrixlink |
|
|
|
|
|
|
|
|
| |
|
|
|
|
|
> |
Listen ID:
alphanumeric tag + Listen Parameter: link |
|
|
|
|
|
|
|
|
|
| |
|
|
|
|
|
> |
Listen ID:
alphanumeric tag + Listen Parameter: playon |
|
|
|
|
|
|
|
|
|
| |
|
|
|
|
|
> |
Listen ID:
alphanumeric tag + Listen Parameter: muteoff |
|
|
|
|
|
|
|
|
|
| |
|
|
|
|
|
|
|
|
|
|
|
|
|
|
|
|
|
|
|
|
|
|
|
|
|
| Auto Pilot |
|
|
|
|
> |
The Auto
Pilot time value field can be used to schedule an Automated Sound |
|
|
|
|
|
|
| |
|
|
|
|
|
Link
(Milliseconds) or an automatic change of the parameter values using |
|
|
|
|
|
|
| |
|
|
|
|
|
the setparam
method described above. |
|
|
|
|
|
|
|
|
|
|
|
|
| |
|
|
|
|
|
|
|
|
|
|
|
|
|
|
|
|
|
|
|
|
|
|
|
|
|
| Links Probability |
|
|
|
|
TIP |
2 |
|
|
|
|
|
|
|
|
|
|
|
|
|
|
|
|
|
|
|
| |
|
|
|
|
|
If you use
two or more Automated Sound Links with the same range of random |
|
|
|
|
|
|
| |
|
|
|
|
|
time values,
each time another Sound Link might be selected. If you vary |
|
|
|
|
|
|
| |
|
|
|
|
|
the time
value ranges for each of the Links, the probability for the Links will |
|
|
|
|
|
|
| |
|
|
|
|
|
change
accordingly. |
|
|
|
|
|
|
|
|
|
|
|
|
|
|
|
|
| |
|
|
|
|
|
|
|
|
|
|
|
|
|
|
|
|
|
|
|
|
|
|
|
|
|
| Second Value |
|
|
|
|
> |
Second values
defines together with first values a value range from which |
|
|
|
|
|
|
| |
|
|
|
|
|
a random
number will be created each time the sound is called. |
|
|
|
|
|
|
|
|
| |
|
|
|
|
|
|
|
|
|
|
|
|
|
|
|
|
|
|
|
|
|
|
|
|
|
| |
|
|
|
|
|
If the Second
value is set to -1, then no random number is created and the |
|
|
|
|
|
|
| |
|
|
|
|
|
first value is
valid. |
|
|
|
|
|
|
|
|
|
|
|
|
|
|
|
|
| |
|
|
|
|
|
|
|
|
|
|
|
|
|
|
|
|
|
|
|
|
|
|
|
|
|
| Target Sound ID |
|
|
|
|
> |
The Target
Sound ID determines the next Animated Sound that will be called |
|
|
|
|
|
|
| |
|
|
|
|
|
as soon as
the Link procedure will be executed (manually, by Auto Pilot |
|
|
|
|
|
|
|
| |
|
|
|
|
|
schedule, or
by other actions as described above). |
|
|
|
|
|
|
|
|
|
|
| |
|
|
|
|
|
|
|
|
|
|
|
|
|
|
|
|
|
|
|
|
|
|
|
|
|
| |
|
|
|
|
|
The value of
the Target Sound ID is a prefix (any letter) and the sound |
|
|
|
|
|
|
|
| |
|
|
|
|
|
number as
provided by Freesound, or the "self" or the "plus"
statement. |
|
|
|
|
|
|
|
| |
|
|
|
|
|
|
|
|
|
|
|
|
|
|
|
|
|
|
|
|
|
|
|
|
|
| |
|
|
|
|
|
<prefix>
+ "self": The sound number of the own sound is applied, for
example, |
|
|
|
|
|
|
| |
|
|
|
|
|
if the own
sound file is S0649 and the prefix is "A", "Aself" will
result in "A0649". |
|
|
|
|
|
|
| |
|
|
|
|
|
|
|
|
|
|
|
|
|
|
|
|
|
|
|
|
|
|
|
|
|
| |
|
|
|
|
|
<prefix>
+ "plus": The following sound number of the own sound is
applied, |
|
|
|
|
|
|
| |
|
|
|
|
|
for example,
if the own sound file is S0649 and the prefix is "A",
"Aplus" will |
|
|
|
|
|
|
| |
|
|
|
|
|
result in
"A0650". |
|
|
|
|
|
|
|
|
|
|
|
|
|
|
|
|
| |
|
|
|
|
|
|
|
|
|
|
|
|
|
|
|
|
|
|
|
|
|
|
|
|
|
| |
|
|
|
|
|
If no Target
Sound ID is intended, "none" must be set in the field and only |
|
|
|
|
|
|
| |
|
|
|
|
|
non target
sound related operations are available. |
|
|
|
|
|
|
|
|
|
|
| |
|
|
|
|
|
|
|
|
|
|
|
|
|
|
|
|
|
|
|
|
|
|
|
|
|
| |
|
|
|
|
|
For more
information about prefixes see the following section. |
|
|
|
|
|
|
|
|
| |
|
|
|
|
|
|
|
|
|
|
|
|
|
|
|
|
|
|
|
|
|
|
|
|
|
| Secondary Target |
|
|
|
|
> |
If Secondary
Target Sound IDs are defined, all of those defined Target Sound |
|
|
|
|
|
| Sound ID |
|
|
|
|
|
IDs are used
as a pool from which one Target Sound ID will be selected |
|
|
|
|
|
|
| |
|
|
|
|
|
randomly. |
|
|
|
|
|
|
|
|
|
|
|
|
|
|
|
|
|
|
| |
|
|
|
|
|
|
|
|
|
|
|
|
|
|
|
|
|
|
|
|
|
|
|
|
|
| |
|
|
|
|
|
The value of
the Target Sound ID is a prefix (any letter) and the sound |
|
|
|
|
|
|
|
| |
|
|
|
|
|
number as
provided by Freesound. |
|
|
|
|
|
|
|
|
|
|
|
|
|
| |
|
|
|
|
|
|
|
|
|
|
|
|
|
|
|
|
|
|
|
|
|
|
|
|
|
| |
|
|
|
|
|
If no Target
Sound ID is intended, "none" must be set in the field and only |
|
|
|
|
|
|
| |
|
|
|
|
|
non target
sound related operations are available. |
|
|
|
|
|
|
|
|
|
|
| |
|
|
|
|
|
|
|
|
|
|
|
|
|
|
|
|
|
|
|
|
|
|
|
|
|
| Links Convention |
|
|
|
|
TIP |
3 |
|
|
|
|
|
|
|
|
|
|
|
|
|
|
|
|
|
|
|
| |
|
|
|
|
|
Animated
Sounds as presented by the Freesound Music project are complying |
|
|
|
|
|
| |
|
|
|
|
|
the following
convention of Target Sound ID links as displayed on the sound |
|
|
|
|
|
|
| |
|
|
|
|
|
graphics: |
|
|
|
|
|
|
|
|
|
|
|
|
|
|
|
|
|
|
| |
|
|
|
|
|
|
|
|
|
|
|
|
|
|
|
|
|
|
|
|
|
|
|
|
|
| |
|
|
|
|
|
> |
Left upper
link box: Links to the sound itself (use "self" syntax) |
|
|
|
|
|
|
|
|
| |
|
|
|
|
|
|
The link
index (of the first instance) is always "0" and the member number |
|
|
|
|
|
| |
|
|
|
|
|
|
is always
"31" as shown in the Adobe Director Score (see Figures 27 below) |
|
|
|
|
|
| |
|
|
|
|
|
> |
Second Left
upper link box: Links to the following sound (use "plus" |
|
|
|
|
|
|
| |
|
|
|
|
|
|
syntax) and
the last sound of a group links back to first one. This way the |
|
|
|
|
|
| |
|
|
|
|
|
|
user can
scroll through a sound group that defines an Animated Sound |
|
|
|
|
|
|
| |
|
|
|
|
|
|
as a group of
sound variations. |
|
|
|
|
|
|
|
|
|
|
|
|
|
| |
|
|
|
|
|
> |
Right upper
link box: Randomly selection of all elements of the sound |
|
|
|
|
|
|
| |
|
|
|
|
|
|
group using
the Secondary Target Sound ID fields. |
|
|
|
|
|
|
|
|
|
| |
|
|
|
|
|
|
|
|
|
|
|
|
|
|
|
|
|
|
|
|
|
|
|
|
|
| Target Index |
|
|
|
|
> |
The Target
Index defines the sample start point from where the following |
|
|
|
|
|
|
| |
|
|
|
|
|
targeted sound
will start to play. |
|
|
|
|
|
|
|
|
|
|
|
|
|
|
| |
|
|
|
|
|
|
|
|
|
|
|
|
|
|
|
|
|
|
|
|
|
|
|
|
|
| Target Volume |
|
|
|
|
> |
The Target
Volume defines the initial volume value from which the following |
|
|
|
|
|
|
| |
|
|
|
|
|
targeted sound
will start to play. |
|
|
|
|
|
|
|
|
|
|
|
|
|
|
| |
|
|
|
|
|
|
|
|
|
|
|
|
|
|
|
|
|
|
|
|
|
|
|
|
|
| Target Panorama |
|
|
|
|
> |
The Target
Parameter defines the initial panorama position from which the |
|
|
|
|
|
|
| |
|
|
|
|
|
following
targeted sound will start to play. |
|
|
|
|
|
|
|
|
|
|
|
|
| |
|
|
|
|
|
|
|
|
|
|
|
|
|
|
|
|
|
|
|
|
|
|
|
|
|
| Sound Page Link |
|
|
|
|
> |
The Sound
Page link is valid only if the first Link Mode value is set to 1. |
|
|
|
|
|
|
|
| |
|
|
|
|
|
In this case,
all Target Sound functions are disabled and the Sound Page |
|
|
|
|
|
|
| |
|
|
|
|
|
link is
executed. |
|
|
|
|
|
|
|
|
|
|
|
|
|
|
|
|
|
| |
|
|
|
|
|
|
|
|
|
|
|
|
|
|
|
|
|
|
|
|
|
|
|
|
|
| |
|
|
|
|
|
The value of
the Sound Page link is a standard URL. |
|
|
|
|
|
|
|
|
|
|
| |
|
|
|
|
|
|
|
|
|
|
|
|
|
|
|
|
|
|
|
|
|
|
|
|
|
| Link Index |
|
|
|
|
> |
The Sound
Page link field can also be used as an index for multiple Link |
|
|
|
|
|
|
|
| |
|
|
|
|
|
procedures.
Multiple Link procedures have the advantage to combine |
|
|
|
|
|
|
|
| |
|
|
|
|
|
various Link
parameters and actions as described above and to assign |
|
|
|
|
|
|
|
| |
|
|
|
|
|
them to one
button only that will execute all of those actions synchronously. |
|
|
|
|
|
|
| |
|
|
|
|
|
|
|
|
|
|
|
|
|
|
|
|
|
|
|
|
|
|
|
|
|
| |
|
|
|
|
|
However, in
order to assure correct recording and play results, the Link index |
|
|
|
|
|
|
| |
|
|
|
|
|
must be used
to differentiate between the different combined Link procedures, |
|
|
|
|
|
|
| |
|
|
|
|
|
for example,
'0' for the first, '1' for the second procedure, etc. |
|
|
|
|
|
|
|
|
|
| |
|
|
|
|
|
|
|
|
|
|
|
|
|
|
|
|
|
|
|
|
|
|
|
|
|
| PREFIXES |
|
|
|
5. |
Create New
Animated Sound with different Prefix |
|
|
|
|
|
|
|
|
|
|
| |
|
|
|
|
|
|
|
|
|
|
|
|
|
|
|
|
|
|
|
|
|
|
|
|
|
| |
|
|
|
|
An Animated
Sound Shockwave movie can hold multiple Animated Sounds utilizing |
|
|
|
|
|
|
| |
|
|
|
|
the Adobe
Director Score window and alphabetic tags in the top line of the Score |
|
|
|
|
|
|
| |
|
|
|
|
window as
shown in the below figure: |
|
|
|
|
|
|
|
|
|
|
|
|
|
|
| |
|
|
|
|
|
|
|
|
|
|
|
|
|
|
|
|
|
|
|
| |
|
|
|
|
|
|
|
|
|
|
|
|
|
|
|
|
|
|
| |
|
|
|
|
|
|
|
|
|
|
|
|
|
|
|
|
|
|
| |
|
|
|
|
|
|
|
|
|
|
|
|
|
|
|
|
|
|
| |
|
|
|
|
|
|
|
|
|
|
|
|
|
|
|
|
|
|
| |
|
|
|
|
|
|
|
|
|
|
|
|
|
|
|
|
|
|
| |
|
|
|
|
|
|
|
|
|
|
|
|
|
|
|
|
|
|
| |
|
|
|
|
|
|
|
|
|
|
|
|
|
|
|
|
|
|
| |
|
|
|
|
|
|
|
|
|
|
|
|
|
|
|
|
|
|
| |
|
|
|
|
|
|
|
|
|
|
|
|
|
|
|
|
|
|
| |
|
|
|
|
|
|
|
|
|
|
|
|
|
|
|
|
|
|
| |
|
|
|
|
|
|
|
|
|
|
|
|
|
|
|
|
|
|
| |
|
|
|
|
|
|
|
|
|
|
|
|
|
|
|
|
|
|
| |
|
|
|
|
|
|
|
|
|
|
|
|
|
|
|
|
|
|
| |
|
|
|
|
|
|
|
|
|
|
|
|
|
|
|
|
|
|
| |
|
|
|
|
|
|
|
|
|
|
|
|
|
|
|
|
|
|
| |
|
|
|
|
|
|
|
|
|
|
|
|
|
|
|
|
|
|
| |
|
|
|
|
|
|
|
|
|
|
|
|
|
|
|
|
|
|
| |
|
|
|
|
|
|
|
|
|
|
|
|
|
|
|
|
|
|
| |
|
|
|
|
|
|
|
|
|
|
|
|
|
|
|
|
|
|
| |
|
|
|
|
|
|
|
|
|
|
|
|
|
|
|
|
|
|
| |
|
|
|
|
|
|
|
|
|
|
|
|
|
|
|
|
|
|
| |
|
|
|
|
|
|
|
|
|
|
|
|
|
|
|
|
|
|
| |
|
|
|
|
|
|
|
|
|
|
|
|
|
|
|
|
|
|
| |
|
|
|
|
|
|
|
|
|
|
|
|
|
|
|
|
|
|
| |
|
|
|
|
|
|
|
|
|
|
|
|
|
|
|
|
|
|
| |
|
|
|
|
|
|
|
|
|
|
|
|
|
|
|
|
|
|
| |
|
|
|
|
|
|
|
|
|
|
|
|
|
|
|
|
|
|
| |
|
|
|
|
|
|
|
|
|
|
|
|
|
|
|
|
|
|
| |
|
|
|
|
|
|
|
|
|
|
|
|
|
|
|
|
|
|
| |
|
|
|
|
|
|
|
|
|
|
|
|
|
|
|
|
|
|
| |
|
|
|
|
|
|
|
|
|
|
|
|
|
|
|
|
|
|
| |
|
|
|
|
Figure 27: Adobe
Director Score window with multiple Animated Sound definitions |
|
|
|
|
|
|
|
|
|
| |
|
|
|
|
|
|
|
|
|
|
|
|
|
|
|
|
|
|
|
|
|
|
|
|
|
| Differentiations |
|
|
|
|
The prefix
method allows interpreting the same sound (and graphic) resource |
|
|
|
|
|
|
|
| |
|
|
|
|
with the
following different settings: |
|
|
|
|
|
|
|
|
|
|
|
|
|
|
| |
|
|
|
|
|
|
|
|
|
|
|
|
|
|
|
|
|
|
|
|
|
|
|
|
|
| |
|
|
|
|
> |
Different
initial parameters set in the Init routine |
|
|
|
|
|
|
|
|
|
|
|
| |
|
|
|
|
> |
Different
delay parameters set in the Play routine |
|
|
|
|
|
|
|
|
|
|
|
| |
|
|
|
|
> |
Different
number of Link procedures (sprites from 31) |
|
|
|
|
|
|
|
|
|
|
| |
|
|
|
|
> |
Different
parameters of the Link procedures |
|
|
|
|
|
|
|
|
|
|
|
|
| |
|
|
|
|
|
|
|
|
|
|
|
|
|
|
|
|
|
|
|
|
|
|
|
|
|
| Access |
|
|
|
|
The access to
an Animated Sound tagged by a specific prefix, is realized |
|
|
|
|
|
|
|
| |
|
|
|
|
by the
following methods: |
|
|
|
|
|
|
|
|
|
|
|
|
|
|
|
|
| |
|
|
|
|
|
|
|
|
|
|
|
|
|
|
|
|
|
|
|
|
|
|
|
|
|
| |
|
|
|
|
> |
<prefix>
+ Sound number as provided by the Freesound site can be |
|
|
|
|
|
|
|
| |
|
|
|
|
|
used in the
Target Sound ID and the Secondary Target Sound ID fields |
|
|
|
|
|
|
|
| |
|
|
|
|
|
of the Link
procedure, and in the Group definitions in the corresponding |
|
|
|
|
|
|
|
| |
|
|
|
|
|
Sound Page
HTML file. |
|
|
|
|
|
|
|
|
|
|
|
|
|
|
|
| |
|
|
|
|
> |
"S"
+ Sound number as provided by the Freesound site is used within |
|
|
|
|
|
|
|
| |
|
|
|
|
|
the
"src" path parameter of the sound object definition in the
corresponding |
|
|
|
|
|
|
| |
|
|
|
|
|
Sound Page
HTML file, whereas the specific prefix is provided in the |
|
|
|
|
|
|
|
| |
|
|
|
|
|
"sw1"
parameter. |
|
|
|
|
|
|
|
|
|
|
|
|
|
|
|
|
| |
|
|
|
|
|
|
|
|
|
|
|
|
|
|
|
|
|
|
|
|
|
|
|
|
|
| Method |
|
|
|
|
The method to
apply a new Animated Sound definition with a prefix is simple: |
|
|
|
|
|
|
|
| |
|
|
|
|
|
|
|
|
|
|
|
|
|
|
|
|
|
|
|
|
|
|
|
|
|
| |
|
|
|
|
> |
Copy the
complete set of sprites and paste it to a position exactly 5 frames |
|
|
|
|
|
|
| |
|
|
|
|
|
after the
former set. |
|
|
|
|
|
|
|
|
|
|
|
|
|
|
|
|
| |
|
|
|
|
> |
Apply an
alphabetic tag in the tagline at the top of the Score window as |
|
|
|
|
|
|
|
| |
|
|
|
|
|
shown in the
above figure. |
|
|
|
|
|
|
|
|
|
|
|
|
|
|
|
| |
|
|
|
|
> |
Apply
parameter and Link changes as described above. |
|
|
|
|
|
|
|
|
|
| |
|
|
|
|
|
|
|
|
|
|
|
|
|
|
|
|
|
|
|
|
|
|
|
|
|
| NEW ANIMATED |
|
|
|
6. |
Create New
Animated Sound from Freesound |
|
|
|
|
|
|
|
|
|
|
|
| SOUND |
|
|
|
|
|
|
|
|
|
|
|
|
|
|
|
|
|
|
|
|
|
|
|
|
|
| |
|
|
|
|
The following
procedure includes the steps that are needed to create a new |
|
|
|
|
|
|
|
| |
|
|
|
|
Animated
Sound that is taken from the Freesound sound repository. |
|
|
|
|
|
|
|
|
| |
|
|
|
|
|
|
|
|
|
|
|
|
|
|
|
|
|
|
|
|
|
|
|
|
|
| |
|
|
|
|
To create a new Animated Sound from
Freesound |
|
|
|
|
|
|
|
|
|
|
|
| |
|
|
|
|
|
|
|
|
|
|
|
|
|
|
|
|
|
|
|
|
|
|
|
|
|
| Accept Sound License |
|
|
|
|
1. Be sure
that you read and understood the Creative Commons License that is |
|
|
|
|
|
|
| |
|
|
|
|
attached to the usage
of Freesound sounds and is published at the Freesound |
|
|
|
|
|
|
| |
|
|
|
|
site. |
|
|
|
|
|
|
|
|
|
|
|
|
|
|
|
|
|
|
|
| |
|
|
|
|
|
|
|
|
|
|
|
|
|
|
|
|
|
|
|
|
|
|
|
|
|
| Locate Sound |
|
|
|
|
2. Locate a
sound from Freesound using the "Sample Packs", "Search",
"Tags" or |
|
|
|
|
|
|
| |
|
|
|
|
other methods that are
offered by the Freesound site. |
|
|
|
|
|
|
|
|
|
|
|
| |
|
|
|
|
|
|
|
|
|
|
|
|
|
|
|
|
|
|
|
|
|
|
|
|
|
| Save and Convert |
|
|
|
|
3. Save the
sound onto your computer. From performance reasons, it is |
|
|
|
|
|
|
|
|
| |
|
|
|
|
recommended to use
sounds in mp3 format for Animated Sounds. If the original |
|
|
|
|
|
|
| |
|
|
|
|
format of the sound is
different you should first convert it into mp3. |
|
|
|
|
|
|
|
|
|
| |
|
|
|
|
|
|
|
|
|
|
|
|
|
|
|
|
|
|
|
|
|
|
|
|
|
| Create Animated |
|
|
|
|
4. Create a
copy from the latest Animated Sounds version. This copy is available |
|
|
|
|
|
|
| Sound Copy |
|
|
|
|
upon request (see
"Contact" tab at the bottom of this page). Save the copy |
|
|
|
|
|
|
|
| |
|
|
|
|
following the strict
naming convention: "S" + <sound number> as provided by |
|
|
|
|
|
|
| |
|
|
|
|
Freesound. For numbers
smaller than 1000 you must use zeros to keep a |
|
|
|
|
|
|
|
| |
|
|
|
|
minimum number of 4
digits, for example, "S0032.dcr". |
|
|
|
|
|
|
|
|
|
|
| |
|
|
|
|
|
|
|
|
|
|
|
|
|
|
|
|
|
|
|
|
|
|
|
|
|
| Copy Sound Image |
|
|
|
|
5. Open the
sound in Freesound in a small thumbnail view, right-click the image, |
|
|
|
|
|
|
| |
|
|
|
|
select "Copy"
from the context menu, and paste it into the first position of the |
|
|
|
|
|
|
| |
|
|
|
|
Adobe Director Cast
window. |
|
|
|
|
|
|
|
|
|
|
|
|
|
|
|
| |
|
|
|
|
|
|
|
|
|
|
|
|
|
|
|
|
|
|
|
|
|
|
|
|
|
| Import Sound |
|
|
|
|
6. In the
Adobe Director application press "Ctrl+R" to open the "Import
Files into |
|
|
|
|
|
|
| |
|
|
|
|
Internal'" dialog,
locate the sound file you downloaded (and converted into |
|
|
|
|
|
|
|
| |
|
|
|
|
mp3), and click the
"Import" button. The sound will be copied into the next free |
|
|
|
|
|
|
| |
|
|
|
|
position of the Cast
window. Cut it from there and paste it onto the second position |
|
|
|
|
|
|
| |
|
|
|
|
of the Cast window. |
|
|
|
|
|
|
|
|
|
|
|
|
|
|
|
|
|
| |
|
|
|
|
|
|
|
|
|
|
|
|
|
|
|
|
|
|
|
|
|
|
|
|
|
| Customize |
|
|
|
|
7. Customize
parameters and create sound links as described above. |
|
|
|
|
|
|
|
|
| |
|
|
|
|
|
|
|
|
|
|
|
|
|
|
|
|
|
|
|
|
|
|
|
|
|
| Publish |
|
|
|
|
8. Press
"Ctrl+Shift+S" to publish your Animated Sound in ".dcr"
format and forward |
|
|
|
|
|
|
| |
|
|
|
|
it to the Freesound
Music project to be included in the Sound Park. For more |
|
|
|
|
|
|
|
| |
|
|
|
|
information about
possible cooperation, click the "Contribution" tag provided |
|
|
|
|
|
|
| |
|
|
|
|
at the bottom of this
page. |
|
|
|
|
|
|
|
|
|
|
|
|
|
|
|
| |
|
|
|
|
|
|
|
|
|
|
|
|
|
|
|
|
|
|
|
|
|
|
|
|
|
| |
|
|
|
|
|
|
|
|
|
|
|
|
|
|
|
|
|
|
|
|
|
|
|
|
|
| |
|
Library |
|
|
|
|
|
|
|
|
|
|
|
|
|
|
|
|
|
|
|
| |
|
|
|
|
|
|
|
|
|
|
|
|
|
|
|
|
|
|
|
|
|
|
|
|
|
| |
|
|
|
|
|
|
|
|
|
|
|
|
|
|
|
|
|
|
|
|
|
|
|
|
|
| Introduction |
|
|
|
The Freesound
Music project is also open for cooperation on a programming level as |
|
|
|
|
|
|
| |
|
|
|
outlined in
the "Contribution" part of this site. The following section
provides an overview |
|
|
|
|
|
|
| |
|
|
|
about the
available resources that are constitutive for the project as a whole and
that |
|
|
|
|
|
|
| |
|
|
|
can be shared. |
|
|
|
|
|
|
|
|
|
|
|
|
|
|
|
|
|
|
|
| |
|
|
|
|
|
|
|
|
|
|
|
|
|
|
|
|
|
|
|
|
|
|
|
|
|
| |
|
|
|
|
|
|
|
|
|
|
|
|
|
|
|
|
|
|
|
|
|
|
|
|
|
| Resources |
|
|
|
The following
technological resources are used for the Freesound Music project: |
|
|
|
|
|
|
|
| |
|
|
|
|
|
|
|
|
|
|
|
|
|
|
|
|
|
|
|
|
|
|
|
|
|
| Sound Pages |
|
|
|
1. |
Sound Pages |
|
|
|
|
|
|
|
|
|
|
|
|
|
|
|
|
|
|
| |
|
|
|
|
|
|
|
|
|
|
|
|
|
|
|
|
|
|
|
|
|
|
|
|
|
| |
|
|
|
|
Standard HTML
and Adobe Shockwave objects that require the Internet Explorer |
|
|
|
|
|
|
| |
|
|
|
|
Browser for a
high number appliance of the objects. |
|
|
|
|
|
|
|
|
|
|
|
| |
|
|
|
|
|
|
|
|
|
|
|
|
|
|
|
|
|
|
|
|
|
|
|
|
|
| Sound Objects |
|
|
|
2. |
Sound and
Sound Page Control objects |
|
|
|
|
|
|
|
|
|
|
|
|
| |
|
|
|
|
|
|
|
|
|
|
|
|
|
|
|
|
|
|
|
|
|
|
|
|
|
| |
|
|
|
|
Adobe
Shockwave objects are built with Adobe Director MX based on |
|
|
|
|
|
|
|
|
| |
|
|
|
|
Lingo
scripts. The following types of objects are used: |
|
|
|
|
|
|
|
|
|
|
|
| |
|
|
|
|
|
|
|
|
|
|
|
|
|
|
|
|
|
|
|
|
|
|
|
|
|
| |
|
|
|
|
> |
Animated
Sounds |
|
|
|
|
|
|
|
|
|
|
|
|
|
|
|
|
| |
|
|
|
|
> |
Control
buttons for playing groups of Animated sounds |
|
|
|
|
|
|
|
|
|
|
| |
|
|
|
|
> |
Recording
feature to record play actions of Animated sounds |
|
|
|
|
|
|
|
|
| |
|
|
|
|
|
and control
functions across various Sound Pages |
|
|
|
|
|
|
|
|
|
|
| |
|
|
|
|
> |
Publishing
options for creating personal Sound Pages |
|
|
|
|
|
|
|
|
|
|
| |
|
|
|
|
> |
FleX
Publisher for creating personal Sound Pages (1 dcr, 4 exe components) |
|
|
|
|
|
|
| |
|
|
|
|
|
|
|
|
|
|
|
|
|
|
|
|
|
|
|
|
|
|
|
|
|
| |
|
|
|
|
The communication
between the objects is realized by the Director preferences |
|
|
|
|
|
|
| |
|
|
|
|
function
(setPref(), getPref()). The communication between the compressed (.dcr) |
|
|
|
|
|
|
| |
|
|
|
|
and the
executable (.exe) components of the Publisher is realized by the Clipboard. |
|
|
|
|
|
|
| |
|
|
|
|
|
|
|
|
|
|
|
|
|
|
|
|
|
|
|
|
|
|
|
|
|
| Main Procedures |
|
|
|
|
The main
procedures of Animated Sounds are: |
|
|
|
|
|
|
|
|
|
|
|
|
| |
|
|
|
|
|
|
|
|
|
|
|
|
|
|
|
|
|
|
|
|
|
|
|
|
|
| |
|
|
|
|
> |
Volume
control: Management of Volume and Panorama fader values |
|
|
|
|
|
|
|
| |
|
|
|
|
> |
Multi-State
Button: Button object (derived from Director sound sample movie) |
|
|
|
|
|
|
| |
|
|
|
|
|
used for
various control buttons |
|
|
|
|
|
|
|
|
|
|
|
|
|
|
| |
|
|
|
|
> |
Fader
horizontal: Fader control for Volume and Panorama (derived from |
|
|
|
|
|
|
|
| |
|
|
|
|
|
Director sound
sample movie) |
|
|
|
|
|
|
|
|
|
|
|
|
|
|
| |
|
|
|
|
> |
Init:
Initialization module |
|
|
|
|
|
|
|
|
|
|
|
|
|
|
|
| |
|
|
|
|
> |
Play:
Interactive play module |
|
|
|
|
|
|
|
|
|
|
|
|
|
|
| |
|
|
|
|
> |
Link:
Hypersound link module (can be used and copied multiple times) |
|
|
|
|
|
|
|
| |
|
|
|
|
> |
Info Link:
Automated link to corresponding sound home page at Freesound |
|
|
|
|
|
|
| |
|
|
|
|
> |
Go the Frame:
General loop control of the movie |
|
|
|
|
|
|
|
|
|
|
|
| |
|
|
|
|
> |
Volume jump:
Jump into fader and apply superior volume control across |
|
|
|
|
|
|
| |
|
|
|
|
|
Animated
Sounds (limiter) |
|
|
|
|
|
|
|
|
|
|
|
|
|
|
|
| |
|
|
|
|
> |
Panorama
jump: Jump into fader and apply superior panorama control across |
|
|
|
|
|
| |
|
|
|
|
|
Animated
Sounds (5 major positions) |
|
|
|
|
|
|
|
|
|
|
|
|
|
| |
|
|
|
|
> |
Publish:
Management of Sound Selector (sound check box) for publishing |
|
|
|
|
|
|
| |
|
|
|
|
|
sound in a new
Sound Page project |
|
|
|
|
|
|
|
|
|
|
|
|
|
| |
|
|
|
|
|
|
|
|
|
|
|
|
|
|
|
|
|
|
|
|
|
|
|
|
|
| Sound Creation |
|
|
|
3. |
Sound Creation |
|
|
|
|
|
|
|
|
|
|
|
|
|
|
|
|
|
| |
|
|
|
|
|
|
|
|
|
|
|
|
|
|
|
|
|
|
|
|
|
|
|
|
|
| |
|
|
|
|
For more
information about the advanced creation of sounds (sample |
|
|
|
|
|
|
|
|
| |
|
|
|
|
processing
and sound synthesis) visit the link to the right: |
|
|
|
>> |
|
|
|
|
|
|
| |
|
|
|
|
|
|
|
|
|
|
|
|
|
|
|
|
|
|
|
|
|
|
|
|
|
| |
|
|
|
|
|
|
|
|
|
|
|
|
|
|
|
|
|
|
|
|
|
|
|
|
|
| |
|
|
|
|
|
|
|
|
|
|
|
|
|
|
|
|
|
|
|
|
|
|
|
|
|
| |
|
|
|
|
|
|
|
|
|
|
|
|
|
|
|
|
|
|
|
|
|
|
|
|
|
| |
|
|
|
|
|
|
|
|
|
|
|
|
|
|
|
|
|
|
|
|
|
|
|
|
|
| |
|
|
|
|
|
|
|
|
|
|
|
|
|
|
|
|
|
|
|
|
|
|
|
|
|
| |
|
|
|
|
|
|
|
|
|
|
|
|
|
|
|
|
|
|
|
|
|
|
|
|
|
| |
|
|
|
|
|
|
|
|
|
|
|
|
|
|
|
|
|
|
|
|
|
|
|
|
|
| |
|
|
|
|
|
|
|
|
|
|
|
|
|
|
|
|
|
|
|
|
|
|
|
|
|
| |
|
|
|
|
|
|
|
|
|
|
|
|
|
|
|
|
|
|
|
|
|
|
|
|
|
| |
|
|
|
|
|
|
|
|
|
|
|
|
|
|
|
|
|
|
|
|
|
|
|
|
|
| |
|
|
|
|
|
|
|
|
|
|
|
|
|
|
|
|
|
|
|
|
|
|
|
|
|
| |
|
|
|
|
|
|
|
|
|
|
|
|
|
|
|
|
|
|
|
|
|
|
|
|
|
| |
|
|
|
|
|
|
|
|
|
|
|
|
|
|
|
|
|
|
|
|
|
|
|
|
|
| |
|
|
|
|
|
|
|
|
|
|
|
|
|
|
|
|
|
|
|
|
|
|
|
|
|
| |
|
|
|
|
|
|
|
|
|
|
|
|
|
|
|
|
|
|
|
|
|
|
|
|
|
| |
|
|
|
|
|
|
|
|
|
|
|
|
|
|
|
|
|
|
|
|
|
|
|
|
|
| |
|
|
|
|
|
|
|
|
|
|
|
|
|
|
|
|
|
|
|
|
|
|
|
|
|
| |
|
|
|
|
|
|
|
|
|
|
|
|
|
|
|
|
|
|
|
|
|
|
|
|
|
| |
|
|
|
|
|
|
|
|
|
|
|
|
|
|
|
|
|
|
|
|
|
|
|
|
|
| |
|
|
|
|
|
|
|
|
|
|
|
|
|
|
|
|
|
|
|
|
|
|
|
|
|
| |
|
|
|
|
|
|
|
|
|
|
|
|
|
|
|
|
|
|
|
|
|
|
|
|
|
| |
|
|
|
|
|
|
|
|
|
|
|
|
|
|
|
|
|
|
|
|
|
|
|
|
|
| |
|
|
|
|
|
|
|
|
|
|
|
|
|
|
|
|
|
|
|
|
|
|
|
|
|
| |
|
|
|
|
|
|
|
|
|
|
|
|
|
|
|
|
|
|
|
|
|
|
|
|
|
| |
|
|
|
|
|
|
|
|
|
|
|
|
|
|
|
|
|
|
|
|
|
|
|
|
|
| End of Page |
|
|
|
|
|
|
|
|
|
|
|
|
|
|
|
|
|
|
|
|
|
|
|
|
|
|
|
|
|
|
|
|
|
|
|
|
|
|
|
|
|
|
|
|
|
|
|
|
|
|
|